Monday, July 10, 2017

Watermelon Ice Cubes Make A Cool Summer Cocktail


Watermelon Surprise, watermelon ice cubes in a vodka cocktail. Credit: Copyright 2016 David Latt
You love summer but not when it is uncomfortably hot. For relief, you could jump into the pool. Or, you could cut a thick slice of watermelon and let the sweet juices cool you down. Even better, you could fill a tall glass with a watermelon cocktail made with watermelon ice cubes and straight-from-the-freezer vodka and settle into the chaise lounge. You stir the ice cubes. Bits of watermelon juice break free. The crystal clear vodka turns pink. You sip, stir and eat a watermelon ice cube and suddenly you are not overheated any longer.  Now, you are cool and happy.

The non-alcoholic version is as delicious. Fill a tall glass with watermelon ice cubes and pour in freshly made lemonade. Stir and enjoy.

Summertime and the livin’ is easy

Summer is good for watermelon. They grow quickly in the heat of the sun, producing fat, heavy fruit loaded with sweetness.
At the farmers market I was always told to use a hand to thump on the melon. When the sound was deep and resonant, the melon was ripe, ready to eat. If there is a farmer you frequent at your neighborhood market, ask for advice about a good melon that’s ready to eat.
Prices for watermelon vary greatly. At Asian and Latin markets, watermelon can sell for as little as 10 cents a pound. At upscale supermarkets and farmers markets, the prices can be significantly higher.
A melon is delicious at room temperature or ice cold. I like to chill the melon overnight in the refrigerator. Of course, the easiest way to eat watermelon is to use a sharp knife to cut out a thick slice.
But when I was in Zurich recently I met Olivier Rais, a talented chef who runs the bistro Rive Gauche in the iconic hotel Baur au Lac across the street from Lake Geneva. He had just returned from working with Tal Ronnen, the celebrated chef who created Crossroads Kitchen, an upscale Los Angeles restaurant devoted to vegan cuisine.
Rais made several vegan dishes for me to taste, one of which was a watermelon-gazpacho served in a glass.
I love watermelon but had never thought of extracting the juice. When I replicated his gazpacho at home, I had watermelon juice left over. Deciding to experiment, I reduced the juice in a sauce pan over a low flame. Once the juice cooled, I poured it into a mini-ice cube tray.
Watermelon ice cubes in an ice cube tray. Credit: Copyright 2016 David Latt
That night I added the ice cubes to vodka that we keep in the freezer. I dropped in an espresso spoon, settled into a chair and stirred my drink. After a few sips, I realized that I had stumbled onto an easy-to-make, deliciously refreshing cocktail. Summer’s perfect drink.
Serve the cocktail with an espresso or small spoon. One of the pleasures of the drink is stirring the ice cubes. As the ice cubes melt, the watermelon juice infuses the vodka. The mellow sweetness takes the edge off the vodka.
As you stir, the ice cubes crater and reduce by half. Use the spoon to scoop up the icy bits. In an effervescent moment, the softened ice cubes dissolve like pop rocks in your mouth.

Watermelon Surprise

Watermelon slices. Credit: Copyright 2016 David Latt
Use any size plastic ice cube tray. The mini-trays that make 1” square ice cubes work well because the ice cubes melt easily. Use only unflavored premium vodka, and for non-alcoholic drinks, add the ice cubes to glasses of carbonated water or lemonade.
Prep time: 30 minutes
Freezer time: 1 hour or overnight depending on the temperature of the freezer
Total time: 1 hour 30 minutes or overnight and 30 minutes
Yield: 4 servings
Ingredients
1 (3-pound) watermelon, washed
8 ounces unflavored premium vodka
Directions
1. Place the vodka bottle in the freezer the night before serving.
2. Using a sharp knife, remove the rind from the watermelon. Discard.
3. Cut the melon into chunks, removing any seeds.
4. Place a food mill or a fine mesh strainer over a non-reactive bowl.
5. Press the watermelon chunks through the food mill or strainer, capturing all the juice in the bowl. Discard any pulp and seeds.
6. Pour the juice into a sauce pan over low heat. Reduce volume by 30%. Remove from stove. Allow to cool.
7. Pour the reduced juice into the ice cube tray.
8. Place into freezer.
9. Just before serving, pour 1½ ounces ice cold vodka into each glass. Place 5 to 6 ice cubes into each glass.
10. Serve with an espresso or small spoon.
Main photo: Watermelon Surprise, watermelon ice cubes in a vodka cocktail. Credit: Copyright 2016 David Latt
  

Friday, July 7, 2017

Corn is Back. Let the Feast Begin.

Two weeks ago the first corn appeared in our local farmers markets in Santa Monica and Pacific Palisades. After the winter months without corn on our plates, we debated should we enjoy our first taste of corn, boiled or grilled? Both are delicious. Both are easy to prepare. We decided to embrace tradition.
We stripped off the husks and silks. Placed the cleaned ears into a pot of water and turned the burner on high. Every couple of minutes we gave the ears a spin so they would cook evenly. Once the water boiled we knew the ears were cooked.

Plucked out of the hot water, drained and placed onto a platter, we seasoned the ears with sweet butter, sea salt and freshly ground pepper. Old School, simple and delicious.
Those first ears were good but not yet great. Early in the season, the ears' flavor is balanced between starchiness and sweetness. For the scales to tilt toward flavor-bursting sweetness, we'll have to wait for the summer sun to blast the kernels with more heat.

At the Palisades and Santa Monica farmers markets, corn commands a premium, selling for $1.00/ear or 3 ears for $2.00. When we visit my wife's mom in New Jersey, we shop at Wegman's, a local supermarket with affordable pricing and Whole Foods quality. There, the corn can sell for much less. Depending on the supply, the corn can sell for as little as 6 ears for $1.00. Whatever the price, Jersey corn is famous for being especially tender and sweet.

For July 4th, a friend splurged and brought a dozen ears of corn to our fireworks-watching picnic. With a great many dishes to share, we had left-over corn. I volunteered to transform what was left into other dishes.

Versatile corn

First thing was to cut the kernels off the cobs. Cooked corn can be added to salads, stews, soups and stir fries. I love mixing the sweet-crunchy kernels to egg salad and potato salad. As a side with charred steak or grilled chicken, butter poached corn with a dusting of cayenne is delicious.
The cobs have flavor too. Usually consigned to the compost bin, the cobs can be boiled in water to create a savory stock, perfect as a base for soups, sauces, and corn chowder.

With the July 4th corn, I made corn stock, corn chowder, braised chicken with carrots, mushrooms and corn, corn and parsley salad and roasted corn to use in a green salad.
Even with all those dishes, there were still several cups of kernels available which were easy to freeze. To avoid freezer burn, submerge the cooked kernels in corn stock and seal them with air tight lid before placing in a freezer.
Then, when corn has again disappeared from the markets, the defrosted kernels can be added to a cold weather soup of root vegetables to remind us of summer's bright heat during the darkness of winter.

Corn Stock

If a large number of cobs are not available at any one time, save them in an air tight plastic bag in the freezer. When a dozen or more are available, you can rinse off any freezer crystals and drop them into a pot of boiling water as described below.

Serves 4

Time to cook: 45 minutes

Ingredients

12 or more corn cobs, kernels removed

Directions
For every 12 cobs, place 2 quarts of water into a large pot. Add the cobs. Place the pot on a medium-high flame.

Cook uncovered and simmer 45 minutes to reduce the volume by half.

Taste. The stock should have a mild flavor. Drain and discard the cobs. Use stock immediately or place in small air tight containers and freeze for future use.

Corn Chowder

The vegan/vegetarian version made with corn stock has its own unique, clean flavor. You can also use clam, lobster or chicken stock, preferably home made.
Use either frozen or freshly prepared stock. Do not use powdered or canned stocks because of their high salt content.

Serves 4

Time to prepare: 10 minutes

Time to cook: 30 minutes

Total time: 40 minutes

Ingredients

4 cups cooked or raw corn kernels removed from the cobs

1 small yellow onion, peeled, stem & root removed, washed, finely chopped

2 cups shiitake mushrooms

1 cup Italian parsley leaves, washed, pat dried, stems removed

4 cups stock, preferably corn stock or homemade chicken stock

Dusting of cayenne (optional)

1 tablespoon olive oil

Sea salt and freshly ground black pepper to taste

2 tablespoons sweet butter (optional)

Directions

In a large saucepan, heat olive oil on medium flame. Add onions. Stir and cook until softened but not browned.

Add mushrooms and parsley. Stir and cook until softened but not browned.

Add corn kernels. Mix well. Season with sea salt and freshly ground black pepper. If desired, add sweet butter and cayenne (optional). Cook 5 minutes to combine flavors.

Add stock. Stir well. Raise heat to a simmer. After 10 minutes, taste and adjust seasoning if needed. Reduce flame to medium. Cook another 15 minutes. Taste and make final flavor adjustments.

Serve hot with steamed rice, pasta, buttered bread, croutons or a salad.

Saturday, July 1, 2017

Fried Chicken, Potato Salad, Carrot Salad, Little Gem Lettuce Salad and More for the Best Ever 4th of July Pot-Luck Party

We're having a party. On July 4th we'll gather in the park opposite our local high school (Pali High) to eat, catch up and watch fireworks. Everyone will bring food and drinks to share and a sweater because when the sun goes down, it gets chilly.
We have been doing this for so many years, I'm not certain when we started. Sometimes the group grows to almost thirty. Sometimes a handful of friends shows up. We've noticed that when the 4th falls on a weekend, there isn't enough time to travel out of town, so our group swells. This year, the 4th is on Tuesday, so our group will be more intimate. Big or small, the gathering is fun.

Everyone is asked to bring a favorite food. Something special. This year I'm making fried chicken the way chef Wes Whitsell (Manuela DTLA) showed me for a cooking video we did last month. His fried chicken is crispy and moist. For the cooking demonstration he made wings, thighs and legs. He doesn't like breasts because they don't have enough flavor. I pretty much agree. For my pot luck contribution, I'm making cut apart wings and legs, the easiest parts to eat at a picnic.
I'm also making carrot salad with golden raisins soaked in lemon juice & seasoned with black pepper, Yukon gold potato salad with charred corn & parsley, a charred corn & vegetable salad, roasted beet salad, garbanzo bean salad with charred onions & Lacinato (purple) kale, salt boiled broccoli florets and a buttermilk custard pie I saw Martha Stewart demonstrate on her PBS show.
I'll also make an Italian parsley salad with chopped vegetables and pitted olives and a Little Gem lettuce salad with carrot rounds and feta cheese, served with whole wheat lavash.
Only recently did I discover Little Gem lettuce. At Glatt, a kosher market, on Pico east of Robertson and then at the Wednesday Santa Monica Farmers Market at the Garden of Organic stand. At first I thought they were "baby" romaine lettuces. They have a cleaner, crisper flavor, with less water and more crunch. Wrapped in a damp kitchen towel and placed in a plastic bag, the heads will keep fresh in the refrigerator for three weeks.
Here's the recipe I'll use for the 4th (which is exactly the recipe I use when I make the salad at home except sometimes I'll trade out the feta for blue cheese).

Crispy Little Gem Lettuce Salad

When making the salad, leave the leaves whole so they don't wilt.

For the olives, use any kind you enjoy. We like Castelvetrano Green olives, which can be found pitted for easy use, although olives taste best when not pitted.
Serves 4

Time to prepare: 20 minutes

Ingredients

2 heads Little Gem Lettuce, leaves removed whole, washed, pat dried

1 large carrot, washed, ends removed, peeled, cut into thin rounds

1 large tomato, stem end removed, washed, pat dried, cut into dime size pieces

1 cup pitted olives, roughly chopped

1 scallion, ends removed, washed, brown leaves discarded, cut into paper thin rounds (optional)

1/2 cup feta, pat dried, crumbled

1 medium avocado, washed, peeled, pit and any brown spots removed, cut into dime sized pieces

1/2 cup homemade croutons (optional)

2 tablespoons olive oil

1/4 cup balsamic vinegar, reduced over a low flame to 2 teaspoons, cooled

Sea salt and freshly ground black pepper to taste

Directions

Lay the Little Gem leaves in the bottom of a serving bowl. Sprinkle on the carrots, tomatoes, olives, scallions (optional), feta, avocado and croutons (optional).

Just before serving, season with sea salt and black pepper, drizzle on olive oil and reduced balsamic vinegar.

Serve with a knife and fork.


Sunday, May 28, 2017

Sweet, Crispy Pork Ribs; Cooked Low And Slow


The summertime debate is on. What is the easiest way to cook pork ribs? Boil, roast or grill? High heat, low heat, wet sauce or dry rub? I’ve tried them all. Now the question is settled, at least for me.  Slow roasting with a dry rub. To avoid summer’s heat, I put the ribs in a 250 F oven before I go to bed. When I wake up, the ribs are moist with a bacon-thin, sweetened crust. And these best-ever ribs cooked while I was fast asleep.
My mother taught me to make pork ribs with a thick coating of sauce sweetened with brown sugar and raisins. Eating those finger-licking ribs was one of my favorite childhood memories.
Everything changed on a busy research trip to Abilene and Fort Worth, when I ate at 25 restaurants in 36 hours. I fell in love with West Texas BBQ.
At restaurant after restaurant, I watched grill masters lay bundles of mesquite into their subcompact-car-sized smokers. With the heavy metal doors open, the wood crackled as flames enveloped the logs The grill masters seasoned their racks of pork ribs with thick, grainy coats of brown sugar and spices rubbed onto the meat.  Waves of dry heat radiated from the smokers. But the heat that would cook these ribs would come not from an open fire but from smoldering mesquite embers.
When the doors were closed, the blazing logs were starved of oxygen. The flames died and a delicate smoke filled the air. At that moment the grill masters loaded in the racks of ribs coated with sweetened dry rub. Hours later, the ribs were removed, their outer coating thickened to crispness, creating what grill masters call “bark.”
I loved those ribs even more than the ones from my childhood.
At home, without the benefit of a smoker, I experimented for years to duplicate that sweet-crispness. Nothing could ever recreate the wonderful mesquite smokiness but I did succeed in making ribs with bark as good as any I enjoyed in West Texas.

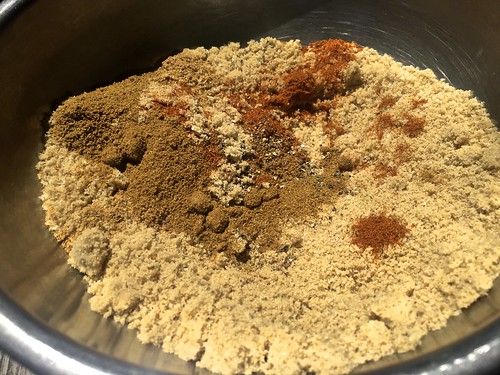
High heat versus slow cookingMix of kosher salt, black pepper, brown sugar, cumin, coriander and cayenne for dry rub slow roasted pork ribs. Credit: Copyright 2016 David Latt

Mix of kosher salt, black pepper, brown sugar, cumin, coriander and cayenne for dry rub slow roasted pork ribs. Credit: Copyright 2016 David Latt

Cooking with high heat is exciting. There is great pleasure in watching the pyrotechnics of an outdoor grill as sizzling fat catches fire.  Roasting at low heat in the oven lacks that excitement.
And yet, what happens in an oven set at 250 F has its own kind of magic. In the darkness of the oven, the waves of steady heat melt the fat inside the rack, tenderizing the meat and gently fusing the dry rub to the outside of the ribs.
The best magic of all is that the oven does the work. No standing over a blazingly hot grill on a hot day. Once the oven door closes, there is nothing to be done.
Walk into the kitchen and a savory-sweet aroma scents the air. Pull the baking tray out of the oven and press a finger against the outside of the rack. The soft pliancy of the meat has been replaced by a jerky-like crust as sweet as a crème brulee topping.

Slow-Roasted, Dry-Rubbed Pork Ribs

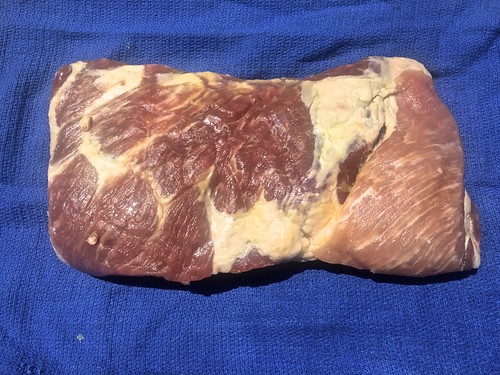
Rack of pork ribs, trimmed. Credit: Copyright 2016 David Latt
Cooking time depends on the size and thickness of the rack.
Buy good quality pork. Asian and Latin markets are often a reliable source of fresh pork products. Unlike the ribs sold in upscale supermarkets, the ribs in these markets will most likely be untrimmed.
Above the actual ribs, the rack will have a top portion with boneless flap meat and a section with thick bones similar to country style ribs.  Another smaller piece of flap meat will stretch across the back of the rib bones.
Requiring only a sharp filleting knife and a few minutes, removing the flap meat and the top portion is not difficult. The flap meat is excellent to use in stir fries, slow roasted in the oven or grilled on the BBQ.
A white membrane is attached to the outside of the flap meat. Use a sharp filleting knife to separate the meat from the membrane and discard.
The flap meat and country style bones can be prepared in the same manner as the ribs.  They will cook more quickly and should be removed from the 250 F oven after a total of 2 to 3 hours depending on thickness.
While the rack of ribs does not have to be turned over, the flap meat and country style bones should be turned over after one hour for even cooking. After another hour, use kitchen shears to cut off a small piece of meat to test for doneness. Return to the oven if the meat is not yet tender.
To eat the country style ribs, have a sharp paring knife handy to help cut out those hard to reach tasty bits tucked between the bones.
The ribs can be cooked ahead and reheated. In which case, do not cut apart the ribs until ready to serve. Reheat in a 300 F oven for 15 minutes.
Prep time: 30 minutes
Cooking time: 6 to 8 hours
Resting time: 5 minutes
Total time: 6 hours, 35 minutes to 8 hours, 35 minutes
Yield: 4 servings
Ingredients
1 rack pork ribs, 4 to 5 pounds, washed, dried
3 cups brown sugar
2 tablespoons kosher salt
2 tablespoons freshly ground black pepper
¼ cup cumin
¼ cup coriander
½ teaspoon cayenne (optional)
Directions
1. Place a wire rack in the middle of the oven. Preheat to 250 F.
2. Select a baking pan or cookie sheet that is 2 inches longer than the rack of ribs. Cover the pan with aluminum foil for easy clean up. Place a wire rack on top of the aluminum foil.
3. Lay the rack of ribs on a cutting board, bone side up. Use a sharp filleting knife to remove the tough membrane on the bone side of the rack. Let the knife help you lift the membrane. Use your fingers to pull the skin off the bones and discard.
4. Do not cut off any fat.
5. In a bowl, mix together dry ingredients.
6. For easy cleanup, lay a sheet of plastic wrap on the cutting board. Place the rack on the cutting board. Layer a thick coat of the dry spices onto both sides, covering the meat and bones.
7. Reserve left-over dry rub in an air tight container and refrigerate for later use.
8. Carefully place the rack of ribs on the wire rack meat side up.
9. Put the baking sheet into the preheated oven.
10. Roast six hours. Remove from oven. Use kitchen shears to cut off a small piece and taste.
11. The outside should have a jerky-crispness. The meat inside should be moist and tender. The tapered end of the rack where the bones are small will cook faster than the rest of the ribs. Use the kitchen shears to cut off that section before returning the rack to the oven for another one-two hours. Be careful not to dry out the meat.
12. Once the ribs are cooked, remove from oven and let the meat rest five minutes.
13. Cut between the rib bones and chop into pieces any flap meat without bones. Serve hot with a green salad, Cole slaw, baked beans or freshly steamed vegetables.
Main photo: Dry rub pork ribs cut apart after slow roasting and ready for serving. Credit: Copyright 2016 David Latt.
 

Tuesday, May 16, 2017

Comfort Food, Italian Style: Making Gnocchi with Chef Mirko Paderno

What’s your favorite comfort food? Do you prefer savory or sweet? Maybe a hot fudge sundae topped with whipped cream puts you in a Zen state. Maybe it’s a fresh-out-of-the-oven chicken pot pie with wild mushrooms or mac n’ cheese with extra cheddar. For Chef Mirko Paderno, a plate of freshly made gnocchi reminds him of home in Northern Italy. In his Vinoteca and Culina kitchen, he showed how to make gnocchi.
Often served in upscale restaurants as a fine dining dish, gnocchi is as basic to Italian home cooking as pasta. The sauces may change and the markings on the little “pillows” may differ depending on the region, but gnocchi is made with three basic ingredients: potatoes, flour and (most often) an egg.
Although there are a variety of opinions about how to make gnocchi, for Paderno if you can boil water and roll out a pie crust, you can make gnocchi. No special kitchen tools are required.

And, he loves gnocchi because of it's versatility. Perfect in winter with a hearty meat sauce or in summer with a light pesto or butter sauce.

Making gnocchi is his yoga
Rolling out the dough puts Paderno into a relaxed, Zen state.  On rainy days, he enjoys making gnocchi with his teenaged daughter.

A James Beard Nominee and a seasoned veteran of kitchens in Italy and Los Angeles, he began his culinary career at the Four Seasons Hotel Milan. With his appointment as Executive Chef at Culina and Vinoteca, he has come full circle, returning to the Four Seasons family. In between, he worked in some of Los Angeles’ best restaurants. Piero Selvaggio’s Primi, Cecconi’s, Oliverio at the Viceroy and DTLA’s Officine BRERA.

But when he was a teenager, he wasn’t certain what he was going to do with his life. That’s when he enrolled at the Cesare Ritz School in Marano. At the time, he wasn’t that focused on cooking. One of his teachers, Abramo Magnani saw talent in him. But Magnani told him point blank, if he didn’t focus and apply himself, his talent would never amount to anything. In one of those wonderful moments when a person’s life changes forever in a good way, Paderno accepted the challenge.
At Vinoteca and Culina, that determination has paid off. His reworking of the menus has created dishes that give local diners an authentic experience with modern Italian food. Unlike many hotel restaurants, Paderno makes changes to the menu depending upon the seasons, the availability of quality ingredients and feedback from his diners. He combines the California love of seasonal food with Italian regional touches. 

Reflecting that dual vision, Paderno worked with Sommelier Amanda Craig who created a wine cellar with a comprehensive selection of wines from around the world but especially from Italy and California. In a tasting flight I selected she paired an Arneis from Piedmont with one from Santa Inez and a Vermentino from Liguria with one from Arroyo Secco in California. The differences were marked. All were delicious.

Gnocchi Made with Cold Potatoes

For Paderno, two details are key to making the best gnocchi. The potatoes must be steamed over salted boiling water so the flesh does not become water-logged. And, the dough must be made with cold cooked potatoes so less flour is needed.

By using cold potatoes, the dough can be prepared before the meal, even the day before. But if hot potatoes are used, when the egg and flour are added, the gnocchi must be cooked immediately to avoid becoming soggy.

Paderno uses Idaho russet potatoes because they have a neutral flavor, the better to work with a variety of sauces. But he suggests using any potato you enjoy, even sweet potatoes or purple potatoes.

Paderno uses “00” flour which blends easily with the potato. If “00” is not available, use all-purpose (AP) flour.

The amount of flour used partly depends on the moisture of the cooked potatoes. Getting the right density takes a bit of practice. The gnocchi dough should be not too dry and not too damp. Like pastry dough, with a dusting of flour, the gnocchi should roll out without sticking on the work surface. Watch the video to see Paderno’s technique.

Serves 8

Time to prepare: 30 minutes

Time to cook: 30 minutes

Total time: 60 minutes

Ingredients

2.2 lbs. Idaho russet potatoes, washed, skin on
14 ounces “00” or AP flour
2 tablespoons AP flour for dusting
1 extra large egg
2 teaspoons kosher salt
1 cup freshly grated Parmesan cheese

Directions

Place a steamer on the bottom of a large pot. Add water only to the bottom of the steamer. Season with 1 teaspoon kosher salt. Bring to a boil. Place potatoes in the pot. Cover. 

Depending on the size of the potatoes, cook 20 minutes or until a paring knife can be inserted into the potatoes easily. Add water as needed if more steaming is required. Remove when the potatoes are soft but not mushy.

Allow potatoes to cool. Peel and discard the skins or reserve to sauté for breakfast. Run the cooked, peeled potatoes through a potato ricer or food mill using a fine blade.

Sprinkle work area with flour. Place potatoes on the work area. Create a “volcano,” the way you do when making fresh pasta, with a depression in the middle of the mound. Dust flour over the potato and place a raw egg into the center of the volcano.

Using fingers, work the egg, flour and potato together until all ingredients are combined. Create a ball.

At this point, the dough can be wrapped in plastic wrap or placed in an air-tight container and refrigerated to use later or the next day.

Before cooking the gnocchi, make a sauce. That can be as simple as a butter sauce with a little pasta water or as complicated as a braised meat ragu.
Sprinkle the work surface with flour. Work in batches. Cut off a cup of dough at a time. Using both hands, fingers and palms, roll the potato dough back and forth until it takes the shape of a dowel, about 1” in diameter.

The dough is forgiving so if the dowel breaks apart, start over.

Once you have made a uniform shape, create individual gnocchi using a pastry cutter or chefs knife. The gnocchi should be approximately 1” long.
It is important to mark each gnocchi using a fork, your finger or a gnocchi board. The indentations will help the sauce stick to each gnocchi.

Fill a large pot with water. Add 1 teaspoon of kosher salt. Bring to a boil.
The gnocchi cook quickly, anywhere from 30-60 seconds. To determine how much time is needed, place several test gnocchi into the water. If the first gnocchi breaks apart, either the water is boiling too fast and/or the potato dough needs more flour, in which case you can return to the work area, gather up the gnocchi, sprinkle with flour, knead together, roll out and cut again.

If your gnocchi hold their shape, after 30 seconds remove one to taste. Then after 45 seconds. And another after 60 seconds. Decide which you like and use that timing to make the rest.

Working in batches, carefully drop a dozen gnocchi at a time into the boiling, salted water.

Using a wire strainer, remove the gnocchi from the boiling water.

Drain and add to the heated sauce, which can be as simple as sautéed San Marzano tomatoes with olive oil or a tablespoon or two of pasta water mixed with melted butter like Rodolphe Le Meunier’s salted French Beurre de Baratte.

Serve each plate of gnocchi hot, topped with freshly grated Parmesan cheese.

Chef Mirko Paderno, Vinoteca and Culina, Four Seasons Hotel Los Angeles at Beverly Hills, 300 S. Doheny Drive, Los Angeles, CA 90048 

Tuesday, April 18, 2017

Dress up Deviled Eggs With a Fresh Take On a Classic


Quarter-sized deviled eggs made with Italian parsley, anchovies and capers. Credit: Copyright 2015 David Latt
What’s Easter without Easter eggs? Hide them. Roll them. And, best of all, eat them. Of the many dishes associated with Easter, deviled eggs have always been high on the list. Traditional deviled eggs are delicious but with some adventuresome spices, all those left-over hardboiled Easter eggs become devilishly delicious.
Our fingers stained blue, red and yellow, my sister and I loved dyeing and decorating Easter eggs. Ultimately our mother turned our colored eggs into deviled eggs with a simple recipe: peel and slice open the eggs, chop up the yolks, add a bit of mayonnaise and season with salt and pepper, then spoon the mixture back onto the egg white halves.
When we were kids that seemed good enough. But for my adult palate, deviled eggs needed spicing up. With experimentation, I discovered that hard-boiled eggs are a great flavor delivery system because they provide a solid, neutral base of flavor to which exciting flavors can be added.
Doing something as simple as adding cayenne or Mexican chili ancho powder gives the mild-mannered eggs a mouth-pleasing heat. Sweeten the flavor up a notch by stirring in finely chopped currants or borrow from Indian cuisine and mix in curry powder that has first been dry roasted in a sauté pan.
Turn the eggs into an entrée by mixing in freshly cooked shellfish. Grill shrimp or steam a few Dungeness crab legs, finely chop the savory meat and add to the yolk mixture. The result is elegantly flavorful.
This year I’m using a Mediterranean approach. Capers add saltiness and Italian parsley adds freshness. Finely chopped and sautéed anchovy filets are the secret ingredient that takes deviled eggs to another level.
Cut into quarters or halves, the deviled eggs make a visually arresting presentation. 
Caper and Anchovy Deviled Eggs
Always worth mentioning, using quality ingredients improves any dish. Nowhere is that more true than with deviled eggs. Use farmers market fresh eggs, quality capers preserved in brine and good anchovy filets. 
The easiest way to fill the egg white sections is with a disposable pastry bag. If one is not available, use a spoon to scoop up filling and a fork to distribute it into each egg white half.
The eggs and filling can be prepared the day before or in the morning. To keep them fresh, the eggs should not be filled until just before serving.
If desired, add a touch of heat with a pinch of cayenne. 
Prep time: 5 minutes
Cook time: 20 minutes
Assembly time: 15 minutes
Total time: 40 minutes
Yield: 4 servings
Ingredients
6 farm fresh eggs, large or extra large, washed
4 anchovy filets, finely chopped
1 tablespoon Italian parsley, washed, pat dried, finely chopped
1 teaspoon capers, finely chopped
2 tablespoons mayonnaise
Sea salt and freshly ground black pepper to taste
Pinch cayenne (optional)
Directions
1. Submerge the eggs in an uncovered saucepan of cold water. Heat the uncovered pot on a medium-high flame. Bring to a simmer and boil five minutes. Turn off the flame, cover and leave the eggs in the hot water 10 minutes. Drain the hot water. Add cold water to cool the eggs.
2. While the eggs are cooking, heat a small sauté or nonstick frying pan over a medium flame. No need to add oil. Sauté the anchovy filets until lightly brown. Set aside.
3. Peel the eggs. Discard the shells. Wash and dry the eggs to remove any bits of shell. Using a sharp paring knife, carefully slice the eggs in half, lengthwise. Remove the yolks and place into a bowl. Set aside the egg white halves.
4. Using a fork, finely crumble the yolks. Add the Italian parsley, capers and sautéed anchovy bits. Stir together all the ingredients. Add mayonnaise and mix well until creamy.
5. Spoon the filling into a disposable pastry bag. If serving the next day or later in the morning, place the egg white halves into an air-tight container and the filled pastry bag into the refrigerator.
6. Prepare a serving dish. The deviled eggs can be served as quarters, halves or reformed as whole. If quarters, cut each halve in two lengthwise. Just before serving the eggs, cut off the tip of the pastry bag. Have a paring knife or fork in hand. Carefully squeeze a generous amount of the filling into each egg white piece. If needed, use the knife or fork to tidy up the filling on each egg. Any leftover filling should be eaten on crackers as a chef’s treat.
7. As the eggs are filled, place them on the serving dish and garnish with Italian parsley or arugula. Serve cold.


Sunday, April 2, 2017

Ugly Tomatoes Make Beautiful Meals

In the winter or spring farmers markets, you've passed them by with a disapproving look. Blemished fresh tomatoes. Discounted to a dollar or less, these unhappy looking suitors for your attention appear destined to become compost.
Occasionally you will see someone who has stopped at the bin looking through the misshapen mound and you probably think they are too poor to buy the perfectly red, perfectly shaped tomatoes grown in a hot house.

The truth is, there are treasures hidden there. Find tomatoes that are firm and only slightly blemished and you will have found diamonds in the rough. They lack summer's full-blasted brightness. but tomatoes grown during winter and spring's weaker sun grow thicker skins and develop a rich, deep umami flavor.
Oven roasted, these tomatoes find sweetness hidden deep within. The acid so prized in summer tomatoes is mellowed and sweetened in off-season farmers market tomatoes.

But treat these tomatoes with care. Brought home from the farmers market and left on the kitchen counter in the sun, they will quickly soften and turn bad. They are used to cold, so place them in the refrigerator and they will last days and even a week until you are ready to use them roasted as a side dish for braised meat, tossed with pasta, served on steamed rice or mixed into soups, stews and braises.

Roasted Winter/Spring Tomatoes

Check each tomato carefully. You want firm tomatoes. A few blemishes are ok because those can be easily removed with a sharp pairing knife. 

Heirloom tomatoes are especially flavorful.

Summer tomatoes can be roasted with a similar but different result. 

Serves 4

Time to prepare: 10 minutes

Time to cook: 30 minutes

Total time: 40 minutes

Ingredients

3 pounds tomatoes

1 medium yellow onion, washed, skins, root and stem ends removed and discarded

1 tablespoon olive oil

1/4 teaspoon sea salt

Freshly ground black pepper to taste

1 tablespoon Italian parsley, leaves only, washed, finely chopped

Directions

Preheat oven to 400F.

Prepare a baking tray with a small lip (about 1/2"). Lay a Silpat (non-stick silicone) sheet or a piece of parchment paper onto the bottom of the baking tray.
Using a sharp pairing knife, remove the stem and spot on the bottom where the blossom was attached. Remove any dark blemishes and discard.

Cut into 1" slabs. Place slabs onto the prepared baking tray.

Cut onion in half, cutting from top to bottom. Cut thin slices by cutting from top to bottom. Place in mixing bowl. Season with olive oil, sea salt and freshly ground black pepper. Mix with Italian parsley.

Spread onion-parsley mixture over tomatoes.

Place baking tray into oven.

After 15 minutes, using a spatula or flipper, turn the slabs over. Keep onion-parsley mixture on top to brown. Return to oven.

Remove after 15 minutes.

The onion-parsley mixture should have lightly browned. Carefully remove the slabs which are now very delicate from the pan. Reserve the onion-parsley mixture and all of the liquid that has accumulated in the pan. This is full of tomato-essence
flavor.

To use as a side-dish, reheat and serve in a bowl. The roasted tomatoes are delicious when added to soups, stews and braises.

If not used immediately, keep the roasted tomatoes in an air-tight container. They will keep in the refrigerator for several days or in the freezer for a month.

Ready, Set, Prep: Careful Planning Makes Thanksgiving Day a Lot More Fun

Thanksgiving was my mother's favorite holiday. She loved the food, the gathering of friends and family and the positive outlook of a hol...