Showing posts with label pasta. Show all posts

Wednesday, June 28, 2023

Tired. Hungry. Cook Like an Italian. Make Pasta with Sausages

Eating well is one of life's great pleasures. The other night I made a simple dish that can become more complex, depending on your preferences and ambition. Sautéed sausages and spaghetti tossed with cooked pasta and topped with freshly grated Parmesan cheese can be that easy. Delicious! 

For added flavor I also sautéed chopped onions, Italian parsley and shiitake mushrooms. With a little more energy I could have added broccoli florets sliced thin and tomato sauce and that's what I will do next time I make the dish. 

Earlier in the day I had made ground pork meatballs with an egg, bread crumbs, chopped an Italian parsley and chopped onions. I added those at the end because, why not? Sausages and meatballs together on pasta, come on, that's crazy delicious!

A couple of general suggestions. 

For the spaghetti (or penne or fussili) buy a high quality Italian brand. I love Borella. The pasta has a clean taste, with a good bite.
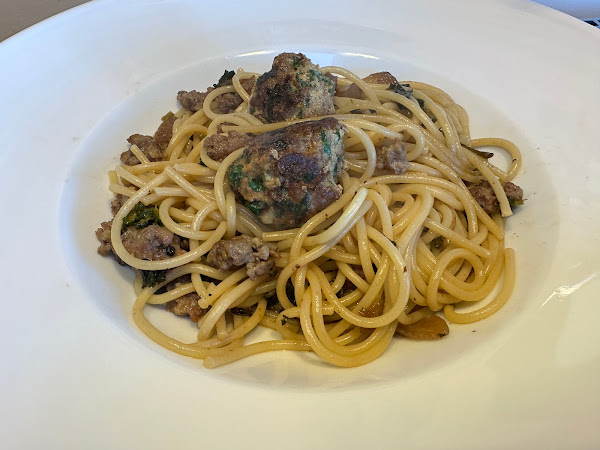
For the sausages, you can use any kind of sausage you like. I prefer pork suasages with fennel made by Monte Carlo (3103 W. Magnolia Blvd Burbank CA 91505), an Italian deli in the San Fernando Valley. That's a long drive from where we live in Pacific Palisades, but when I am already in the Valley, I'll stock up and buy five pounds. 

I'm not going to eat five pounds of sausages all at once. Freezing keeps them "fresh" and available. To freeze the sausages, I dredge each sausage in olive oil, then I wrap each sausage in plastic wrap before placing the wrapped sausages into a sealable plastic bag. Even months later, the sausages taste fresh and delicious. 

There are many ways to saute the sausage. My preference is to first remove the casing, then using my fingers, I create quarter sized chunks of sausage. That way each piece of sausage has a crisp outside. Use a carbon steel or cast iron frying pan for best results. 

The recipe is for one. If you want to make the dish for two, double the ingredients and so on for as many people as you like. 

Pasta with Italian Sausage 

Serves one

Time to cook 25 minutes

Ingredients 

1 Italian sausage or any sausage you enjoy 

1/4 package of pasta, any shape you enjoy 

2 tablespoons chopped yellow onions, washed, peel removed 

2 tablespoons chopped Italian parsley, washed, leaves only 

2 large shiitake mushrooms or a mushroom you enjoy, washed, end of the stem removed, thin sliced 

4 tablespoons extra virgin olive oil, a good quality brand, preferably from Italy 

1 teaspoon kosher salt, preferably Diamond Crystal Kosher Salt, do not use any salt that has iodine 

1 garlic clove, washed, peeled, finely chopped (optional) 

1/4 cup pasta water, reserved from cooking the pasta

1/2 cup freshly grated Parmesan cheese 

Directions 

Place a large carbon steel or cast iron frying pan on a medium flame. 

Add 1 tablespoon olive oil. 

Sauté the chunks of sausage without the casing until browned on all sides. Remove from the pan. Drain on a paper towel on a plate. 

Discard the oil in the pan. 

Add 1 tablespoon of olive oil. Heat on a medium flame. 

Add the vegetables. Sauté until lightly browned. 

Return the cooked sausages to the pan. Remove from the heat and set aside. 

Fill a large pot with water. Season with kosher salt. Place on the stove on high heat. Bring to a boil. 

Add pasta and stir well to prevent the pieces of pasta sticking together. 

Cook 10 minutes or until al dente. 

As you drain the pasta in the sink, capture 1/4 cup of pasta water. 

Add the pasta water and cooked pasta to the sautéed vegetables.  Drizzle the remaining olive oil over the pasta and vegetables.

Heat on a medium flame. 

Toss well and reduce the liquid so the sauce coats the pasta. Plate the pasta and top with freshly grated cheese. Serve hot.

Tuesday, May 24, 2022

For a Taste of Italy and Spain, Travel to Your Kitchen

Getting ready to travel to Italy next week, I remembered my last trip three years ago, a few weeks before the world changed and my overseas travel was limited to webinars and Instagram posts. In the fall of 2019, I visited Piedmont and Milan. 

Walking one day in the courtyard of the Duomo, that wonderful cathedral in the heart of Milan, and the next day descending hand chiseled stairs that led down to an Infernot where farmers stored produce and later wine. 

Before the discovery of the New World, Italian farmers in the Piedmont were digging deep into the sandstone underneath their homes in their own exploration of discovery, building rooms where men gathered to eat, talk and drink wine. All they lacked was air. Without a ventilation system, once the air was used up, the men rushed up those hand chiseled stairs before they passed out.

On that trip, I ate local cheeses, charcuterie, bagna cauda (an anchovy-garlic dip), spaghetti with clams, and so many dishes that made me very happy. When travel was not possible, I satisfied my "hunger" for all things Italian by cooking foods that reminded me of Italy. Last night I made pasta with Italian sausage, butter clams, vegetables and a touch of sweet butter. 

For my wife, who doesn't eat meat, I used a Chinese clay pot to make braised tofu with vegetables, the Spanish spice pimeton and San Marzano tomatoes D.O.P. That brought together China, Spain and Italy in a one pot dish.

For myself, I use bone-in chicken thighs and legs instead of tofu. Where the recipe says tofu, substitute 2 chicken thighs and 2 chicken legs.

Hot Pot Braised Tofu with San Marzano Tomatoes, Vegetables, Olives and Noodles

The cans of San Marzano Tomatoes I was gifted (see at the end, below) had enough tomatoes and sauce for several dishes. What I didn't originally use, separating sauce from tomatoes, I froze in 6 oz and 8 oz containers. Because our sons are fully grown, I cook for two. Whenever I have too much of an ingredient, I place small containers in the freezer, available when I want to create a dinner or lunch.

The San Marzano Tomatoes and sauce froze and reheated with no loss of flavor. 

Clay hot pots are available in Asian markets. Inexpensive, they require a bit of special care. Before using, each time, submerge the clay pot into clean water for 15 minutes. Purchase a wire trivet that you'll place on the stove-top burner. The clay pot goes on top of the wire trivet. Only use a low to medium flame to avoid stressing the clay. Allow the pot to cool before washing to avoid cracking.

If you can find only small clay pots, use two to prepare this dish.

Serves 4

Time to prepare 15 minutes

Time to cook 45 minutes

Total time: 60 minutes

Ingredients

1 cup yellow onions, washed, peeled, roughly chopped

1 cup carrots, washed, ends removed, peeled, roughly chopped

1 cup daikon, washed, ends removed, peeled, roughly chopped

1/2 cup corn kernels, cut off the cob (when available)

1 cup broccolini or broccoli, stems roughly chopped, leaves whole and florets sliced into bite sized pieces

2 cups tofu, preferably firm and organic, washed, cut into bite sized pieces

1 cup San Marzano tomatoes D.O.P., roughly chopped

1/2 cup San Marzano tomato sauce, D.O.P.

2 cups homemade vegetable stock, if none available, use water

1 cup green or black olives, preferably olives with pits

1 pound noodles, dried or fresh

1/2 tablespoon pimeton

Sea salt and freshly ground black pepper to taste

Directions

Heat olive oil in hot pot over medium heat. 

Saute onions until lightly browned.

Add tofu, lightly brown and stir well.

Add pimeton and stir well. Don't burn the spice.

Add carrots, daikon and corn. Stir after each ingredient is added.

Add broccolini or broccoli stems. Stir well and cook to soften.

Add broccoli or broccoli leaves. Sir well.

Add chopped tomatoes and tomato sauce, if frozen, no need to defrost.

Add vegetable stock, if frozen, no need to defrost. If stock unavailable, use water.

Add olives, cover and simmer 30 minutes.

While the tofu is braising, bring a pot of salted water to boil and cook noodles according to the package. 10 minutes if dried, 2-3 minutes if fresh. Drain and set aside.

Remove cover and add cooked noodles.

Stir well to mix together tofu, vegetables and noodles.

Serve hot in bowls.

Please send me recipes and photographs when you make your delicious dishes using Pomodoro San Marzano Dell'Agro Sarmese-Nocerino D.O.P. and I will submit your recipe to enter a contest to win a gift basket of these wonderful D.O.P. San Marzano tomatoes.


The tomatoes I used were provided courtesy of the Consorzio di Tutela del Pomodoro San Marzano dell’Agro Sarnese-Nocerino DOP and ANICAV.

Wednesday, April 1, 2020

Ready. Set. Go. "00" Flour Makes the Best Homemade Pasta, Especially When We're "Safe-At-Home"

A post from last year is worth revisiting now. Making pasta is an ideal dish for these times when we are denied visits to our favorite restaurants. 

As with gnocchi, pasta is as variable as the sauces. Go simple with olive oil, black pepper and a sprinkling of freshly grated Parmesan cheese or make a savory meat sauce enlivened with roasted tomatoes and shiitake mushrooms. 

I recommend using "OO" flour, usually easily available at upscale markets like Whole Foods, Gelson's and Wegman's and online. If "00" flour is not available right now, All Purpose (AP) white flour is a good substitute. But "00" is clearly superior and I hope you can find some.

For those of you who always wanted to make pasta but were discouraged because you thought it was too difficult to make and required special equipment, this is your moment to have fun and delight your family with the best comfort dish ever!  Buon Appetito!

When I learned how to make pasta from scratch, I gave away all my boxes of dried pasta. Quality brands of spaghetti, linguini, fusilli, penne, tagliatelle and pappardelle. All of it.

I put away my shiny chrome Marcata hand-operated pasta making machine.

Now I only wanted to eat pasta that I made myself.  No machines. Just me, a rolling pin, an egg and "00" flour.

I always loved pasta, even when my mom served me Chef Boyardee's pasta and sauce in a can. As an adult, I made my own sauces and used dried pastas, priding myself on buying the best quality available.

On a press trip to Seattle, I had a pasta-epiphany at Spinasse (1531 14th Avenue, Seattle 98122, 206/251-7673). I was traveling with a group of food writers. Before the pasta arrived, we were talking nosily about the trip. One taste of our pasta and all talking ceased. Everyone focused on their plates. I had pasta with a deliciously savory meat ragu (Tajarin al ragu). 

That pasta was a revelation. The bite, flavor and texture of chef Stuart Lane's pasta was unique in my experience. After that visit, I wanted to make my own pasta at home. I bought a machine and read countless recipes. The result was always less than satisfying.

Ultimately I gave up on making my own pasta and concentrated on sauces


Then I watched the "Fat" episode of Samin Nosrat's Netflix series Salt Fat Acid Heat. That episode is my favorite of the series. I loved watching chef Nostrat lose herself in the sights, sounds, textures and ingredients of Italy.

In the episode she visits Benedetta Vitali's Tuscan kitchen to learn her way of making pasta. The instruction was simple. Mix together the best eggs and "00" flour you can find. Knead and roll out the dough into a paper-thin, round sheet. Use a knife to cut the pasta. Boil in salted water. Drain. Done!

As soon as the episode ended, I had to try. Since I didn't have "00" flour, I used All-Purpose flour. The result was good and, thinking "00" flour was too exotic to find locally, I kept using AP flour, but the result was inconsistent. 


So I went in search of "00" flour. Which wasn't much of a search. Our local supermarket carried it. A bit more expensive than AP flour, "00" made all the difference.

I was so excited by the result, now I make pasta all the time.

Basic Pasta Dough

In correspondence with chef Lane for this post, he explained that "'00' is "a fine grained/milled slightly softer than all purposed flour."  That finer grain gives the dough better elasticity. 


To prevent the dough from sticking while you roll it out, sprinkle flour on the surface of the cutting board and on the dough. When pastry chef Federico Fernandez was showing me how to make sfogletella, a wonderful Italian pastry, for my YouTube Channel: Secrets of Restaurant Chefs, he used semolina instead of flour on the cutting board. 

I liked the idea of using the coarser semolina when I make pasta. I dust the cutting board with semolina, which is incorporated into the dough. I think it adds a nice texture. Less available than "00" flour, both are sold in Italian markets. (For a good description of the differences between "00" flour and semolina, please visit the website Farro.)


As with any dish, using the best ingredients improves the quality, so use the best eggs you can find. Chef Lane sources his from organic farms in the Seattle area like Stokesberry.

One day after I had rolled out the dough, I was distracted by a phone call. Before I realized it, more than half an hour had passed. When I returned to the kitchen, I discovered that the dough had dried slightly. The pasta that day was lighter, with a better bite. I added the air-drying step to my pasta making. I was very pleased when chef Lane noted that letting his dough dry was a key step for him as well.

Because the dough is fresh, the pasta cooks more quickly than dried pasta. On average, 5 minutes is sufficient, but taste the pasta after 3 minutes so it doesn't over cook.

I add freshly ground pepper and sea salt to the flour for added flavor, but that is optional.

When the pasta cooks in the salted water, it expands. What appears to be a small amount of dough on the cutting board will yield a much larger amount of cooked pasta.

To make larger yields, multiple the ingredients by the number of servings you want. However, for ease when rolling out the dough, I would advise working with an amount of dough equivalent to that made with 1 egg and 1/2 cup of flour.

The dough must be used the same day you make it. Once cooked, the pasta can be kept in an air-tight container to use the next day.

Prep time: 15 minutes

Waiting time: 45 minutes

Cook time: 5 minutes

Total time: 65 minutes

Yield: one entrée serving or two side dish servings

Ingredients

1 farm fresh egg

1/2 cup "00" flour + 2 tablespoons "00" flour or semolina to dust the cutting board and dough

1/8 teaspoon freshly ground black pepper (optional)

1/4 teaspoon sea salt (optional)

1 tablespoon kosher salt

Directions

1. Place the flour on the cutting board. Using a fork, make an indentation into the top of the mound to create a "volcano." Season flour with black pepper and sea salt (optional)


2. Remove the egg from its shell and place into the indentation.

3. Using the fork, swirl the egg into the flour until completely incorporated. Use the fork to scrape the wet dough off the cutting the dough.


4. Dust the wet dough with flour or semolina. Clean any dough off the fork. Use your hands to form the dough into a ball. Liberally sprinkling flour or semolina on the cutting board, roll the dough back and forth. Incorporate any dough that sticks to your fingers or the cutting board. Continue rolling the ball back and forth on the cutting board for 10-15 minutes. As chef Lane notes, "Really knead the dough a lot. You are not going to overwork it (like bread). In fact, it is more common to underwork it."

5. Wrap the dough in plastic wrap and allow to rest 30 minutes. If the weather is cool, leave the dough on the counter. If the weather is hot, place the dough in the refrigerator.


6. Unwrap the dough. Sprinkle flour or semolina on the cutting board. Using a rolling pin, flatten the dough and roll out, keeping the round shape by turning the disk of dough frequently. After rolling out the dough three or four times, flip it over, dusting the cutting board and the dough to prevent sticking. Continue rolling out the dough until it is paper thin.


7. Allow the rolled out dough to air-dry for 15-30 minutes.

8. Add kosher salt to water in a large stock pot. Bring to a boil.

9. Place a colander and a heat-proof cup in the sink.

10. Sharpen a chefs knife.

11. Lightly dust the rolled out, air-dried dough with flour or semolina, fold the circle of dough in half. Do not press the dough.


Dust again and fold a second time.


Dust again and fold a third time and then a fourth time until the folded dough is approximately 1" wide.


12. You can cut the pasta into any width you enjoy, remembering that the pasta will double in size in the boiling salted water.


13. After you have cut the dough into strips, lift the cut pasta and let fall onto the cutting board so the strands separate.

14. Place into the boiling salted water, using tongs to separate the strands. Cook 3-5 minutes. Taste after 3 minutes to confirm when the pasta is to your liking.


15. Drain in the colander, capturing 1 cup of salted pasta water in the heat-proof cup to use in making a pasta sauce.

16. Toss in the colander so the strands do not stick together and serve while hot.

Tuesday, March 31, 2020

Ready, Set, Go: Easy-to-Make Gnocchi is a Perfect Staying-at-Home Comfort Food


Monday, March 30, 2020

Ready, Set, Go: Easy-to-Make Gnocchi is a Perfect Staying-at-Home Comfort Food 

Making gnocchi is perfect for this time when we are spending a lot of time at home. If you make gnocchi already, you know how easy they are to prepare. If you have enjoyed gnocchi in Italian restaurants, you remember how these heavenly "pillows" make you happy.


I was lucky enough to have chef Mirko Paderno invite me into his kitchen where he did a cooking video showing how to make gnocchi. Please go this link to see Mirko make gnocchi.

Mirko's original recipe was designed to serve 8. I have adapted his recipe to serve 4 people since we cannot currently have dinner parties. I made other small changes as well.

Gnocchi Made with Cold Potatoes

For Paderno, two details are key to making the best gnocchi. The potatoes must be steamed over salted boiling water so the flesh does not become water-logged. 

Mirko lets his salt-steamed potatoes cool before he puts them into the food mill. By using cold potatoes, the dough needs less flour. Also, if hot potatoes are used, when the egg and flour are added, the gnocchi must be cooked immediately to avoid becoming soggy. By working with cold potatoes, he can make the dough, seal it in plastic wrap and use it later that day or the next.

Paderno uses Idaho russet potatoes because they have a neutral flavor, the better to work with a variety of sauces. But he suggests using any potato you enjoy, even sweet potatoes or purple potatoes. 

Paderno uses “00” flour which blends easily with the potato. If “00” is not available, use all-purpose (AP) flour. 

The amount of flour used partly depends on the moisture of the cooked potatoes. Getting the right density takes a bit of practice. The gnocchi dough should be not too dry and not too damp. Like pastry dough, with a dusting of flour, the gnocchi should roll out without sticking on the work surface. Watchthe video to see Paderno’s technique.

Serves 4

Time to prepare: 30 minutes

Time to cook: 30 minutes

Total time: 60 minutes

Ingredients

1 lb. Idaho russet potatoes, washed, skin on
5 ounces “00” or AP flour
2 tablespoons AP flour for dusting
1/2 extra large egg
2 teaspoons kosher salt
1 cup freshly grated Parmesan cheese

Directions

Place a steamer on the bottom of a large pot. Add water only to the bottom of the steamer. Season with 1 teaspoon kosher salt. Bring to a boil. Place potatoes in the pot. Cover.  

Depending on the size of the potatoes, cook 20 minutes or until a paring knife can be inserted into the potatoes easily. Add water as needed if more steaming is required. Remove when the potatoes are soft but not mushy. 

Cool potatoes to room temperature or refrigerate. When it is time to make the gnocchi, peel and discard the skins or reserve to sauté with onions and parsley for breakfast. 

Run the cooked, peeled potatoes through a potato ricer or food mill using a fine blade. If neither is available, press the softened potatoes though a strainer or colander.

The potatoes will now look like strands of soft pasta. Place into a mixing bowl and add flour (preferably "00") and mix well together. 

Sprinkle work area with flour. Place potato-flour mixture on the work area and create a “volcano,” the way you do when making fresh pasta, with a depression in the middle of the mound.

In a bowl, crack open a raw egg and whisk with a fork until the white and yolk are well blended.

Pour 1/2 the egg mixture into the center of the volcano.  Reserve the other 1/2 for another use.

Using the fork and your fingers, work the egg, flour and potato together until all ingredients are combined into a ball. 

As you do with pasta (please see that recipe as well), roll the ball back and forth on the work surface. Sprinkle additional flour to prevent sticking. When the ball is smooth and well-formed, wrap the dough in plastic wrap and place into an air-tight plastic bag and refrigerate for one hour or until the next day.

Before cooking the gnocchi, make a sauce. That can be as simple as a butter sauce with a little pasta water or as complicated as a braised meat ragu.


Shaping the Dough into Gnocchi

Sprinkle the work surface with flour. Work in batches. Cut the dough into four pieces. 

Form one piece of dough into a ball and then using both hands, fingers and palms, roll the potato dough back and forth until it takes the shape of a dowel, about 1” in diameter. 


The dough is forgiving so if the dowel breaks apart, start over.

Once you have made a uniform shape, create individual gnocchi using a pastry cutter or chefs knife. The gnocchi should be approximately 1” long.


It is important to mark each gnocchi using a fork, your finger or a gnocchi board. The indentations will help the sauce stick to each gnocchi.

Cooking the Gnocchi

Fill a large pot with water. Add 1 teaspoon of kosher salt. Bring to a boil.


The gnocchi cook quickly. To determine how much time is needed, place several test gnocchi into the water. 

If the first gnocchi breaks apart, either the water is boiling too fast and/or the potato dough needs more flour, in which case you can return to the work area, gather up the gnocchi, sprinkle with flour, knead together, roll out and cut again.

If your gnocchi hold their shape in the boiling water, test how long they should cook. Taste one after 30 seconds. Taste another after 45 seconds. And another after 60 seconds and so on. Decide which you like and use that timing to make the rest. For my latest batch, 120 seconds worked the best.

Working in batches, carefully drop a dozen gnocchi at a time into the boiling, salted water. 

Using a wire strainer, remove the gnocchi from the boiling water. 

Drain and add to the heated sauce, which can be as simple as sautéed San Marzano tomatoes with olive oil or a tablespoon or two of pasta water mixed with a good quality melted butter. Or more robust with slices of grilled sausage or coated with pesto sauce.

Serve each plate of gnocchi hot, topped with freshly grated Parmesan cheese.

Saturday, September 21, 2019

Ready. Set. Go. "00" Flour Makes the Best Homemade Pasta

I am reprising a post from last year because making pasta is an ideal dish for these times when we are denied visits to our favorite restaurants. As with gnocchi, pasta is as variable as the sauces. Go simple with olive oil, black pepper and a sprinkling of freshly grated Parmesan cheese or make a savory meat sauce enlivened with roasted tomatoes and shiitake mushrooms. I recommend finding "OO" flour usually easily available at upscale markets like Whole Foods, Gelson's and Wegman's and online. If "00" flour is not available right now, All Purpose (AP) white flour is a good substitute. But "00" is clearly superior and I hope you can find some.

For those of you who always wanted to make pasta but were discouraged because you thought it was too difficult to make and required special equipment, this is your moment to have fun and delight your family with the best comfort dish ever!  Buon Appetito!

When I learned how to make pasta from scratch, I gave away all my boxes of dried pasta. Quality brands of spaghetti, linguini, fusilli, penne, tagliatelle and pappardelle. All of it.

I also gave away my shiny chrome Marcato hand-operated pasta making machine.

Now I only wanted to eat pasta that I made myself.  No machines. Just me, a rolling pin, an egg and "00" flour.

I always loved pasta, even when my mom served me Chef Boyardee's pasta and sauce in a can. As an adult, I made my own sauces and used dried pastas, priding myself on buying the best quality available.

On a press trip to Seattle, I had a pasta-epiphany at Spinasse (1531 14th Avenue, Seattle 98122, 206/251-7673). I was traveling with a group of food writers. Before the pasta arrived, we were talking nosily about the trip. One taste of our pasta and all talking ceased. Everyone focused on their plates. I had pasta with a deliciously savory meat ragu (Tajarin al ragu). 

That pasta was a revelation. The bite, flavor and texture of chef Stuart Lane's pasta was unique in my experience. After that visit, I wanted to make my own pasta at home. I bought a machine and read countless recipes. The result was always less than satisfying.

Ultimately I gave up on making my own pasta and concentrated on sauces


Then I watched the "Fat" episode of Samin Nosrat's Netflix series Salt Fat Acid Heat. That episode is my favorite of the series. I loved watching chef Nostrat lose herself in the sights, sounds, textures and ingredients of Italy.

In the episode she visits Benedetta Vitali's Tuscan kitchen to learn her way of making pasta. The instruction was simple. Mix together the best eggs and "00" flour you can find. Knead and roll out the dough into a paper-thin, round sheet. Use a knife to cut the pasta. Boil in salted water. Drain. Done!

As soon as the episode ended, I had to try. Since I didn't have "00" flour, I used All-Purpose flour. The result was good and, thinking "00" flour was too exotic to find locally, I kept using AP flour, but the result was inconsistent. 


So I went in search of "00" flour. Which wasn't much of a search. Our local supermarket carried it. A bit more expensive than AP flour, "00" made all the difference.

I was so excited by the result, now I make pasta all the time.

Basic Pasta Dough

In correspondence with chef Lane for this post, he explained that "'00' is "a fine grained/milled slightly softer than all purposed flour."  That finer grain gives the dough better elasticity. 

To prevent the dough from sticking while you roll it out, sprinkle flour on the surface of the cutting board and on the dough. When pastry chef Federico Fernandez was showing me how to make sfogletella, a wonderful Italian pastry, for my YouTube Channel: Secrets of Restaurant Chefs, he used semolina instead of flour on the cutting board. 

I liked the idea of using the coarser semolina when I make pasta. I dust the cutting board with semolina, which is incorporated into the dough. I think it adds a nice texture. Less available than "00" flour, both are sold in Italian markets. (For a good description of the differences between "00" flour and semolina, please visit the website Farro.)

As with any dish, using the best ingredients improves the quality, so use the best eggs you can find. Chef Lane sources his from organic farms in the Seattle area like Stokesberry.

One day after I had rolled out the dough, I was distracted by a phone call. Before I realized it, more than half an hour had passed. When I returned to the kitchen, I discovered that the dough had dried slightly. The pasta that day was lighter, with a better bite. I added the air-drying step to my pasta making. I was very pleased when chef Lane noted that letting his dough dry was a key step for him as well.

Because the dough is fresh, the pasta cooks more quickly than dried pasta. On average, 5 minutes is sufficient, but taste the pasta after 3 minutes so it doesn't over cook.

I add freshly ground pepper and sea salt to the flour for added flavor, but that is optional.

When the pasta cooks in the salted water, it expands. What appears to be a small amount of dough on the cutting board will yield a much larger amount of cooked pasta.

To make larger yields, multiple the ingredients by the number of servings you want. However, for ease when rolling out the dough, I would advise working with an amount of dough equivalent to that made with 1 egg and 1/2 cup of flour.

The dough must be used the same day you make it. Once cooked, the pasta can be kept in an air-tight container to use the next day.

Prep time: 15 minutes

Waiting time: 45 minutes

Cook time: 5 minutes

Total time: 65 minutes

Yield: one entrée serving or two side dish servings

Ingredients

1 farm fresh egg

1/2 cup "00" flour + 2 tablespoons "00" flour or semolina to dust the cutting board and dough

1/8 teaspoon freshly ground black pepper (optional)

1/4 teaspoon sea salt (optional)

1 tablespoon kosher salt

Directions

1. Place the flour on the cutting board. Using a fork, make an indentation into the top of the mound to create a "volcano." Season flour with black pepper and sea salt (optional)


2. Remove the egg from its shell and place into the indentation.

3. Using the fork, swirl the egg into the flour until completely incorporated. Use the fork to scrape the wet dough off the cutting the dough.


4. Dust the wet dough with flour or semolina. Clean any dough off the fork. Use your hands to form the dough into a ball. Liberally sprinkling flour or semolina on the cutting board, roll the dough back and forth. Incorporate any dough that sticks to your fingers or the cutting board. Continue rolling the ball back and forth on the cutting board for 10-15 minutes. As chef Lane notes, "Really knead the dough a lot. You are not going to overwork it (like bread). In fact, it is more common to underwork it."

5. Wrap the dough in plastic wrap and allow to rest 30 minutes. If the weather is cool, leave the dough on the counter. If the weather is hot, place the dough in the refrigerator.


6. Unwrap the dough. Sprinkle flour or semolina on the cutting board. Using a rolling pin, flatten the dough and roll out, keeping the round shape by turning the disk of dough frequently. After rolling out the dough three or four times, flip it over, dusting the cutting board and the dough to prevent sticking. Continue rolling out the dough until it is paper thin.


7. Allow the rolled out dough to air-dry for 15-30 minutes.

8. Add kosher salt to water in a large stock pot. Bring to a boil.

9. Place a colander and a heat-proof cup in the sink.

10. Sharpen a chefs knife.

11. Lightly dust the rolled out, air-dried dough with flour or semolina, fold the circle of dough in half. Do not press the dough.


Dust again and fold a second time.


Dust again and fold a third time and then a fourth time until the folded dough is approximately 1" wide.


12. You can cut the pasta into any width you enjoy, remembering that the pasta will double in size in the boiling salted water.


13. After you have cut the dough into strips, lift the cut pasta and let fall onto the cutting board so the strands separate.

14. Place into the boiling salted water, using tongs to separate the strands. Cook 3-5 minutes. Taste after 3 minutes to confirm when the pasta is to your liking.


15. Drain in the colander, capturing 1 cup of salted pasta water in the heat-proof cup to use in making a pasta sauce.

16. Toss in the colander so the strands do not stick together and serve while hot.

Tuesday, September 19, 2017

A Lot of Veggies + A Little Protein Makes For a Massively Delicious Hearty Meal

I love meat. A big steak. Fried chicken. A rack of ribs. But I also love veggies. Carrots. Onions. Cabbage. Mushrooms. English peas. Spinach. Broccoli. Asparagus. When I want to prepare an easy-to-make meal, I turn to vegetables to help me out. Full of flavor, vegetables cook quickly and get a meal on the table without too much effort.

For today I'm going light on the meat and heavy on the vegetables and aromatics. The portion for each person (pictured below) uses only one chicken leg or thigh and one pork sausage. That small amount of animal protein will add a large amount of flavor that will grab on to the vegetable flavors and bundle them into umami deliciousness.
Vegetables You Love and one Chicken Leg (or Thigh) and one Sausage Per Person 

Sautéing the vegetables, chicken and sausage in seasoned olive oil adds flavor by caramelizing the outside. That lovely browning also removes some of the water, concentrating flavors.

The dish cries out for a starch. Since the recipe will create a sauce, serve the ragout with dumplings, steamed rice (brown or white), pasta or large croutons.
Use any vegetables you love. In many dishes, cutting vegetables into a small dice adds to the flavor but that makes the vegetables disappear. To create a hearty dish, cut the veggies into large pieces.

Pork sausage is best because the fats add more flavor than other sausages. For those who want to avoid pork, the sausage is certainly optional.

Skin on the chicken adds flavor.

The dish can be prepared ahead, even the day before and reheated.
Use cabbage, broccoli, asparagus, English peas, spinach, celery, corn kernels, quartered Brussel sprouts, green beans, slow roasted tomatoes finely chopped or any other vegetables you enjoy. The vegetables should have a crisp quality, so avoid over cooking. Leafy vegetables will cook more quickly, so delay adding them until the end or, if reheating, add those just before serving.

Only use green cabbage. Red cabbage will discolor the broth. Savoy cabbage has more delicate leaves and more flavor than does green cabbage.

Time to prepare: 20 minutes

Time to cook: 40 minutes

Total time: 60 minutes

Ingredients

4 large chicken legs or thighs, skin on, washed, pat dried

4 Italian pork sausages, washed, pat dried, cut into 1" rounds

1 large yellow onion, root and stem ends, outer two layers removed, washed, pat dried

4 large carrots, washed, root and stem ends, outer skin removed

2 cups green cabbage, preferably Savoy

3 cups mushrooms, preferably Shiitake, cleaned, pat dried, end of stems and dirt removed, thinly sliced

1 bunch spinach, washed to remove grit, drained, stems removed from leaves and finely chopped

1 clove garlic, washed, skin removed, finely minced (optional)

2 tablespoons extra virgin olive oil

Sea salt to taste

Freshly ground black pepper to taste

Pinch cayenne (optional)

Directions

If using large cabbage leaves, separate the delicate part of the leaves from the thick rib. Finely chop the rib into small bits. The delicate leaves and the finely chopped ribs will be cooked at different times.
Heat olive oil in large pot. Season with a dusting of sea salt, black pepper and cayenne (optional). Add chicken legs or thighs. Remove when lightly browned on both sides.

Add sausage rounds. Brown as with the chicken and remove.

Sauté onions, finely chopped spinach stems, finely chopped cabbage ribs and mushrooms until softened. Add browned chicken parts. Cover with water. Cover pot and simmer 30 minutes or until chicken is tender. Check every ten minutes and add water if needed to keep covered.

Add browned sausage rounds,  spinach leaves, cabbage leaves, carrot rounds, garlic (optional) and any other similar vegetables, like Italian parsley, broccoli or celery. Add water to cover if needed. Cover pot and simmer 10 minutes.

Add English peas if using in the last 2 minutes.

Taste and adjust seasoning if needed. If broth needs more concentrating, return the pot to high heat and reduce liquid until flavorful.

Serve hot with dumplings, steamed rice (brown or white), pasta or large croutons.

Saturday, October 15, 2016

Quick and Easy Mac & Cheese Goes Au Naturel

I remember the "blond" stage of cooking for our sons. White bread, spaghetti with butter and that store-bought, powdered flavorless Parmesan cheese and, of course, Mac & Cheese. We kept boxes of Kraft Mac & Cheese in the pantry so we could make the boys food whenever they wanted.

Once they graduated from high school and left for college, we stopped making Mac & Cheese. A few months ago, I was cleaning out the pantry and found a box pushed way to the back. I think it expired in 2007.

Last week we were invited to a pot luck dinner party. For no reason in particular, the dish we were to bring was Mac & Cheese.
As classic American dishes have gotten make-overs in the past decade, restaurants now serve Mac & Cheese with lobster, Dungeness crab, shrimp, truffles, artisanal cheeses, blue cheese, heritage bacon, gruyere béchamel sauce and gluten free pasta.

For the dinner party I wanted to make a Mac & Cheese that was close to the comfort food we served the boys with a few "adult" touches, but not so many that the dish lost it's identity.
I prepared the Mac & Cheese two ways. One, with charred shallots and kale added for color and texture. The second, I added slow roasted Roma tomatoes and thin sliced shiitake mushrooms along with the shallots and kale.

Mac & Cheese Au Naturel

To be "comforting," Mac & Cheese needs hot fats. Cheese alone won't be smooth enough, so I added heavy cream, whole milk and sweet butter. Not very dietetic but it tastes good. Serve the Mac & Cheese with a tossed green salad and fresh fruit for dessert and the calories will balance out.

For the cheese, use whatever kind you like. I used Kerrygold white cheddar and that worked well.

Serves 4

Time to prep: 20 minutes

Time to cook: 20 minutes

Total time: 40 minutes

Ingredients

1/2 pound small macaroni pasta
1/2 cup whole milk
1/4 cup heavy cream
1 tablespoon sweet butter
1/2 pound good quality white cheddar, shredded
1 cup kale, preferably curly green or purple Lacinato, washed, pat dried, leaves removed from rib and thin sliced
2 tablespoons shallots or 1/2 small yellow onion, washed, pat dried, skin and ends removed, thin sliced
1/2 cup homemade bread crumbs
2 large Roma tomatoes, washed pat dried (optional)
1/2 cup shiitake, brown or portabella mushrooms, washed, pat dried, thin sliced (optional)
1 tablespoon kosher salt
1 tablespoon canola oil
Sea salt and black pepper to taste.
Pinch cayenne pepper (optional)

Directions

1. If using Roma tomatoes (optional), preheat oven to 200F. Cut each tomato in half, slicing from top to bottom. Place on a baking sheet lined with a Silpat sheet or parchment paper. Place in oven. Roast eight hours. Remove. Let cool. Remove and discard skins. Refrigerate until ready to use.
2. Bring 1 gallon water with kosher salt to a boil. Add pasta. Stir well. Cook 8 minutes. When draining pasta, reserve 1 cup salted pasta water. Toss pasta and set aside.

3. Place a carbon steel pan or a sauté pan that can take high heat (not a non-stick pan) on the burner. Char the shallot or onion slices in a few drops of oil. Remove when edges are blackened being careful not to burn. Remove. Set aside. Do the same with the kale. Char but do not blacken. Remove. Set aside. If using mushrooms (optional), add a few drops of oil to the hot pan. Char but do not blacken. Remove. Set aside.

4. Melt butter in carbon steel or sauté pan. Add milk and heavy cream. Stir well. Season with sea salt and black pepper to taste.

5. Pre-heat oven to 350F.

6. Break apart cooked macaroni and add to pan. Stir well to coat. Simmer 5 minutes.

7. Add charred shallots or onions and kale. Stir well. If using slow roasted Roma tomatoes, fine chop and add to pasta along with charred mushrooms.

8. Transfer cooked pasta to large bowl. Add shredded cheese. Toss well. If more sauce is desired add 1/4 cup pasta water, remembering that it is salty so use sparingly.

9. Transfer to decorative baking dish. Top with bread crumbs. Bake 20 minutes or until cheese is gooey and bubbling. Serve hot.


Pickle Me Up! It's Thanksgiving!

Pickles are delicious anytime of the year. For Thanksgiving they are especially good. Their crunch and acidity counterbalances the delicious...