Friday, June 17, 2022

Fish, Nothing But the Whole Fish - Encased in Kosher Salt

Hard to believe but the easiest way to cook a whole fish is to roast it encased in a dome of kosher salt. 


Cocooned inside its salt blanket, the protein rich-fish cooks in its own juices. The technique is very low-tech. No fancy machines or tools required. All you need is kosher salt and water.


Some recipes call for egg whites and water to moisten the salt, but from my experience, water alone works perfectly. After the fish has cooked inside the coating of moistened salt, crack open the hardened salt and use a fork to effortlessly peel back the skin. A chef’s knife easily separates the meat from the bones.


When creating the salt coating, it is important to use kosher salt. Do not use table salt and definitely do not use salt that has been treated with iodine, which has an unpleasant minerality. Personally, I prefer Diamond Crystal kosher salt because it is additive-free.


When you buy the fish, ask to have the guts and gills removed but there is no need to have the fish scaled because the skin will be removed before serving. If the only whole fish available in your seafood market is larger than you need, a piece without the head or tail can still be used. To protect the flesh, place a small piece of parchment paper across the cut end, then pack the moistened kosher salt on all the sides to completely seal the fish.


Even though the fish is cooked inside salt, the flesh never touches the salt. The result is mild tasting, moist, delicate meat.


After removing the salt-roasted fish from the oven, let it rest on the table on a heat-proof trivet. The sight of the pure white mound, warm to the touch and concealing a hidden treat is a delight. Before serving, take the fish back into the kitchen to remove the salt casing, head, tail. skin and bones.


What kind of fish to use?


So far I have used the technique on trout, salmon, sea bass, salmon trout and pompano with equally good results. 


Choose a fish that is as fresh as possible, with a clean smell and clear eyes. When you press the body, the flesh should spring back. Cooking time is roughly 10 minutes per pound but will vary depending on the size and thickness of the fish.


In general, a whole fish weighing 3 to 5 pounds will require a three-pound box of kosher salt.  Since that is an estimate, it is a good idea to have a second box of kosher salt on hand. 


Salt-Roasted Fish

Use only enough water to moisten the kosher salt so the grains stick together. Too much water will create a slurry, which will slide off the fish. Because kosher salt is not inexpensive,  use only as much as you need. A quarter-inch coating around the fish is sufficient. 


Placing herbs and aromatics inside the fish’s cavity can impart flavor and appealing aromas when the salt dome is removed. Sliced fresh lemons, rosemary sprigs, parsley, cilantro, bay leaves or basil all add to the qualities of the dish but discard before platting.


Depending on the density of the flesh, generally speaking, one pound of fish requires 10 minutes of cooking at 350 F. 


The mild fish can be served with a tossed salad, pasta, rice or cooked vegetables. The fish goes well with freshly made tartar sauce, salsa verde, pesto, romesco, chermoula or pico de Gallo.


Prep time: 10 minutes


Cooking time: 30 minutes if the fish weighs 3 pounds, 50 minutes if the fish weighs 5 pounds


Resting time: 5 minutes


Total time: 45 or 65 minutes depending on the size of the fish


Yield: 4 to 6 servings depending on the size of the fish


Ingredients


1 whole fish, 3 to 5 pounds, with the head and the tail, cleaned and gutted but not necessarily scaled


1 3-pound box kosher salt, preferably Diamond Crystal kosher salt


½ to 1 cup water


2 cups fresh aromatics and lemon slices (optional)


Directions


1. Preheat oven to 350 F.


2. Wash the fish inside and outside. Pat dry and set aside.


3. Pour 2 pounds of the kosher salt into a large bowl. Moisten with ½ cup water. Mix with your fingers.  If needed, add more water a tablespoon at a time until the salt sticks together.


4. Select a baking tray that is 2 inches longer and wider than the fish. Line with parchment paper or a Silpat sheet.


5. Place a third of the moistened salt on the bottom of the lined baking tray.


6. Lay the whole fish on top of the salt. Place aromatics and lemon slices inside the fish, if desired.


7. Carefully mold the rest of the moistened salt over the entire fish. If more salt is needed, moisten an additional amount of salt.


8. Place the baking tray into the pre-heated oven.


9. After 30 minutes for a 3-pound fish and 50 minutes for a 5-pound fish, remove the baking tray from the oven and allow the fish to rest for 5 minutes.


10. Using a chef’s knife, slice into the salt dome on the back side of the fish, along the fin line. Make another slice on the bottom of the fish. Lift the salt dome off the fish and discard. Using the knife, make a cut across the gills and the tail. Insert a fork under the skin and lift the skin separating it from the flesh.


11. Have a serving platter ready. Using the flat side of a chef’s knife, slide the blade between the flesh and the skeleton along the fin line. Separate the flesh from the bones. Try as best you can to keep the entire side of the fish intact, but no worries if the flesh comes off in several pieces. When you place the flesh on the serving platter, you can reassemble the fillet.


12. Turn the fish over and repeat the process on the other side.


13. Discard the head, tail, bones and skin. 


14. Serve the fish at room temperature with sauces of your choice and side dishes.

So delicious. So easy to make.

And email me photographs of YOUR FISH when you make it.

Enjoy!


Thursday, June 16, 2022

A Mother's Day Treat Now a Father's Day Special - Broiled Lobster

My mother loved lobster. For Mother's Day we would pick her up from her apartment and drive to Little Saigon  to Dong Khanh a restaurant an hour south of Los Angeles. With our cousins and sons, we would order a dozen dishes and eagerly turn the lazy Susan in the center of the large table so we could sample all the dishes.


My mother's favorite was the salt and pepper stir fried lobster. Picked from the salt water tank, the lobster would be paraded to the table for our approval, then it was walked to the small kitchen in back to be transformed into that wonderful dish.


Cooked in the shell, eating the lobster took a lot of work. But the sauce was so fragrant and tasty, we didn't mind. And mother, always a gnawer of bones, would gleefully take her time, making certain she enjoyed every last drop of sauce and all the tender sweet lobster meat.

It's difficult to think that my mom passed away sixteen years ago. She seems very much alive in my memory. Unfortunately, Dong Khan closed years ago. So, life as we all know, moves on.

Truthfully, I loved the lobster at Dong Khan as much as she did. When I was growing up, fresh lobster was an occasional restaurant treat. Dipping big chunks of lobster tail in the hot, melted butter was one of my first culinary epiphanies.

At home, I make oven roasted lobsters topped with bread crumbs and sweet butter. Prepping the lobsters takes a bit of time but the result is well worth the effort.

Oven Roasted Lobsters

Many supermarkets have live lobsters. If you live near an Asian market, live lobsters are usually available along with a variety of other live seafood. Some markets will clean the lobsters without charge. In which case, you will only have to prep the individuals parts as described below.

For this recipe, because the claw shells need to be cut open, smaller lobsters 1 1/2 pounds each are preferred. Add a grilled steak and you'll have Surf 'n Turf. With a salad and a side vegetable like salt boiled broccoli, that is a beautiful meal. Dessert can be a fresh fruit salad and a nice chocolate eclair.  It all depends on what the "dad" in your home loves.

The day ahead, the lobsters can be prepped and refrigerated covered with plastic wrap (not aluminum foil) and final cooked in the broiler just before serving.

Serves 4

Prep Time 30 minutes

Cooking Time 10 minutes

Total Time 40 minutes

Ingredients

4 1 1/2 pound live lobsters
1 cup bread crumbs, preferably home made
1/2 cup Italian parsley, washed, pat dried, finely chopped stems and leaves
2 tablespoons sweet butter
1 teaspoon olive oil
Sea salt to taste
Black pepper to taste

Directions

When you bring home the live lobsters, place them in the kitchen sink. Run water on them to cool them off. Do not submerge them in water. They live in salt water and fresh water will kill them.

Put 3" water into a large, tall stock pot. Place on stove with the burner on high. Cover. Bring water to a boil.

Preheat oven to broil or to the highest temperature possible.

Heat a sauce pan on a medium flame. Add olive oil, season with sea salt and black pepper. Add Italian parsley and mix well. Sauté until lightly browned. Add bread crumbs. Stir together and sauté until lightly browned. Set aside.


If the pot is not large enough to handle all the lobsters at once, do them one or two at a time. Pick the lobster up by the body and place the head into the boiling water. Hold it there for a minute. Cover and cook 2 minutes. Lift cover. 

Using tongs lift the lobster up and flip it over in order to submerge the lobster tail into the boiling water. Cover and cook another 3 minutes.

Using tongs, transfer the now red lobster to the kitchen sink. Run cold water over the cooked lobster. Continuing cooking the lobsters until all 4 are cooked.

If you want to make stock, which is a good thing to do, reserve the cooking water and add the shells after your meal, simmering the shells until the liquid is reduced by half, then strain out the shells and discard. The stock can be reserved in air tight containers and frozen for later use.


When the lobsters are cool to the touch, using kitchen shears, cut off the rubber bands on each of the claws.

Working with one lobster at a time, place a lobster into a large bowl. Wear gloves if you want and be careful when you are working with the lobster that you do not cut your hands on the sharp parts of the lobster's body.

Twist off the claws at the body. Place them in the bowl. Twist off the tail and the flippers at the tail. Place them in the bowl. Place the body with the open side up in the bowl. Using the kitchen shears, cut the lobster tail in half. In the sink, rinse off the tail. Remove the black vein and discard.

If you enjoy the savory bits inside the body--which I do--pour them into a bowl. Personally, I discard the black egg sack and reserve the green tomalley, which is delicious. The video shows how to serve the tomalley on toast with avocado.


But if you are not into those flavors, simply wash out the body in the sink and run the disposal to get rid of the bits that will be redolent if they linger.

Using the kitchen shears, cut the body in half, so there are legs on each side. Continue to wash and clean the half-bodies to remove any residual parts of the egg sack or tomalley.

Separate each claw from its sections. Separate each of the sections.

Using the kitchen shears, remove half of the shell of each claw. Cut off the top of the shell from each of the sections.

Line a baking pan with parchment paper, a Silpat sheet or aluminum foil.

Place the tails, claws, sections and bodies onto the prepared baking pan, cut side up.

At this point, the prepped lobsters can be covered with plastic wrap (not aluminum foil) and refrigerated to cook the night before or in the morning. Remove the baking pan of lobsters from the refrigerator an hour before serving.

Spoon the seasoned bread crumbs onto the cut sides. Slice 1/8" pieces of sweet butter and place on top of the bread crumbs.


Place the baking sheet into the oven. Cook 4-5 minutes, checking to be careful the bread crumbs do not burn.

The sweet butter will melt, flavoring the bread crumbs and lobster meat.

Serve hot with a salad, side dishes and an ice cold beverage.

Tuesday, May 24, 2022

For a Taste of Italy and Spain, Travel to Your Kitchen

Getting ready to travel to Italy next week, I remembered my last trip three years ago, a few weeks before the world changed and my overseas travel was limited to webinars and Instagram posts. In the fall of 2019, I visited Piedmont and Milan. 

Walking one day in the courtyard of the Duomo, that wonderful cathedral in the heart of Milan, and the next day descending hand chiseled stairs that led down to an Infernot where farmers stored produce and later wine. 

Before the discovery of the New World, Italian farmers in the Piedmont were digging deep into the sandstone underneath their homes in their own exploration of discovery, building rooms where men gathered to eat, talk and drink wine. All they lacked was air. Without a ventilation system, once the air was used up, the men rushed up those hand chiseled stairs before they passed out.

On that trip, I ate local cheeses, charcuterie, bagna cauda (an anchovy-garlic dip), spaghetti with clams, and so many dishes that made me very happy. When travel was not possible, I satisfied my "hunger" for all things Italian by cooking foods that reminded me of Italy. Last night I made pasta with Italian sausage, butter clams, vegetables and a touch of sweet butter. 

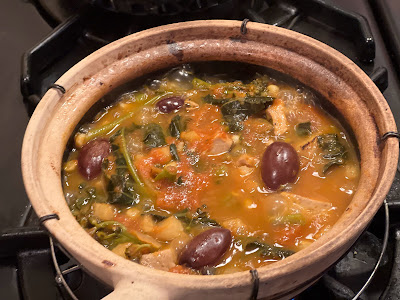
For my wife, who doesn't eat meat, I used a Chinese clay pot to make braised tofu with vegetables, the Spanish spice pimeton and San Marzano tomatoes D.O.P. That brought together China, Spain and Italy in a one pot dish.

For myself, I use bone-in chicken thighs and legs instead of tofu. Where the recipe says tofu, substitute 2 chicken thighs and 2 chicken legs.

Hot Pot Braised Tofu with San Marzano Tomatoes, Vegetables, Olives and Noodles

The cans of San Marzano Tomatoes I was gifted (see at the end, below) had enough tomatoes and sauce for several dishes. What I didn't originally use, separating sauce from tomatoes, I froze in 6 oz and 8 oz containers. Because our sons are fully grown, I cook for two. Whenever I have too much of an ingredient, I place small containers in the freezer, available when I want to create a dinner or lunch.

The San Marzano Tomatoes and sauce froze and reheated with no loss of flavor. 

Clay hot pots are available in Asian markets. Inexpensive, they require a bit of special care. Before using, each time, submerge the clay pot into clean water for 15 minutes. Purchase a wire trivet that you'll place on the stove-top burner. The clay pot goes on top of the wire trivet. Only use a low to medium flame to avoid stressing the clay. Allow the pot to cool before washing to avoid cracking.

If you can find only small clay pots, use two to prepare this dish.

Serves 4

Time to prepare 15 minutes

Time to cook 45 minutes

Total time: 60 minutes

Ingredients

1 cup yellow onions, washed, peeled, roughly chopped

1 cup carrots, washed, ends removed, peeled, roughly chopped

1 cup daikon, washed, ends removed, peeled, roughly chopped

1/2 cup corn kernels, cut off the cob (when available)

1 cup broccolini or broccoli, stems roughly chopped, leaves whole and florets sliced into bite sized pieces

2 cups tofu, preferably firm and organic, washed, cut into bite sized pieces

1 cup San Marzano tomatoes D.O.P., roughly chopped

1/2 cup San Marzano tomato sauce, D.O.P.

2 cups homemade vegetable stock, if none available, use water

1 cup green or black olives, preferably olives with pits

1 pound noodles, dried or fresh

1/2 tablespoon pimeton

Sea salt and freshly ground black pepper to taste

Directions

Heat olive oil in hot pot over medium heat. 

Saute onions until lightly browned.

Add tofu, lightly brown and stir well.

Add pimeton and stir well. Don't burn the spice.

Add carrots, daikon and corn. Stir after each ingredient is added.

Add broccolini or broccoli stems. Stir well and cook to soften.

Add broccoli or broccoli leaves. Sir well.

Add chopped tomatoes and tomato sauce, if frozen, no need to defrost.

Add vegetable stock, if frozen, no need to defrost. If stock unavailable, use water.

Add olives, cover and simmer 30 minutes.

While the tofu is braising, bring a pot of salted water to boil and cook noodles according to the package. 10 minutes if dried, 2-3 minutes if fresh. Drain and set aside.

Remove cover and add cooked noodles.

Stir well to mix together tofu, vegetables and noodles.

Serve hot in bowls.

Please send me recipes and photographs when you make your delicious dishes using Pomodoro San Marzano Dell'Agro Sarmese-Nocerino D.O.P. and I will submit your recipe to enter a contest to win a gift basket of these wonderful D.O.P. San Marzano tomatoes.


The tomatoes I used were provided courtesy of the Consorzio di Tutela del Pomodoro San Marzano dell’Agro Sarnese-Nocerino DOP and ANICAV.

Monday, May 23, 2022

San Marzano Tomatoes Make a Best-Ever Vegan Soup

"You say tomato, I say tomato" say Ella Fitzgerald and Louis Armstrong in their classic song about lovers who can't even agree on how to pronounce everyday words like "tomato" and "potato." But today pronunciation isn't the only issue when it comes to "tomato."

Recently, I was brought up-close-and-personal with a controversy that is raging in the culinary world. 

When is a San Marzano tomato a real San Marzano tomato? 

Widely regarded as the best-of-the-best, low-acid San Marzano tomatoes are so prized they have been given a D.O.P. designation along with Italy's other prized food products like Basilico Genovese, Acute Balsamic di Reggio Emilia and Grand Padang cheese, to name a few. 

Officially the tomatoes are called Pomodoro San Marzano Dell'Agro Sarmese-Nocerino D.O.P.   "D.O.P" means "Denominazionedi Origins Protetta" or "Protected Designation of Origin." In the EU, if a can of tomatoes says "San Marzano," the D.O.P. seal must also be visible on the label to confirm that the tomatoes and sauce inside are guaranteed to have been grown in San Marzano and harvested and packaged according to the designation (more about that later).

That seems simple enough. If the label says "San Marzano," then it must be "San Marzano D.O.P." But not so fast. 

In the United States, "D.O.P." has no meaning. U.S. domestic producers can say "San Marzano" if the seeds are from that tomato strain. So it's buyer beware. If you want a San Marzano experience in the U.S., look for "D.O.P." 

Why are San Marzano tomatoes so highly regarded?

Grown within sight of Mount Vesuvius in the Agro Sarnese-Nocerino region near Naples, the tomatoes develop their delicate flavor, sweetness and low-acidity in the rich volcanic soil, under the ever-present southern Italian sun. To receive the D.O.P designation, the tomatoes must also be handpicked, steamed, peeled and combined with sauce made from San Marzano tomatoes. 

At the Wednesday Santa Monica Farmers Market, one enterprising farmer had identified his fresh tomatoes as "Sanmarzano." He might have found San Marzano seeds, but his Southern California tomatoes do not have the benefit of the Agro Sarnese-Nocerino terroir. 


The tomatoes are always packaged whole. If you see a label that says San Marzano "cherry tomatoes" or "diced tomatoes," that product might be of good quality but if you want a D.O.P. experience, look for that D.O.P. 

To purchase San Marzano D.O.P. products, search online. I found authentic products on Amazon, Supermarket Italy, Etaly and other online retailers and even many supermarkets like Ralph's and Von's as well as Italian shops and specialty food stores. Try Cost Plus World Market as well.

Please send me recipes and photographs when you make your delicious dishes using Pomodoro San Marzano Dell'Agro Sarmese-Nocerino D.O.P. and I will submit your recipe to enter a contest to win a gift basket of these wonderful D.O.P. San Marzano tomatoes.


The tomatoes I used were provided courtesy of the Consorzio di Tutela del Pomodoro San Marzano dell’Agro Sarnese-Nocerino DOP and ANICAV.

San Marzano Tomatoes-Garbanzo Bean and Vegetable Soup

I knew about San Marzano tomatoes but had never cooked with them because I have used my own roasted tomatoes and tomato sauce. When I was offered several cans of San Marzano tomatoes, I was very happy. I quickly made a favorite recipe, tomato-garbanzo bean and vegetables soup. The result was excellent. The tomatoes thickened the soup and added a layer of flavor that made me a fan.

Please try my recipe and track down authentic San Marzano tomatoes D.O.P. Enjoy!


Cut all vegetables into pieces the size of a garbanzo bean.

Use homemade stock. I keep my vegetable stock in the freezer so its available whenever I want to make soup.

Serves: 4

Time to Prepare: 30 minutes

Time to Cook: 60 minutes

Ingredients

1 medium carrot, washed, peeled, ends trimmed

1 small yellow onion, washed, peeled, ends trimmed 

2 cups kale, washed, stems removed

1/2 cup corn kernels (when in season)

1/2 cup Italian parsley, washed, stems removed

1/2 cup celery hearts and small leaves (celery hearts have more flavor)

1 cup broccoli florets, washed

2 cups green cabbage, preferably Savoy, ribs removed and chopped separately from leaves

6 shiitake mushrooms, washed, pat dried

1 cup canned garbanzo beans with liquid 

2 cups San Marzano tomatoes and sauce 

4 cups stock, preferably homemade

2 oz cheese rind (optional)

2 tablespoons olive oil

Sea salt and freshly ground black pepper to taste

Directions

Season olive oil with sea salt and pepper and heat over a medium flame.

Add all vegetables except the garbanzo beans and liquid and San Marzano tomatoes and liquid.

Stir well and soften. Do not brown. 10-15 minutes.

Add garbanzo beans with liquid and stir.

Add San Marzano tomatoes and sauce and stir.

Add stock and stir.

Add cheese rind (optional).

Simmer uncovered 30 minutes.

Taste and adjust seasoning and continue simmering if needed.

Served hot with crusty bread and a tossed green salad

Friday, April 15, 2022

Devil Your Eggs for Easter or Anytime

After two weeks in New York City and the Jersey Shore, Spring weather was all over the place. Freezing cold, rain, sunny skies, gloomy grey skies and then gradually warming. Now I'm home in Pacific Palisades and the weather is ideal. A clear blue sky with a crispness in the air where we are close to the beach. 

For Passover and Easter, the forecast is good for fun, happy, family celebrations. For me, that's a good time to make deviled eggs, always a food-favorite at any meal.


What’s Easter without Easter eggs? Hide them. Roll them. And, best of all, eat them. Of the many dishes associated with Easter, deviled eggs have always been high on the list. Traditional deviled eggs are delicious but with some adventuresome spices, all those left-over hardboiled Easter eggs become devilishly delicious.

Our fingers stained blue, red and yellow, my sister and I loved dyeing and decorating Easter eggs. Ultimately our mother turned our colored eggs into deviled eggs with a simple recipe: peel and slice open the eggs, chop up the yolks, add a bit of mayonnaise and season with salt and pepper, then spoon the mixture back onto the egg white halves.

When we were kids that seemed good enough. But for my adult palate, deviled eggs needed spicing up. With experimentation, I discovered that hard-boiled eggs are a great flavor delivery system because they provide a solid, neutral base of flavor to which exciting flavors can be added.
Doing something as simple as adding cayenne or Mexican chili ancho powder gives the mild-mannered eggs a mouth-pleasing heat. Sweeten the flavor up a notch by stirring in finely chopped currants or borrow from Indian cuisine and mix in curry powder that has first been dry roasted in a sauté pan.
Turn the eggs into an entrée by mixing in freshly cooked shellfish. Grill shrimp or steam a few Dungeness crab legs, finely chop the savory meat and add to the yolk mixture. The result is elegantly flavorful.
This year I’m using a Mediterranean approach. Capers add saltiness and Italian parsley adds freshness. Finely chopped and sautéed anchovy filets are the secret ingredient that takes deviled eggs to another level.
Cut into quarters or halves, the deviled eggs make a visually arresting presentation. 
Caper and Anchovy Deviled Eggs
Always worth mentioning, using quality ingredients improves any dish. Nowhere is that more true than with deviled eggs. Use farmers market fresh eggs, quality capers preserved in brine and good anchovy filets. 
The easiest way to fill the egg white sections is with a disposable pastry bag. If one is not available, use a spoon to scoop up filling and a fork to distribute it into each egg white half.
The eggs and filling can be prepared the day before or in the morning. To keep them fresh, the eggs should not be filled until just before serving.
If desired, add a touch of heat with a pinch of cayenne. 
Prep time: 5 minutes
Cook time: 20 minutes
Assembly time: 15 minutes
Total time: 40 minutes
Yield: 4 servings
Ingredients
6 farm fresh eggs, large or extra large, washed
4 anchovy filets, finely chopped
1 tablespoon Italian parsley, washed, pat dried, finely chopped
1 teaspoon capers, finely chopped
2 tablespoons mayonnaise
Sea salt and freshly ground black pepper to taste
Pinch cayenne (optional)
Directions
1. Submerge the eggs in an uncovered saucepan of cold water. Heat the uncovered pot on a medium-high flame. Bring to a simmer and boil five minutes. Turn off the flame, cover and leave the eggs in the hot water 10 minutes. Drain the hot water. Add cold water to cool the eggs.
2. While the eggs are cooking, heat a small sauté or nonstick frying pan over a medium flame. No need to add oil. Sauté the anchovy filets until lightly brown. Set aside.
3. Peel the eggs. Discard the shells. Wash and dry the eggs to remove any bits of shell. Using a sharp paring knife, carefully slice the eggs in half, lengthwise. Remove the yolks and place into a bowl. Set aside the egg white halves.
4. Using a fork, finely crumble the yolks. Add the Italian parsley, capers and sautéed anchovy bits. Stir together all the ingredients. Add mayonnaise and mix well until creamy.
5. Spoon the filling into a disposable pastry bag. If serving the next day or later in the morning, place the egg white halves into an air-tight container and the filled pastry bag into the refrigerator.
6. Prepare a serving dish. The deviled eggs can be served as quarters, halves or reformed as whole. If quarters, cut each halve in two lengthwise. Just before serving the eggs, cut off the tip of the pastry bag. Have a paring knife or fork in hand. Carefully squeeze a generous amount of the filling into each egg white piece. If needed, use the knife or fork to tidy up the filling on each egg. Any leftover filling should be eaten on crackers as a chef’s treat.
7. As the eggs are filled, place them on the serving dish and garnish with Italian parsley or arugula. Serve cold.


Thursday, February 10, 2022

The Super Bowl Needs Super Food

These are my favorite Super Bowl recipes. I've posted them before. I'm posting them again. Enjoy the Game.

If you've watched teams do battle all year, not knowing which teams will make it to Sunday's Super Bowl, the match-up of the Los Angeles Rams and the Cincinnati Bengals is either your bucket-list-dream matchup or a big disappointment.

Since I live in LA, you can guess how I feel.

For the Game, I'll make favorites that can stand the test of time. Pork ribs and Vietnamese-style chicken wings. Delicious hot or room-temperature, I can serve them at half-time and any that are left will be delicious at game's end.

Kimchi Chicken Wings

Chicken wings are sold whole, the drumstick only or the two-bone part. If you prefer one part of the wing over another, buy only those. The whole chicken wing will be less expensive and the wing tips can be roasted and used to create stock.

I cut up the wings because the whole chicken wing is too difficult to eat. 


When you can, find preservative-free kimchi. I have been enjoying Mommy Boss napa cabbage kimchi. Read the label carefully because there are different kinds of kimchi, I would recommend only using cabbage kimchi without dried shrimp.

Serves 4

Time to prepare: Marinate overnight, prep 20 minutes, bake 60 minutes

Ingredients

2 pounds chicken wings

1 cup kimchi, without preservatives

1/2-3/4 cup brown sugar, depending on taste

1 medium yellow onion, washed, pat dried, peeled, root and stem removed, thin sliced from root to stem

1/4 cup kimchi liquid

1 tablespoon olive oil

Directions

Thinly slice kimchi and mix together with onion slices, brown sugar, kimchi liquid and olive oil.

Add chicken wing parts to marinade. Mix well. Place in a covered bowl or sealed plastic bag. Refrigerate over night.

Preheat oven to 350F.

Prepare a roasting pan. Line the bottom with aluminum foil. Because the drippings are sticky (and delicious!) I place a Silpat sheet on top of the aluminum foil so I can easily retrieve the delicious bits of caramelized onions and kimchi. Place a wire on top of the aluminum foil and Silpat sheet.


Place the chicken wings on top of the wire rack, allowing space between each part to allow for even cooking. Reserve the liquid marinade with the onions and kimchi.

Place wings into preheated oven.

While the wings are roasting, place the reserved marinade into a small sauce pan and reduce the liquid by 1/2 over a low heat.

Remove wings from the oven after 30 minutes.

Turn wings over and baste with reduced marinade, placing onion and kimchi slices on each wing.

Return to oven.

After 30 minutes, remove and check for doneness. The onions and kimchi slices should be lightly browned and beginning to crisp. The wings should be tender. If not, return to oven and continue baking. Check every 10 minutes for doneness.

Serve hot as an appetizer or on top of steamed rice. The wings are delicious at room temperature, perfect for a picnic. However they are served, have a good supply of napkins available.

Slow Roasted, Brown Sugar Pork Ribs
My mother taught me to make pork ribs with a thick coating of sauce sweetened with brown sugar and raisins. Eating those finger-licking ribs was one of my favorite childhood memories.
Everything changed on a busy research trip to Abilene and Fort Worth, when I ate at 25 restaurants in 36 hours. I fell in love with West Texas BBQ.
At restaurant after restaurant, I watched grill masters lay bundles of mesquite into their subcompact-car-sized smokers. With the heavy metal doors open, the wood crackled as flames enveloped the logs The grill masters seasoned their racks of pork ribs with thick, grainy coats of brown sugar and spices rubbed onto the meat.  Waves of dry heat radiated from the smokers. But the heat that would cook these ribs would come not from an open fire but from smoldering mesquite embers.
When the doors were closed, the blazing logs were starved of oxygen. The flames died and a delicate smoke filled the air. At that moment the grill masters loaded in the racks of ribs coated with sweetened dry rub. Hours later, the ribs were removed, their outer coating thickened to crispness, creating what grill masters call “bark.”
I loved those ribs even more than the ones from my childhood.
At home, without the benefit of a smoker, I experimented for years to duplicate that sweet-crispness. Nothing could ever recreate the wonderful mesquite smokiness but I did succeed in making ribs with bark as good as any I enjoyed in West Texas.

High heat versus slow cooking

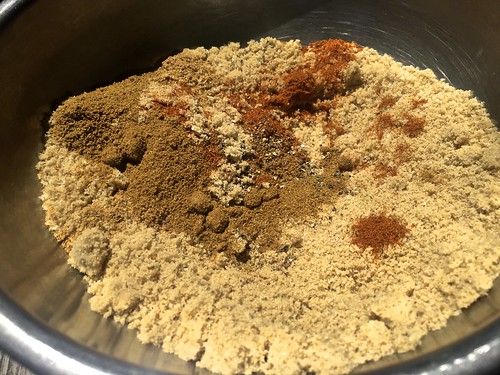
Mix of kosher salt, black pepper, brown sugar, cumin, coriander and cayenne for dry rub slow roasted pork ribs. Credit: Copyright 2016 David Latt

Mix of kosher salt, black pepper, brown sugar, cumin, coriander and cayenne for dry rub slow roasted pork ribs. 

Cooking with high heat is exciting. There is great pleasure in watching the pyrotechnics of an outdoor grill as sizzling fat catches fire.  Roasting at low heat in the oven lacks that excitement.
And yet, what happens in an oven set at 250 F has its own kind of magic. In the darkness of the oven, the waves of steady heat melt the fat inside the rack, tenderizing the meat and gently fusing the dry rub to the outside of the ribs.
The best magic of all is that the oven does the work. No standing over a blazingly hot grill on a hot day. Once the oven door closes, there is nothing to be done.
Walk into the kitchen and a savory-sweet aroma scents the air. Pull the baking tray out of the oven and press a finger against the outside of the rack. The soft pliancy of the meat has been replaced by a jerky-like crust as sweet as a crème brulee topping.

Slow-Roasted, Dry-Rubbed Pork Ribs

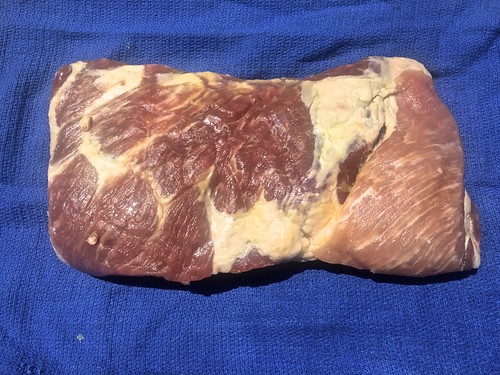
Rack of pork ribs, trimmed. Credit: Copyright 2016 David Latt
Cooking time depends on the size and thickness of the rack.
Buy good quality pork. Asian and Latin markets are often a reliable source of fresh pork products. Unlike the ribs sold in upscale supermarkets, the ribs in these markets will most likely be untrimmed.
Above the actual ribs, the rack will have a top portion with boneless flap meat and a section with thick bones similar to country style ribs.  Another smaller piece of flap meat will stretch across the back of the rib bones.
Requiring only a sharp filleting knife and a few minutes, removing the flap meat and the top portion is not difficult. The flap meat is excellent to use in stir fries, slow roasted in the oven or grilled on the BBQ.
A white membrane is attached to the outside of the flap meat. Use a sharp filleting knife to separate the meat from the membrane and discard.
The flap meat and country style bones can be prepared in the same manner as the ribs.  They will cook more quickly and should be removed from the 250 F oven after a total of 2 to 3 hours depending on thickness.
While the rack of ribs does not have to be turned over, the flap meat and country style bones should be turned over after one hour for even cooking. After another hour, use kitchen shears to cut off a small piece of meat to test for doneness. Return to the oven if the meat is not yet tender.
To eat the country style ribs, have a sharp paring knife handy to help cut out those hard to reach tasty bits tucked between the bones.
The ribs can be cooked ahead and reheated. In which case, do not cut apart the ribs until ready to serve. Reheat in a 300 F oven for 15 minutes.
Prep time: 30 minutes
Cooking time: 6 to 8 hours
Resting time: 5 minutes
Total time: 6 hours, 35 minutes to 8 hours, 35 minutes
Yield: 4 servings
Ingredients
1 rack pork ribs, 4 to 5 pounds, washed, dried
3 cups brown sugar
2 tablespoons kosher salt
2 tablespoons freshly ground black pepper
¼ cup cumin
¼ cup coriander
½ teaspoon cayenne (optional)
Directions
1. Place a wire rack in the middle of the oven. Preheat to 250 F.
2. Select a baking pan or cookie sheet that is 2 inches longer than the rack of ribs. Cover the pan with aluminum foil for easy clean up. Place a wire rack on top of the aluminum foil.
3. Lay the rack of ribs on a cutting board, bone side up. Use a sharp filleting knife to remove the tough membrane on the bone side of the rack. Let the knife help you lift the membrane. Use your fingers to pull the skin off the bones and discard.
4. Do not cut off any fat.
5. In a bowl, mix together dry ingredients.
6. For easy cleanup, lay a sheet of plastic wrap on the cutting board. Place the rack on the cutting board. Layer a thick coat of the dry spices onto both sides, covering the meat and bones.
7. Reserve left-over dry rub in an air tight container and refrigerate for later use.
8. Carefully place the rack of ribs on the wire rack meat side up.
9. Put the baking sheet into the preheated oven.
10. Roast six hours. Remove from oven. Use kitchen shears to cut off a small piece and taste.
11. The outside should have a jerky-crispness. The meat inside should be moist and tender. The tapered end of the rack where the bones are small will cook faster than the rest of the ribs. Use the kitchen shears to cut off that section before returning the rack to the oven for another one-two hours. Be careful not to dry out the meat.
12. Once the ribs are cooked, remove from oven and let the meat rest five minutes.
13. Cut between the rib bones and chop into pieces any flap meat without bones. Serve hot with a green salad, Cole slaw, baked beans or freshly steamed vegetables.
 

Ready, Set, Prep: Careful Planning Makes Thanksgiving Day a Lot More Fun

Thanksgiving was my mother's favorite holiday. She loved the food, the gathering of friends and family and the positive outlook of a hol...