Inspired by California-Mediterranean cuisines and farmers markets, I cook healthy, flavorful dishes that are easy-to-prepare yet elegant. I write for Zester Daily, One for the Table, Luxury Travel Magazine, Huffington Post & New York Daily News. My latest Amazon eCookbook is 10 Delicious Holiday Recipes. My handcrafted chocolates are available at www.dchocolates.com.
"Subscribe via email" and you'll get an email whenever I post a new recipe.
We are planning a Super Bowl Sunday party. My plan is to serve "picnic" food. Carrot salad, potato salad, Little Gem green salad, Persian salad, crispy fried chicken, brown sugar salmon and roasted artichokes.
Super Bowl Sunday food should be fun, delicious and healthy.
Spring is happening and artichokes are showing up in our farmers markets. The dark green vegetable, prized by cooks, is healthy and easy-to-prepare.
Looking at an artichoke, with its hard exterior and sharp pointed leaves makes me wonder how anyone figured out they would be good to eat. With a small amount of effort, that tough looking exterior gives up the wonderfully savory flavor bits at the end of the each leaf.
Choosing a good artichoke
Whether you find one that is the size of your hand or a larger one the size of a soft ball, give it a squeeze. If the artichoke feels solid, you've found a good one. An artichoke past its prime will be squishy like a child's squeeze toy. Make sure all the leaves are green. Don't buy an artichoke with brown or blackened leaves.
Having a sharp pair of scissors or kitchen shears, a pairing knife and a chefs knife will make breaking down the artichoke easy.
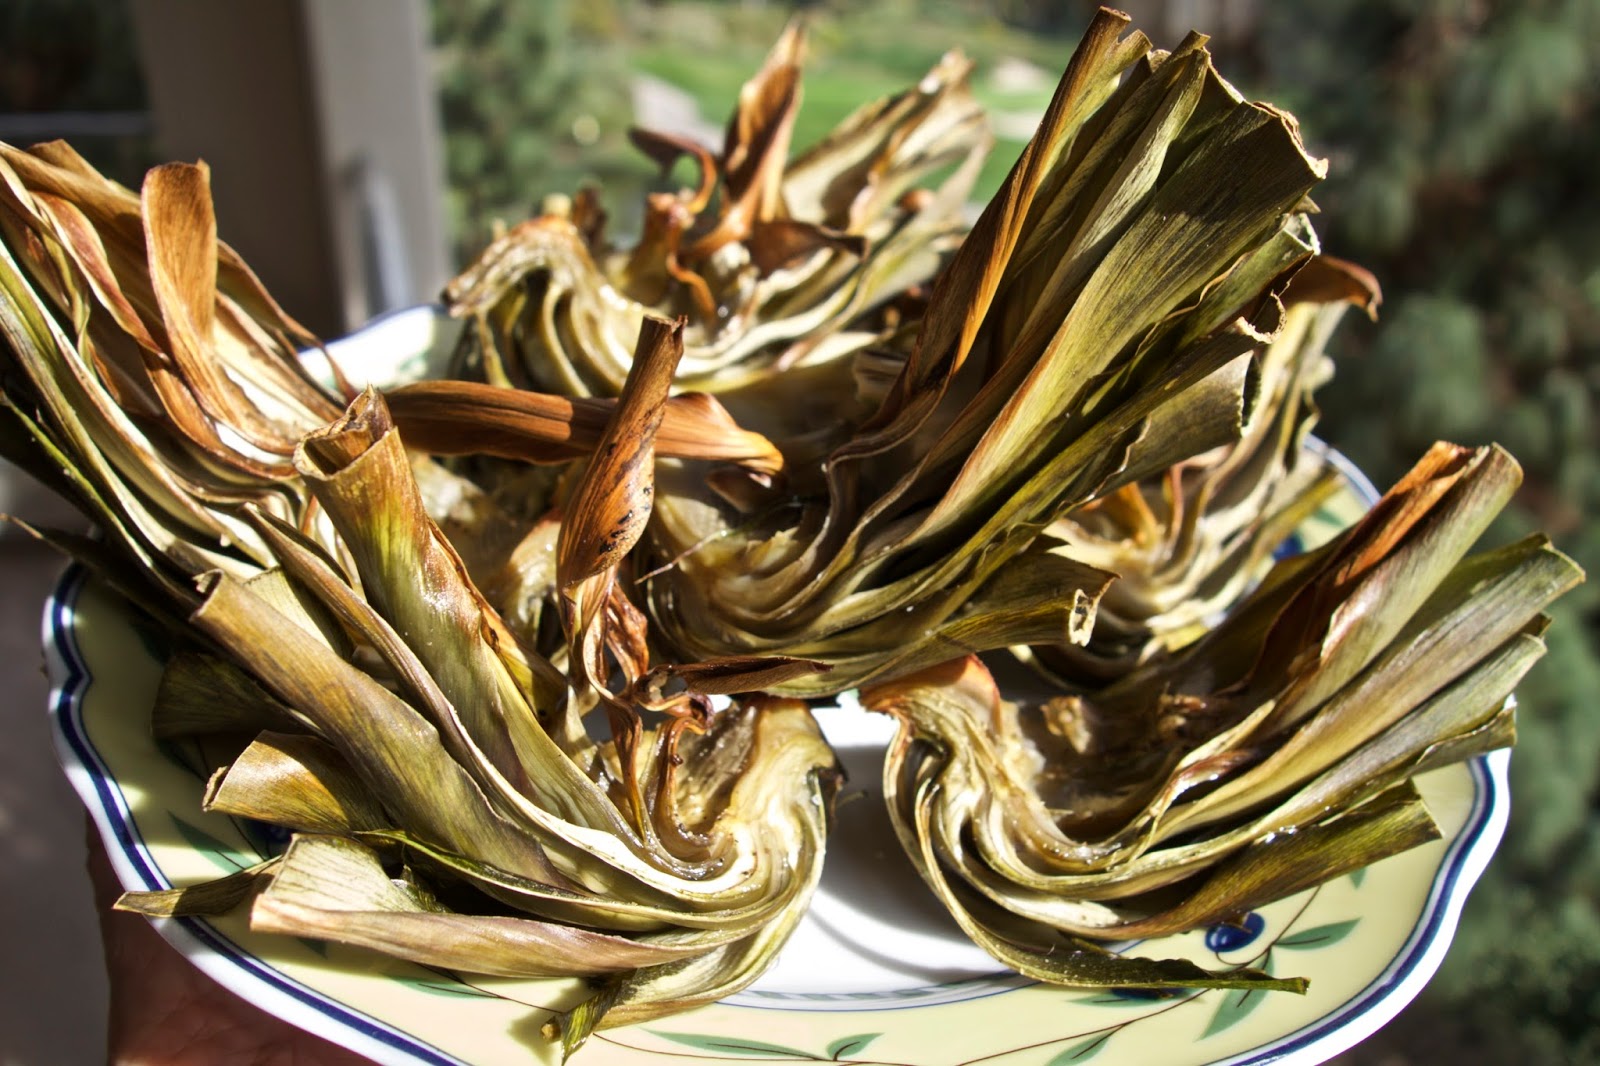
Roasted or Grilled Artichokes
One person can easily eat one artichoke the size of your hand. The larger artichokes will feed 2-3 people as an appetizer or a side dish.
4 medium sized or 2 large artichokes, washed
1 tablespoon kosher salt
2 tablespoons olive oil
1 teaspoon sea salt
1/2 teaspoon black pepper
1/4 cup sweet butter (optional)
Directions
Preheat oven to 350F. Or, set grill (indoor or outdoor) to medium-high.
Place a large stock pot on the stove on a high flame. Add kosher salt. Bring to a low boil. Cover.
To roast the artichoke sections after boiling, cover the bottom of a baking sheet with parchment paper, a Silpat sheet or a piece of aluminum foil. Set aside.
Using scissors trim off the pointy end of each artichoke leaf.
Trim off the stem of each artichoke, flush to the bottom. Discard the stems.
Give each artichoke a flat-top haircut. Place the artichoke on its side. Using a chefs knife, trim off the top 1/4" of each artichoke and discard.
Place the artichoke on the cutting board. Using a chefs knife, cut each artichoke in half, from bottom to the top. Cut each half into two pieces. If the artichoke is large, cut those four pieces in half, creating eight segments.
Working quickly, because the inside of the artichoke will discolor when exposed to air, use a sharp pairing knife to remove the fuzzy part on the inside of each section. Rinse the artichoke sections and discard the fuzzy parts.
Place all the artichoke sections in the boiling salted water. Cover and cook 10 minutes.
Using the pairing knife, test one of the artichoke sections. The knife should easily go into the fleshy part on the bottom of the leaves. If the knife doesn't go in easily, cook another 5 minutes but beware not to over cook the artichokes. They should be firm not mushy.
Place a colander or strainer in the sink. Pour the hot salted water with the artichoke sections into the colander and drain.
Transfer the artichoke sections to a mixing bowl. Drizzle with olive oil. Season with sea salt and black pepper. Toss well to coat.
If grilling, place the artichokes on the pre-heated grill. Turn frequently to avoid burning. Remove when grill marks appear on all sides.
If baking in the oven, arrange the artichokes on the prepared baking sheet, leaving room between the sections.
Place in the oven and cook 15 minutes. Using tongs, turn the sections over and place back in the oven another 15 minutes so they cook evenly.
Remove the artichokes from the oven and serve hot or at room temperature with sea salt, black pepper and small dishes of melted butter (optional).
If serving with melted butter (optional), melt the butter in a small saucepan being careful to avoid burning.
Which Swiss wines do you love? Hands? Anybody? Nobody?
Know why? Only 2% of Switzerland’s wine production is exported. All the rest, 98%,
is consumed domestically. The best way -- actually, the only way -- to sample
Swiss wines is to visit Switzerland. That’s what I did.
The Valais’ Microclimate
Having grown up with images of Switzerland as a land of
snow-covered mountains, when I visited the Valais, a wine-growing,
French-speaking canton east of Geneva, I expected cold weather. But the climate
was better suited to shorts and T-shirts than to parkas.
Neatly trellised vineyards climb up steep hills taking
advantage of a hot, dry microclimate. With 300 days of sun a year, the Valais feels
like Napa and Sonoma
except for the Matterhorn looming in the distance.
In Switzerland, family-owned vineyards and wineries (calledvignerons-encaveurs) are the rule. Even
if unprofitable, they stay in the family. During a hosted trip we met one wine
maker whose family was regarded as a newcomer. They had only worked the
vineyard for three generations, while the neighboring farm had been owned by
one family for seven generations. Neither winery was self-sustaining. Everyone
had a day job.
We tasted dozens of varietals from local
vineyards, some with such a small output, customers who lived in the
neighborhood consumed their entire production.
The wine most closely associated with the Valais is
Fendant a white wine made with the Chasselas grape. But
it is a red wine not a white that is making news these days.
Cornalin, the new kid on the block
Twenty-five years ago the Swiss government encouraged farmers
to plant improved strains of grapes that were indigenous to Switzerland and to
pursue new blends with distinctive qualities. The goal was to expand the export
market for Swiss wines.
In the Valais, that led to the improvement of Cornalin, a
grape that has been cultivated since the time of the Roman Empire. Used
primarily in blends to make inexpensive table reds, the wine was often bottled without
appellation or date of production.
Rouge du Pays
Frequently confused with an Italian grape with a similar
name, the Swiss variety (Rouge du Pays
or Cornalin du Valais) is genetically
distinct. In the 1990s the Agroscope Changins-Wädenswi, a federal
agricultural agency, funded research to cultivate promising local strains to
improve the quality of the grapes and the survivability of the vines. A group
of young vintners adopting the appellation Le
Coteaux de Sierre planted the new
vines. Over time, the acreage in the Valais devoted to Cornalin has expanded.
The wines have a low-tannin, fruity flavor and a dark
cherry red color. Helping market wines made with 100% Cornalin grapes, the
wineries of the area have enlisted an unlikely champion.
Antoine
Bailly is an internationally respected academic and a Nobel
Peace Prize winner (Geography, 2012). A native of Switzerland, Bailly travels the world as a lecturer. These
days his passion project is Cornalin.
A Cornalin Museum: Château de Vaas, La Maison des
Cornalins
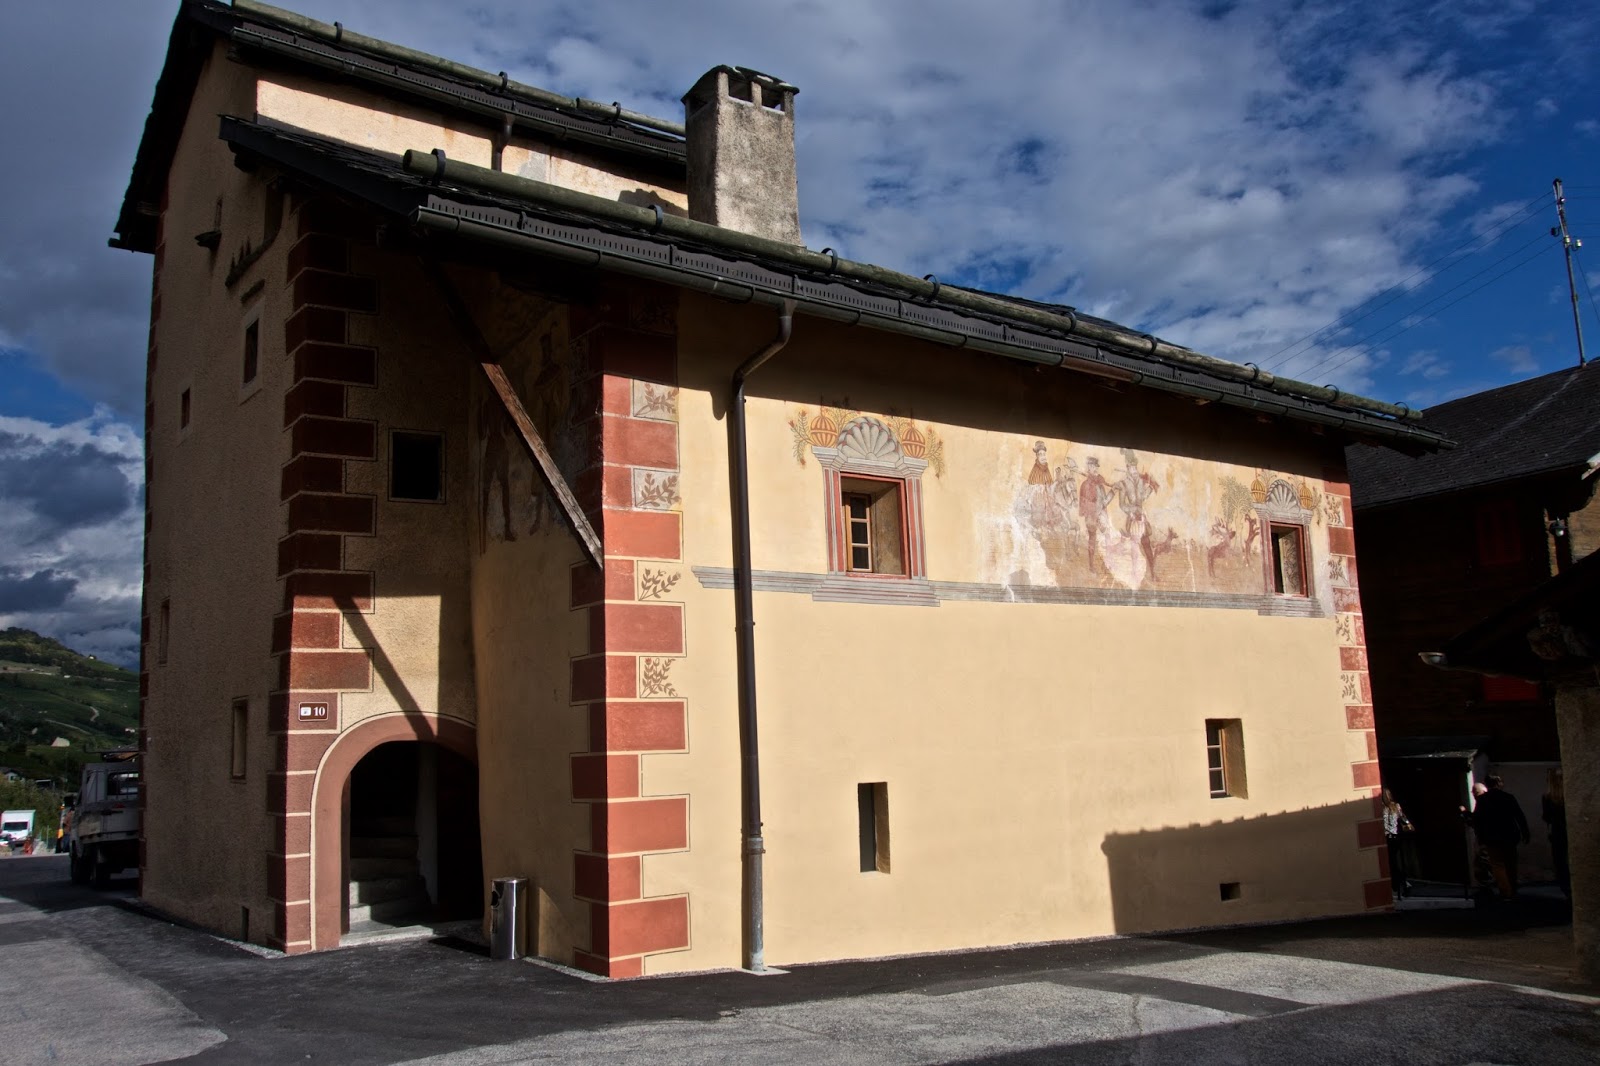
When I toured the under-renovation Château de Vaas, La
Maison des Cornalins in the village of Flanthey (Chemin du Tsaretton 46, 3978
Flanthey), Bailly pointed out details of the building,
parts of which were built in the 13th and 16th centuries. Restored at great
expense, the building is unique in the area for its history and architectural
details. Opened to the public in late August 2014, a photographic tour of the
museum is available on a French languageweb site.
In the tasting room, products from the local
wineries can be sampled, along with cheeses
and charcuterie from local purveyors. To visualize where the grape is grown, Bailly created an interactive map with the
locations of the Cornalin vineyards in the Valais. Another interactive display
with video screens illustrates the cultivation of the grape.
A Temperamental Grape
In the tasting room, with Bailly leading an animated discussion accompanied
with appetizers of local cheeses and slices of beef sausage from Boucherie La
Lienne in the village of Lens, we sampled several of the 100% Cornalin wines. Each
of us had our favorite. Mine was the Bagnoud Cornalin, Coteaux de Sierra (2012)
Rouge du Valais.
Bailly described the grape as difficult to grow and
unstable. Slight variations in heat or rainfall can ruin the harvest. Through
trial and error, the local vintners have learned how to get the best out of the
grape.
So why bother with such a temperamental grape? The
answer was pretty direct. The vintners like the wine they’re making with
Cornalin. For them, the extra effort and increased risk are worth the result.
Cornalin needs three years in the bottle to mature. With
the vintages currently offered for sale, these wines will be at their best just
about the time the museum opens. Bailly
invited us all to come back then. In the meantime, we bought bottles of our
favorites to bring home. We had become little agents of export for Swiss wines.
Growing up in Los Angeles, and this was many years ago, the
closest I got to an Italian meal was opening a can of Chef Boyardee SpaghettiOs.
Only when I moved to Providence to teach at Rhode Island College did I
experience authentic Italian cuisine. Living close to Federal Hill, the
historic center of the city’s Italian community, I had easy access to Italian
delis that imported cheeses, pastas and charcuterie directly from Italy. Every
block had a small bakery making cakes, pies, cookies, breads and pastries
according to recipes handed down for generations.
I discovered cannoli filled with ricotta cheese studded with
flakes of bittersweet chocolate. Twice baked biscotti with almonds. Pastry
cream filled zeppole, a fat doughnut of sugared dough, baked or deep fried. I
loved them all, but my favorite was a seashell shaped pastry, the deliciously crisp
sfogliatella.
What makes this Tuscan pastry so famous is a crunchy
flakiness outside and a sturdy, sweet ricotta cheese filling inside. Imagine
the best croissant with a thick custardy filling. And, by the way, the “g” is silent, so
sfogliatella is pronounced “sfo-li-a-tella.”
Holiday baking
Some recipes are best saved for the holidays or special
occasions when helping hands are available to join in the cooking. Making
tamales on your own isn’t easy, but at holidays when you are joined by friends
and family, the repetitive work becomes social and fun. The same for making
Chinese dumplings filled with savory ground pork and spices.
For me, I’m making sfogliatelle with my family. Happily the
pastry can be made in stages, so the work can be spread out over several days. The
dough and ricotta filling can be made on separate days and refrigerated.
Assembling the sfogliatelle can be saved for yet another day. And, the
completed, unbaked pastries can be kept in the freezer for months, available on
a moment’s notice to brighten an afternoon tea break or a weekend dinner party.
Executive Pastry Chef
Federico Fernandez
For years I searched for an easy-to-follow recipe without
success. When I was told that Chef Federico Fernandez of Bianca Bakery (Platform, 8850 Washington Blvd., Culver City California 90232) would demonstrate making sfogliatelle, I jumped at the opportunity.
Born in Buenos Aires, Fernandez is a worldly student of
South American, French and Italian cuisine. His pastries have been served at
some of the world’s most elegant hotels and restaurants, the Park Hyatt, the Marriott Plaza,
the Fontainebleau, the Four Seasons and, now, Bianca Bakery. Before we met, I admired his work
on Instagram. His elegantly beautiful pastries are amazing.
Making sfogliatelle requires patience, muscle work and an
attention to details. Demonstrating how to make sfogliatelle for the YouTube video on Secrets of Restaurant Chefs, the
very affable Fernandez showed how the process can be fun. I enjoyed the passion
he puts into baking. He is an artist with a soul and a good sense of humor.
While he worked, he filled my head with technical details about the art of baking
and fed me samples that put me into culinary heaven.
Sfogliatelle
All-purpose flour could
be used, but that would be a mistake. Fernandez uses bread flour because its
higher gluten strength gives the dough more elasticity. That allows the dough
to be worked repeatedly to create sfogliatelle’s characteristic flaky layers.
In the video, Fernandez
uses a recipe to make 50 sfogliatelle. Not that he bakes that many at one time.
He freezes the unbaked pastries, taking out each morning only the number he needs
for the hotel’s breakfast service. Freezing does not diminish the quality of
the sfogliatella which are freshly baked before serving.
To make his
sfogliatelle, Fernandez includes semolina flour in the dough to add color and
texture. He also uses semolina in the filling because that is a traditional
ingredient and because Semolina gives the filling density as well as its
characteristic yellow color. By contrast, pastry cream which is not as dense
would melt when the sfogliatelle are baked in a hot oven.
Fernandez uses a room-sizedRondomat sheeter machine to
flatten and stretch the dough. “Little by little,” as he says in the video, the
dough softens and thins. At home you will use a rolling pin and a lot of elbow
grease. Have friends help with the process or take breaks. If you want to rest,
place a damp kitchen towel over the dough.
Creating multiple
layers gives the pastry its distinctive crispy, flaky quality. This is the most
labor intensive part of the process. The result is worth the effort.
If you do not have a
small rolling pin, pick up a ½ - ¾ ” dowel, 5-6” in length from a lumber yard
or hardware store. When you get home, sand the dowel and treat with a light
film of safflower oil. Dry and clean before using.
Special equipment
2 large, sturdy rolling
pins
1 small rolling pin or
½ - ¾ ” dowel, 5-6” long Wooden spoon Wire whisk
A large work surface
A heavy duty electric mixer
1 metal ring, 3 ½”– 4” in
diameter, the ring of a small spring-form pan will do nicely
Parchment paper or Silpat sheets
Yield: 10 -12 sfogliatelle
Time: 4 hours + refrigeration
overnight for the dough
The Dough
Sfogliatelle are
famous for being deliciously crisp. Three things create that wonderful quality,
a dozen+ paper thin layers of dough with fat between the layers and using bread
flour with more gluten to create thin, stretchable sheets of dough.
For the fat, unsalted
butter can be used, but Fernandez recommends an equal mix of unsalted
butter and Sweetex Z or Crisco because butter melts too easily. Please note
that Sweetex is an artificially sweetened fat. Fernandez uses a different
product, Sweetex Z which has zero trans fats. Even though fat is essential to making the sfogliatelle's layers crisp, in the heat of a 400F oven, the fat all but disappears.
Ingredients for dough
4 cups bread flour
2 cups semolina flour
3 teaspoons kosher salt
1 ½ tablespoons honey
1 cup + 1 tablespoon water
4 cups unsalted butter, room
temperature or 2 cups unsalted butter + 2 cups Crisco or Sweetex Z
½ cup all-purpose flour for dredging when assembling the
sfogliatelle
¼ cup
powdered sugar for dusting before serving
Ingredients for ricotta filling
2 ½ cups whole milk
½ rounded tablespoon fresh orange zest, avoiding all the
bitter white pith
1 ½ cups white sugar
1 ½ cups semolina
5 egg yolks
1 ¾ cups cow’s milk ricotta cheese
Directions
Before making the dough, whip the unsalted butter or
unsalted butter and Crisco or Sweetex Z in a mixer for ten minutes using the
paddle attachment so it is very soft and fluffy. Use at room temperature.
Making dough with layers using a “simple fold”
In a mixer fitted with a hook, combine the two flours, salt
and honey. Blend on a low speed to mix well, then slowly add water. Continue
blending on a low speed about 10 minutes. Increase the speed and blend another
2 minutes.
Touch the dough in the bowl of the mixer. If it feels too
dry, add a small amount of water. Turn on the mixer and incorporate the water.
Be careful not to add too much water. If the dough becomes soggy, you cannot
add more flour.
Transfer the dough from the mixing bowl to a work surface.
Work the dough with your fingers until it is in the shape of a fat log. Wrap
the dough with plastic wrap and let rest 10 minutes on the counter. Do not
refrigerate.
After resting, remove the plastic wrap. Dust the work
surface with bread flour and position the log in front of you, the long way.
Use the rolling pin to roll the dough away from your body. The log of dough
will flatten and elongate.
To create layers, fold 1/3 of the dough from the end closest
to you onto the middle. Fold the other 1/3 from the opposite end on top of the
first fold. This is called a “simple fold.”
Roll out the dough. Flip the dough over and rotate it
clockwise a quarter turn. Press down on the folded dough with your hands. Roll
out the dough again. Allow the dough to relax a minute or two before making the
next simple fold.
After folding, rolling out, flipping and rotating the dough 15
times, you will have created dozens and dozens of delicate layers. Cover the
dough with a damp kitchen towel. The dough needs to rest and so do you. Take 10
minutes and have a cup of tea.
Making fat dough thin
Now that you have created layers
and made the dough softer, the dough needs to become thinner.
Fernandez uses a Rondomat dough sheeter. He can handle a
large recipe because the mechanical rollers do the physical work of rolling out
the dough into a sheet almost thirty feet long. In your kitchen, you will use a
rolling pin and a lot of upper body strength. But even though you are using a
smaller recipe, your sheet will still be quite large. As you roll and thin the
dough, it will spread in length and width so clear your counter for this step.
You will need the space.
Sprinkle bread flour on the work surface. Make a simple fold
one time, then roll out the dough. Because the sheet will become too large for
the work space, you will wrap the dough around the second rolling pin.
Once you have rolled out all the dough and accumulated it on
the second rolling pin, check the thickness. If it is not yet paper thin, roll
the dough out again. You may have to do this step several times until the dough
is paper thin. Once all of the paper thin dough has accumulated on the second
rolling pin, you are ready for the next step.
Adding fat for crispness
In order to create croissant-like flaky layers, a fat is
required. Using your hands, apply a thin film of room temperature butter or the
mixture of butter-Crisco or Sweetex Z on the work surface.
Place the rolling pin with the sheet of dough on the back of
the work area.
Keeping the sheet attached to the rolling pin, pull forward
on the dough and lay a length of the unbuttered sheet on the work surface. Use a
sharp knife to trim off and discard the rounded end of the dough so the edge
facing you is square.
Spread a thin layer of fat onto the sheet of dough on the
work surface.
Start a new roll. As Fernandez shows in the video, use your
fingers to lift the end of the buttered dough off the work surface and roll it
away from you.
To unwind another length of dough from the rolling pin, lift
the roll of buttered dough and bring it back toward you.
Continue that process, pulling dough from the rolling pin
onto the work surface, spreading on fat and adding that length to the buttered
roll, until you have buttered all the dough.
As you create the buttered roll, the ends will become
untidy. No worries. You will trim those later.
When you have applied fat to all of the dough, the roll will
be in the shape of a large log. Give the entire log a final coat of fat, seal
with plastic wrap and refrigerate overnight.
Ricotta Filling
You can make the
sweetened ricotta filling and refrigerate in an air-tight container for up to
three days until you are ready to assemble the sfogliatelle.
Directions
Combine whole milk and white sugar in a pan over low heat. Whisk
to combine. Add orange zest. Increase the heat.
When the mixture boils, add semolina all at once and whisk well.
The mixture will thicken quickly. Cook 2-3 minutes, stirring frequently to
combine. Avoid burning.
Switch to a wooden spoon when the filling becomes
paste-like. Continue stirring. Reduce heat. Cook another 3-4 minutes. Remove
from heat.
Use a spatula to transfer the thickened mixture into the
mixer bowl. Be certain to scrape off all of the batter that has accumulated on
the sides and bottom. Allow to cool for a minute.
On the mixer, use the paddle attachment to aerate the
filling. Run the mixer at a low speed for a minute. Increase the speed and run
for another 2 minutes.
To prevent splattering, before adding the egg yolks, stop
the mixer and lower the bowl. Add yolks.
Change the mixer speed to low. Mix for a minute. Increase the speed and run
another 2 minutes.
Once the filling is creamy, use a spatula to scrape the
sides of the bowl and incorporate all of the mixture. Run the mixer again at higher
speed.
Add ricotta using the low speed and, once incorporated,
increase the mixer speed to high. Scrape the sides of the bowl and mix again
for 10 minutes on medium to aerate the filling.
Once the filling is creamy, allow to cool. If not using
immediately, place in an air-tight container and refrigerate for up to three
days.
Assembly
When you make the
individual sfogliatella, work in batches of four. Plastic wrap and refrigerate
the other sfogliatelle so the fat doesn’t soften.
Organize an assembly
line on the counter with the four sfogliatelle rounds, the bowl of ricotta
filling, the small rolling pin, the metal ring, a large spoon and all-purpose
flour in a bowl.
The mini-rolling pin
makes flattening out the dough faster and easier but if one is not available,
use your fingers to stretch out the dough.
Directions for assembly
Preheat oven to 400F.
Remove the buttered dough from the refrigerator and unwrap.
Lightly flour the work surface. Use your hands to press,
stretch, roll and reshape the log. Roll the log back and forth and squeeze with
your hands, keeping the shape round until the diameter is reduced to 2 ½”.
Using a sharp chefs knife, remove 1” of the uneven dough on
both ends and discard. Cut the log into ½” thick rounds.At this point, the slices can be plastic
wrapped, refrigerated and stored for a day or two.
Working with one piece at a time, shape the dough into a
round with your fingers and lightly dredge in the all-purpose flour.
Place the dough on the work surface. Use the small rolling
pin to flatten the dough until it is half again as large as it was. If the
layers come apart, press them back together.
Adding the filling is easy. Use your fingers to soften and
slightly stretch the middle of the dough. Make a circle with your thumb and
index finger. Lay the thin round of dough over the opening between your thumb
and finger. Create a cone shape by gently pressing the center of the dough into
that opening.
Spoon two large tablespoons of ricotta filling into the cone
and center of the dough. Fold the dough over the filling. Press the edges of
the dough together and create a conch-shell shape. Lay the sfogliatella on the
work surface.
Use the metal ring to trim the ragged
front edge of the dough.
Line a sheet pan with a piece of
parchment paper or a Silpat sheet. Place the sfogliatelle on the sheet pan with
½” spacing between them.
Baking
If you want to save
any of the sfogliatelle for later use, refrigerate or freeze them as described
below.
Directions for baking
If serving right away, place the
parchment paper covered sheet pan in the preheated 400F oven and bake 35
minutes, checking that the sfogliatelle brown but do not burn.
Allow to cool. Dust with powdered
sugar before serving.
Refrigerating and Freezing
If reserving for use within 72
hours, keep the sfogliatelle on the parchment paper covered sheet pan. Lay
another parchment paper on top and seal the sheet pan in a plastic bag.Place in refrigerator. Remove before serving and bake as directed
above.
If reserving for even later use,
place the plastic bag covered tray with sfogliatelle into the freezer. Once
frozen, remove the sheet pan. Put the frozen sfogliatella into an airtight bag.
They will keep up to six months in the freezer.
Baking After Freezing
Remove from the freezer the
number of sfogliatelle you want to bake.
Place on a parchment paper lined
sheet pan, cover with parchment paper and seal in a plastic bag. Refrigerate
for one day so the sfogliatelle defrost slowly.
Prepping for Thanksgiving reminded me of my mother's kitchen. Thanksgiving was her favorite holiday when my sister and I would join her in the kitchen and friends and family gathered around the table to share a meal.
She grew up in a household with her mom, dad, brother and four step-brothers from her dad's first marriage. Hers was a blended home in New York city with a lot of advantages and many disagreements. I think that's why she enjoyed Thanksgiving in her own home. No sibling rivalries, no mother looking over her shoulder to tell her how to make the turkey.
Brussels sprouts were always on the table for Thanksgiving. She was of the boiling-vegetables-school. She did that with beets, broccoli, carrots and Brussels sprouts. My wife and I are of the roasting-is-better method of cooking vegetables, especially Brussels sprouts.
Shopping for Brussels sprouts this week at the farmers market, I noticed that they were difficult to locate and they were priced at $4.50-5.50 a pound, higher than usual.
If you find small sized ones, they are good to cook whole or cut in half (top to root/bottom). The larger ones are best shredded, cutting from the top to the bottom-stem part so that most of the slices hold their shape.
In either case, the seasoning can be as simple as a drizzle of olive oil, a pinch of freshly ground black pepper and a sprinkling of sea salt. As a side note, do not use iodized salt. If you like kosher salt, only use Diamond Crystal brand without additives.
I wish my mom were with us Thursday. I'm certain she would like the roasted sprouts.
Have a great Thanksgiving.
Roasted Brussels Sprouts - Whole
Yield: 4 servings
Time: depending on size 30-45 minutes Ingredients
1 pound Brussels sprouts, washed, stems trimmed of any brown spots
1 tablespoon extra virgin olive oil
1/4 teaspoon sea salt
1/8 teaspoon freshly ground black pepper
Directions
Pre-heat oven to 350F and line a baking sheet with a Silpat sheet, parchment paper or aluminum foil.
In a mixing bowl, toss Brussels sprouts with olive oil and seasonings.
Roast in the oven for 30-45 minutes, turning them every 10 minutes for even roasting.
Serve hot.
Roasted Brussels Sprouts - Shredded
Yield: 4 servings
Time: depending on size 30-45 minutes Ingredients
1 pound Brussels sprouts, washed, stems trimmed of any brown spots
1 tablespoon extra virgin olive oil
1/4 teaspoon sea salt
1/8 teaspoon freshly ground black pepper
Directions
Pre-heat oven to 350F and line a baking sheet with a Silpat sheet, parchment paper or aluminum foil.
To shred, place a Brussels sprout on the cutting board, stem side down. Slice from top to stem so the slices keep their shape. In effect you have created a cross-section of the vegetable.
In a mixing bowl, toss Brussels sprouts with olive oil and seasonings to coat well.
Spread the shredded sprouts on a lined baking sheet. For crispy edges, avoid layering the sprouts on top of one another.
Roast in the oven for 30-45 minutes, turning them every 10 minutes for even roasting. Because they are cut, there should be browning on the edges. Be careful not to burn them.
Serve hot.
Variations
Before serving, sprinkle with bits of crisp bacon.
Before serving add 2 tablespoons charred onion slices.
Before serving sprinkle on 2 tablespoons crushed roasted hazelnuts.