Thursday, November 24, 2022

Celebrate Thanksgiving by Making Turkey Stock, then Serve Turkey Stew with Dumplings, the Best Day-After Thanksgiving Meal

My mother-in-law laughs when she thinks about it. On Thanksgiving, as everyone at the table is passing around platters heavy with freshly sliced turkey, cranberry sauce, roasted Brussel sprouts and so much more, I am still in the kitchen standing next to a large stock pot, stirring the hot water as it receives the bones and carcass from the turkey that I just carved.


Even as dinner is being served, I'm making turkey stock for the day after Thanksgiving with enough to have on hand in the freezer for days and weeks and months afterwards.

With the stock I can make soups, sauces and, my favorite, dumplings and turkey stew. The absolute best comfort food. 


The basics are straightforward. Cooked turkey meat. A handful of favorite vegetables. A cup of white flour. A bit of half and half. A cube of butter. Homemade turkey stock. A few seasonings.

Simmer. Cover. Uncover. Serve. Easy and delicious.


Homemade Turkey Stock

During Thanksgiving dinner, a large stock pot sits on the back of the stove. A steady flame brings the water to a slow-boil and, as I carve, I add bits of bones, skin and the parts we don't eat into the pot. As we share a feast, passing plates around the table, refilling wine glasses and looking with excitement at the dessert table, the stock pot does it work. A slow-boil does its work. The stock thickens and becomes lusciously nourishing.


When the liquid has been reduced by half, the flame is turned off so the stock can cool. A quick pass through a colander to remove the bones and bits and we have pure turkey stock. Allowed to cool to room temperature, the stock goes into the refrigerator in 16 ounce covered containers to allow for easy refrigeration or for freezing. 

Kept in the refrigerator, the stock is good for up to four days. Stored in the freezer, the stock will retain its qualities for up to six months. One tip, when you remove the frozen stock from the freezer, take off the lid and rinse the top of the frozen stock with water to remove any ice crystals, which can add an unpleasant flavor.

Another tip, use the left over meat and skin for your pet. Our son's dog, Fig, loves chopped up turkey meat and skin added to his daily bowl of prepared food. We freeze 6 ounce containers of the left over turkey so we can chop off pieces, defrost and give him a treat during the week.

Farm-to-Table Vegetables, Turkey and Dumplings

Use a good quality organic turkey and buy farmers market produce when available. 

If you have dried whole shiitake mushrooms, use them. They add a distinctive flavor, different from the delicate flavor of thinly sliced shiitakes.

Use vegetables you love. And lots of them. English peas. Squash rounds. Kabocha chunks. Roasted sweet potatoes. Green beans. Kale. Shredded cabbage. Chopped turnips. My preference is to tilt the balance towards the fresh produce, plating great mounds of vegetables with a leg and a wing or two pieces of breast.

The dish can be covered and served the next day or divided into smaller covered containers and frozen for up to three months.


Yield: 4 servings

Time to prep: 15 minutes (if you already have turkey stock as described above) or 1 hour (including time to make turkey stock)

Time to cook: 30 minutes

Total time: 45 minutes - 1 hour 30 minutes

Ingredients

4 cups cooked turkey meat, cut into quarter sized pieces, no bones
1 medium yellow onion, washed, ends trimmed, outer skin removed, cut into 1/2" pieces
1 cup green beans, washed, ends removed, cut into 1" long pieces
1 cup broccoli florets, washed and cut into 1" pieces or broccoli leaves, washed, shredded
2 cups shiitake mushrooms, washed, stem end trimmed, thinly sliced or 2 cups dried whole shiitake mushrooms, washed
1/4 cup Italian parsley, leaves only, washed, finely chopped
1 garlic, peeled, finely chopped (optional)
1/2 cup celery, washed, ends trimmed, cut into 1/2" pieces (optional)
4 cups homemade turkey stock, as described above
1 large carrot, washed, trimmed, peeled, cut into 1/2" thick rounds
2 tablespoons extra virgin olive oil
1/4 teaspoon sea salt
Pinch freshly ground black pepper
Pinch cayenne powder (optional)


Dumpling ingredients

1 cup all-purpose flour, white
2 tablespoons sweet (unsalted) butter, cut into fine bits
1 teaspoon baking soda
1/4 teaspoon sea salt
Pinch freshly ground black pepper
1 scallion, washed, ends trimmed, green and white parts finely chopped or 2 tablespoons Italian parsley, leaves only, washed, finely chopped (optional)
1/2-1/3 cup half and half, cream or whole milk


Directions

Turkey stock can be used when made fresh or when thawed after having been frozen, as described above.


In a mixing bowl, add flour, cut up butter, scallion (or Italian parsley), baking soda, sea salt and black pepper. Using a fork, mix well. Slowly add milk, stirring until thickened. The resulting mixture should be like thick batter. If the mixture is too runny, add a tablespoon of flour. Cover and set aside.


In a large pot, heat olive oil and sauté onions and garlic (optional) with oil until softened. Add cooked turkey and vegetables. Season with sea salt and freshly ground black pepper. Add turkey stock.  Stir and simmer 20 minutes.


To make the dumplings, use two soup spoons to create small rounds of dough. Drop each dumpling into the simmering liquid. Make room for each dumpling so they do not touch because they will expand as they cook. Use all the dumplings batter and cover.

Adjust the heat so the stock simmers but does not boil.

Cook 30 minutes and serve immediately. Place several dumplings into each bowl, adding a protein and a good helping of vegetables with several tablespoons of sauce.

Serve hot.

Saturday, October 29, 2022

Soup's On! Easy to Make Squash Soup Sets the Table for Cold Weather

My friend Harriet emailed me."’I'm supposed to bring butternut squash soup to a dinner Sunday. There are SOOO many different recipes, even on the New York Times. Do you happen to have a recipe you love and could share?" 

A few more exchanges and what she wanted became clear. She had already made a vegetable stock from an Otolenghi recipe. She needed to make soup for six people. 

Making soup is easy. Or, less-easy. Depending on some choices. 

Easiest-to-Make Squash Soup

Serves 4-6

Time to prepare: 45 minutes

Ingredients

1 medium sized squash (preferably kabocha or acorn or butternut), 2 pounds, washed, cut into 4 pieces, seeds and fuzzy stuff removed

6 cups homemade stock, vegetable or land animal

1 teaspoon Diamond Brand Kosher salt

Sea salt to taste

Freshly ground black pepper to taste

Directions

The easiest way to make a squash soup (I prefer Kabocha because it has more flavor than most other squash, but that's a personal preference) is to cut the squash into four pieces. Remove the seeds and fuzzy stuff. Place in salted water (only use Diamond Brand Kosher salt because regular salt is iodized and adds a metallic flavor). Boil or steam (steaming is better so the flesh doesn't get water-logged) until the flesh is softened (5-10 minutes). Remove from the water, cool and cut off the skin (and discard).

Then heat the stock (which can be any stock you like, made from vegetables or land animals, your choice). Cut up the cooked squash. Add to the stock in the pot. 

Now you want to combine the squash with the liquid. The easiest way to do that is with an immersion or wand blender. KitchenAid makes a nice one, but other companies make very good ones. 


If you don't have an immersion blender, you should get one, but if there's no time, use a blender. In either case, you want to puree the pieces of cooked squash with the stock. That will take a minute or less.

Heat the soup. Taste and season with sea salt and freshly ground pepper and your soup is guest-ready in less than 30 minutes.

That's the easy version.

The less-easy version adds one step. Not a big step. A little step.

To add flavor, add other vegetables, which you will first sauté with a little olive oil, if the soup is Vegan. If Vegetarian, in olive oil with a little sweet butter (unsalted).

So here are the details.

Less-Easy But Still Really Easy Squash Soup

Serves 4-6 (depending on whether the serving is appetizer or entree size)

Time to prepare: 15 minutes (prep), 30-50 minutes cooking


Ingredients

1 medium sized squash (preferably kabocha or acorn or butternut), 2 pounds, washed, cut into 4 pieces, seeds and fuzzy stuff removed

1 medium onion, washed, peel removed, cut into bite sized pieces

1 garlic, washed, peeled, cut into small bits (optional)

2 large kale leaves, washed, stems removed, cut into bite sized pieces

4 large mushrooms, preferably shiitake but brown mushrooms are good, wash, cut into bite sized pieces

1 large tomato, washed cut into bite sized pieces

6 cups homemade stock, vegetable or land animal

Sea salt to taste

Freshly ground black pepper to taste

1 tablespoon olive oil

1 tablespoon sweet (unsalted) butter (optional)

Directions 

There are two ways to cook the squash. Roasting or salt water steaming. Roasting is an added step but it also adds flavor.

If roasting, place the quartered squash onto a Silpat (non-stick) sheet in a baking sheet. Season with olive oil. Bake in a 350F oven for 20 minutes. Remove. Cool. Cut off the skin (and discard).

If salt water steaming, put 2 cups of water into the bottom of a small pot, season with 1 teaspoon Diamond Brand Kosher salt, bring to a boil, place the squash into a basket or small strainer so the squash sits above the boiling water. Cover and cook 10 minutes. Remove. Cool. Cut off the skin (and discard). If you don't have a basket or small strainer, place the cut up squash into the boiling salted water for 5 minutes. Remove. Cool. Cut off the skin (and discard).

Heat a pot large enough for the soup. Add olive oil and sweet butter (optional). Add vegetables. Stir together. Over a medium flame, sauté 10 minutes until the vegetables soften. If they lightly brown, that's ok.

Add stock and cooked squash.

Simmer 10 minutes.

Blend, either with an immersion blender or by transferring the stock into a blender, until all the vegetables are incorporated. The soup can be either completely smooth or still have bits of vegetables. Your choice.

Simmer 10 minutes. Taste and adjust the seasoning with sea salt and freshly ground black pepper. You can add cream, if you want. Or a bit more sweet butter, if you want.

Serve hot with bread and butter.


Monday, September 5, 2022

Corn Salad, Elote Style for End of Summer Feasts

Today's Labor Day, tomorrow it's back to work after a wonderful vacation-work trip to The Netherlands and Berlin. Last night we had our annual dinner with friends at Back On The Beach (445 Pacific Coast Hwy, AKA Palisades Beach Road, Santa Monica CA 90402). Today is the last dinner service at Back On The Beach so we were happy to enjoy a meal and the sunset.

We're joining a potluck dinner tonight at our neighbors around the corner. We're looking forward to catching up and hanging out. We're bringing homemade pickles and my version of an elote salad. I'm reprising the post I wrote after a trip to Mexico.  Enjoy!

Mexican street food 

Travel in Mexico and you'll encounter street vendors selling a great number of delicious food snacks. Elote is one of the best. An ear of corn is grilled, dusted with dry cheese, slavered with mayonnaise and seasoned with chili powder and fresh lime juice. The ear of corn is always served whole, sometimes resting in a paper dish or with a stick in the bottom like a corndog.


Elote is delicious but messy to eat. A whole ear of corn takes two hands to manage. And, with each bite, the finely grated Cotija cheese floats into the air, landing on clothing.

Deconstructing elote

Cutting the kernels off the cobs makes the seasoned corn easier to enjoy. In Mexico there is a corn kernel snack called esquires, which employs some of the elote seasonings. The recipe I settled on uses olive oil instead of mayonnaise. That way the salad can be served as a light entrée topped with a protein or as a side dish accompanying grilled vegetables, meats, poultry and fish. A perfect summer recipe.


The best way to cook corn on the cob is a topic of heated debate. There are those who will only boil corn, others who will only grill it. I have seen elote prepared using both. My preference is to strip off the husk and grill the ear so that some of the kernels are charred, adding caramelized sweetness to the salad.

Just the right cheese

What gives elote its distinctive flavor is the combination of spicy chili powder, fresh lime juice and Mexican Cotija cheese. 

Powdery when finely grated, Cotija cheese is salty so you may not need to add salt when you make the corn salad. Often described as having qualities similar to feta and Parmesan, Cotija tastes quite different.


Mexican Corn Salad

Adding finely chopped Italian parsley to the seasoned corn kernels brightens the flavors. Cilantro can be used instead of parsley to give the salad a peppery flavor.

The corn can be prepared ahead and kept in the refrigerator overnight. In which case, do not add the Cotija cheese or parsley until just before serving.

To create a colorful salad, just before serving, toss the seasoned corn and parsley with quartered cherry tomatoes, cut-up avocados and butter lettuce or romaine leaves.

After tossing, taste the salad and adjust the amount of Cotija cheese and chili powder and, if needed sea salt.

Prep time: 10 minutes

Cook time: 15 to 20 minutes

Total time: 25 to 30 minutes

Yield: 4 entrée servings or 8 side dish servings

Ingredients

4 tablespoons olive oil, divided

1/2 teaspoon sea salt 

1/4 teaspoon freshly ground black pepper

4 large ears of corn, husks and silks removed, washed, dried

1/2 cup finely grated Cotija cheese

1/2 teaspoon chili powder

Directions

1. Preheat an indoor grill or outdoor barbecue to hot.

2. Pour 2 tablespoons olive oil into a flat pan and season with sea salt and black pepper.

3. Roll the ears of corn in the seasoned olive oil to coat all sides.

4. Using tongs, place the corn on the grill, turning every 2 to 3 minutes so that some of the kernels char, being careful not to burn the ears.

5. After the corn is cooked on all sides, remove and let cool in the flat pan with the seasoned olive oil.

6. To cut the kernels off the cob, use a sharp chef's knife. Hold each ear of corn over the pan with the seasoned oil and slice the kernels off the cob.


7. Transfer the kernels and the remaining seasoned oil into a large mixing bowl.

8. Add Cotija cheese, chili powder and parsley. Toss well.


9. Drizzle the remaining olive oil over the salad and toss.


10. Serve at room temperature with lime wedges on the side.

Saturday, July 2, 2022

Recipes to Celebrate the 4th of July

I am reprising my July 4th post from previous years. This year is different. COVID isn't over, so we'll practice social distancing even as we pass around containers of food. We're all shell shocked by the events of 2022. The brutality of Russia's war against the people of Ukraine. The revelations of the Select Committee to Investigate the January 6th Attack on the U.S. Capital. The actions of the Supreme Court. 

Yet, even with all that, we are still grateful for our country and its democracy. We consider ourselves blessed to be living here with our family and friends, in our communities. To celebrate we will share a meal, watch fireworks and commit ourselves to get out the VOTE. 

Wishing you all a great 4th of July. And now, let's COOK!

We're having a party. On July 4th we'll gather in the park opposite our local high school (Pali High) to eat, catch up and watch fireworks. Everyone will bring food and drinks to share and a sweater because when the sun goes down, it gets chilly.

We have been doing this for so many years, I'm not certain when we started. Over the years sometimes the group grows to almost thirty. Sometimes a handful of friends shows up. It all depends on what day of the week the holiday falls. We've noticed that when the 4th falls on a weekend, there isn't enough time to travel out of town, so our group swells. This year, the 4th is on Thursday, so our group will be more intimate. Big or small, the gathering is fun.

Everyone is asked to bring a favorite food. Something special. This year I'm making favorite dishes, ones designed to share at a picnic or at buffet-style fireworks watching party.


I love my kimchi chicken wings (see below), sticky sweet with heat, moist and tender. Nothing is better except fried chicken the way chef Wes Whitsell (Hatchet Hall) showed me for a cooking video we did last month. His fried chicken is crispy and moist. For the cooking demonstration he made wings, thighs and legs. He doesn't like breasts because they don't have enough flavor. I pretty much agree. For my pot luck contribution, I'm making cut apart wings and legs, the easiest parts to eat at a picnic.


I'm also making carrot salad with golden raisins soaked in lemon juice & seasoned with black pepper, Yukon gold potato salad with charred corn & parsley, a charred corn & vegetable saladroasted beet saladgarbanzo bean salad with charred onions & Lacinato (purple) kale, salt boiled broccoli florets and a buttermilk custard pie I saw Martha Stewart demonstrate on her PBS show.


I'll also make an Italian parsley salad with chopped vegetables and pitted olives and a Little Gem lettuce salad with carrot rounds and feta cheese, served with whole wheat lavash.


Only recently did I discover Little Gem lettuce. First, at Glatt, a kosher market, on Pico east of Robertson and then at the Wednesday Santa Monica Farmers Market at the Garden of Organic stand. At first I thought they were "baby" romaine lettuces. They have a cleaner, crisper flavor, with less water and more crunch. Wrapped in a damp kitchen towel and placed into a plastic bag, the heads will keep fresh in the refrigerator for three weeks.


Here's the recipe I'll use for the 4th (which is exactly the recipe I use when I make the salad at home except sometimes I'll trade out the feta for blue cheese).

Crispy Little Gem Lettuce Salad

When making the salad, leave the leaves whole so they don't wilt.

For the olives, use any kind you enjoy. We like Castelvetrano Green olives, which can be found pitted for easy use, although olives taste best when not pitted.


Serves 4

Time to prepare: 20 minutes

Ingredients

2 heads Little Gem Lettuce, leaves removed whole, washed, pat dried

1 large carrot, washed, ends removed, peeled, cut into thin rounds

1 large tomato, stem end removed, washed, pat dried, cut into dime size pieces

1 cup pitted olives, roughly chopped

1 scallion, ends removed, washed, brown leaves discarded, cut into paper thin rounds (optional)

1/2 cup feta, pat dried, crumbled

1 medium avocado, washed, peeled, pit and any brown spots removed, cut into dime sized pieces

1/2 cup homemade croutons (optional)

2 tablespoons olive oil

1/4 cup balsamic vinegar, reduced over a low flame to 2 teaspoons, cooled

Sea salt and freshly ground black pepper to taste

Directions

Lay the Little Gem leaves in the bottom of a serving bowl. Sprinkle on the carrots, tomatoes, olives, scallions (optional), feta, avocado and croutons (optional).

Just before serving, season with sea salt and black pepper, drizzle on olive oil and reduced balsamic vinegar.

Serve with a knife and fork.

Kimchi Chicken Wings

Chicken wings are sold whole, the drumstick only or the two-bone part. If you prefer one part of the wing over another, buy only those. The whole chicken wing will be less expensive and the wing tips can be roasted and used to create stock.

Do not use the whole chicken wing, which is too difficult to eat. 


I prefer preservative-free kimchi. I have been enjoying Mommy Boss napa cabbage kimchi. Read the label carefully because there are different kinds of kimchi, I would recommend only using cabbage kimchi without dried shrimp.

Serves 4

Time to prepare: Marinate overnight, prep 20 minutes, bake 60 minutes

Ingredients

2 pounds chicken wings

1 cup kimchi, without preservatives

1/2-3/4 cup brown sugar, depending on taste

1 medium yellow onion, washed, pat dried, peeled, root and stem removed, thin sliced from root to stem

1/4 cup kimchi liquid

1 tablespoon olive oil

Directions

Thinly slice kimchi and mix together with onion slices, brown sugar, kimchi liquid and olive oil.

Add chicken wing parts to marinade. Mix well. Place in a covered bowl or sealed plastic bag. Refrigerate over night.

Preheat oven to 350F.

Prepare a roasting pan. Line the bottom with aluminum foil. Because the drippings are sticky (and delicious!) I place a Silpat sheet on top of the aluminum foil so I can easily retrieve the bits of caramelized onions and kimchi. Place a wire on top of the aluminum foil and Silpat sheet.


Place the chicken wings on top of the wire rack, allowing space between each part to allow for even cooking. Reserve the liquid marinade with the onions and kimchi.

Place wings into preheated oven.

While the wings are roasting, place the reserved marinade into a small sauce pan and reduce the liquid by 1/2 over a low heat.

Remove wings from the oven after 30 minutes.

Turn wings over and baste with reduced marinade, placing onion and kimchi slices on each wing.

Return to oven.

After 30 minutes, remove and check for doneness. The onions and kimchi slices should be lightly browned and beginning to crisp. The wings should be tender. If not, return to oven and continue baking. Check every 10 minutes for doneness.

Serve hot as an appetizer or on top of steamed rice. The wings are delicious at room temperature, perfect for a picnic. However they are served, have a good supply of napkins available.

Friday, June 17, 2022

Fish, Nothing But the Whole Fish - Encased in Kosher Salt

Hard to believe but the easiest way to cook a whole fish is to roast it encased in a dome of kosher salt. 


Cocooned inside its salt blanket, the protein rich-fish cooks in its own juices. The technique is very low-tech. No fancy machines or tools required. All you need is kosher salt and water.


Some recipes call for egg whites and water to moisten the salt, but from my experience, water alone works perfectly. After the fish has cooked inside the coating of moistened salt, crack open the hardened salt and use a fork to effortlessly peel back the skin. A chef’s knife easily separates the meat from the bones.


When creating the salt coating, it is important to use kosher salt. Do not use table salt and definitely do not use salt that has been treated with iodine, which has an unpleasant minerality. Personally, I prefer Diamond Crystal kosher salt because it is additive-free.


When you buy the fish, ask to have the guts and gills removed but there is no need to have the fish scaled because the skin will be removed before serving. If the only whole fish available in your seafood market is larger than you need, a piece without the head or tail can still be used. To protect the flesh, place a small piece of parchment paper across the cut end, then pack the moistened kosher salt on all the sides to completely seal the fish.


Even though the fish is cooked inside salt, the flesh never touches the salt. The result is mild tasting, moist, delicate meat.


After removing the salt-roasted fish from the oven, let it rest on the table on a heat-proof trivet. The sight of the pure white mound, warm to the touch and concealing a hidden treat is a delight. Before serving, take the fish back into the kitchen to remove the salt casing, head, tail. skin and bones.


What kind of fish to use?


So far I have used the technique on trout, salmon, sea bass, salmon trout and pompano with equally good results. 


Choose a fish that is as fresh as possible, with a clean smell and clear eyes. When you press the body, the flesh should spring back. Cooking time is roughly 10 minutes per pound but will vary depending on the size and thickness of the fish.


In general, a whole fish weighing 3 to 5 pounds will require a three-pound box of kosher salt.  Since that is an estimate, it is a good idea to have a second box of kosher salt on hand. 


Salt-Roasted Fish

Use only enough water to moisten the kosher salt so the grains stick together. Too much water will create a slurry, which will slide off the fish. Because kosher salt is not inexpensive,  use only as much as you need. A quarter-inch coating around the fish is sufficient. 


Placing herbs and aromatics inside the fish’s cavity can impart flavor and appealing aromas when the salt dome is removed. Sliced fresh lemons, rosemary sprigs, parsley, cilantro, bay leaves or basil all add to the qualities of the dish but discard before platting.


Depending on the density of the flesh, generally speaking, one pound of fish requires 10 minutes of cooking at 350 F. 


The mild fish can be served with a tossed salad, pasta, rice or cooked vegetables. The fish goes well with freshly made tartar sauce, salsa verde, pesto, romesco, chermoula or pico de Gallo.


Prep time: 10 minutes


Cooking time: 30 minutes if the fish weighs 3 pounds, 50 minutes if the fish weighs 5 pounds


Resting time: 5 minutes


Total time: 45 or 65 minutes depending on the size of the fish


Yield: 4 to 6 servings depending on the size of the fish


Ingredients


1 whole fish, 3 to 5 pounds, with the head and the tail, cleaned and gutted but not necessarily scaled


1 3-pound box kosher salt, preferably Diamond Crystal kosher salt


½ to 1 cup water


2 cups fresh aromatics and lemon slices (optional)


Directions


1. Preheat oven to 350 F.


2. Wash the fish inside and outside. Pat dry and set aside.


3. Pour 2 pounds of the kosher salt into a large bowl. Moisten with ½ cup water. Mix with your fingers.  If needed, add more water a tablespoon at a time until the salt sticks together.


4. Select a baking tray that is 2 inches longer and wider than the fish. Line with parchment paper or a Silpat sheet.


5. Place a third of the moistened salt on the bottom of the lined baking tray.


6. Lay the whole fish on top of the salt. Place aromatics and lemon slices inside the fish, if desired.


7. Carefully mold the rest of the moistened salt over the entire fish. If more salt is needed, moisten an additional amount of salt.


8. Place the baking tray into the pre-heated oven.


9. After 30 minutes for a 3-pound fish and 50 minutes for a 5-pound fish, remove the baking tray from the oven and allow the fish to rest for 5 minutes.


10. Using a chef’s knife, slice into the salt dome on the back side of the fish, along the fin line. Make another slice on the bottom of the fish. Lift the salt dome off the fish and discard. Using the knife, make a cut across the gills and the tail. Insert a fork under the skin and lift the skin separating it from the flesh.


11. Have a serving platter ready. Using the flat side of a chef’s knife, slide the blade between the flesh and the skeleton along the fin line. Separate the flesh from the bones. Try as best you can to keep the entire side of the fish intact, but no worries if the flesh comes off in several pieces. When you place the flesh on the serving platter, you can reassemble the fillet.


12. Turn the fish over and repeat the process on the other side.


13. Discard the head, tail, bones and skin. 


14. Serve the fish at room temperature with sauces of your choice and side dishes.

So delicious. So easy to make.

And email me photographs of YOUR FISH when you make it.

Enjoy!


Thursday, June 16, 2022

A Mother's Day Treat Now a Father's Day Special - Broiled Lobster

My mother loved lobster. For Mother's Day we would pick her up from her apartment and drive to Little Saigon  to Dong Khanh a restaurant an hour south of Los Angeles. With our cousins and sons, we would order a dozen dishes and eagerly turn the lazy Susan in the center of the large table so we could sample all the dishes.


My mother's favorite was the salt and pepper stir fried lobster. Picked from the salt water tank, the lobster would be paraded to the table for our approval, then it was walked to the small kitchen in back to be transformed into that wonderful dish.


Cooked in the shell, eating the lobster took a lot of work. But the sauce was so fragrant and tasty, we didn't mind. And mother, always a gnawer of bones, would gleefully take her time, making certain she enjoyed every last drop of sauce and all the tender sweet lobster meat.

It's difficult to think that my mom passed away sixteen years ago. She seems very much alive in my memory. Unfortunately, Dong Khan closed years ago. So, life as we all know, moves on.

Truthfully, I loved the lobster at Dong Khan as much as she did. When I was growing up, fresh lobster was an occasional restaurant treat. Dipping big chunks of lobster tail in the hot, melted butter was one of my first culinary epiphanies.

At home, I make oven roasted lobsters topped with bread crumbs and sweet butter. Prepping the lobsters takes a bit of time but the result is well worth the effort.

Oven Roasted Lobsters

Many supermarkets have live lobsters. If you live near an Asian market, live lobsters are usually available along with a variety of other live seafood. Some markets will clean the lobsters without charge. In which case, you will only have to prep the individuals parts as described below.

For this recipe, because the claw shells need to be cut open, smaller lobsters 1 1/2 pounds each are preferred. Add a grilled steak and you'll have Surf 'n Turf. With a salad and a side vegetable like salt boiled broccoli, that is a beautiful meal. Dessert can be a fresh fruit salad and a nice chocolate eclair.  It all depends on what the "dad" in your home loves.

The day ahead, the lobsters can be prepped and refrigerated covered with plastic wrap (not aluminum foil) and final cooked in the broiler just before serving.

Serves 4

Prep Time 30 minutes

Cooking Time 10 minutes

Total Time 40 minutes

Ingredients

4 1 1/2 pound live lobsters
1 cup bread crumbs, preferably home made
1/2 cup Italian parsley, washed, pat dried, finely chopped stems and leaves
2 tablespoons sweet butter
1 teaspoon olive oil
Sea salt to taste
Black pepper to taste

Directions

When you bring home the live lobsters, place them in the kitchen sink. Run water on them to cool them off. Do not submerge them in water. They live in salt water and fresh water will kill them.

Put 3" water into a large, tall stock pot. Place on stove with the burner on high. Cover. Bring water to a boil.

Preheat oven to broil or to the highest temperature possible.

Heat a sauce pan on a medium flame. Add olive oil, season with sea salt and black pepper. Add Italian parsley and mix well. Sauté until lightly browned. Add bread crumbs. Stir together and sauté until lightly browned. Set aside.


If the pot is not large enough to handle all the lobsters at once, do them one or two at a time. Pick the lobster up by the body and place the head into the boiling water. Hold it there for a minute. Cover and cook 2 minutes. Lift cover. 

Using tongs lift the lobster up and flip it over in order to submerge the lobster tail into the boiling water. Cover and cook another 3 minutes.

Using tongs, transfer the now red lobster to the kitchen sink. Run cold water over the cooked lobster. Continuing cooking the lobsters until all 4 are cooked.

If you want to make stock, which is a good thing to do, reserve the cooking water and add the shells after your meal, simmering the shells until the liquid is reduced by half, then strain out the shells and discard. The stock can be reserved in air tight containers and frozen for later use.


When the lobsters are cool to the touch, using kitchen shears, cut off the rubber bands on each of the claws.

Working with one lobster at a time, place a lobster into a large bowl. Wear gloves if you want and be careful when you are working with the lobster that you do not cut your hands on the sharp parts of the lobster's body.

Twist off the claws at the body. Place them in the bowl. Twist off the tail and the flippers at the tail. Place them in the bowl. Place the body with the open side up in the bowl. Using the kitchen shears, cut the lobster tail in half. In the sink, rinse off the tail. Remove the black vein and discard.

If you enjoy the savory bits inside the body--which I do--pour them into a bowl. Personally, I discard the black egg sack and reserve the green tomalley, which is delicious. The video shows how to serve the tomalley on toast with avocado.


But if you are not into those flavors, simply wash out the body in the sink and run the disposal to get rid of the bits that will be redolent if they linger.

Using the kitchen shears, cut the body in half, so there are legs on each side. Continue to wash and clean the half-bodies to remove any residual parts of the egg sack or tomalley.

Separate each claw from its sections. Separate each of the sections.

Using the kitchen shears, remove half of the shell of each claw. Cut off the top of the shell from each of the sections.

Line a baking pan with parchment paper, a Silpat sheet or aluminum foil.

Place the tails, claws, sections and bodies onto the prepared baking pan, cut side up.

At this point, the prepped lobsters can be covered with plastic wrap (not aluminum foil) and refrigerated to cook the night before or in the morning. Remove the baking pan of lobsters from the refrigerator an hour before serving.

Spoon the seasoned bread crumbs onto the cut sides. Slice 1/8" pieces of sweet butter and place on top of the bread crumbs.


Place the baking sheet into the oven. Cook 4-5 minutes, checking to be careful the bread crumbs do not burn.

The sweet butter will melt, flavoring the bread crumbs and lobster meat.

Serve hot with a salad, side dishes and an ice cold beverage.

Tuesday, May 24, 2022

For a Taste of Italy and Spain, Travel to Your Kitchen

Getting ready to travel to Italy next week, I remembered my last trip three years ago, a few weeks before the world changed and my overseas travel was limited to webinars and Instagram posts. In the fall of 2019, I visited Piedmont and Milan. 

Walking one day in the courtyard of the Duomo, that wonderful cathedral in the heart of Milan, and the next day descending hand chiseled stairs that led down to an Infernot where farmers stored produce and later wine. 

Before the discovery of the New World, Italian farmers in the Piedmont were digging deep into the sandstone underneath their homes in their own exploration of discovery, building rooms where men gathered to eat, talk and drink wine. All they lacked was air. Without a ventilation system, once the air was used up, the men rushed up those hand chiseled stairs before they passed out.

On that trip, I ate local cheeses, charcuterie, bagna cauda (an anchovy-garlic dip), spaghetti with clams, and so many dishes that made me very happy. When travel was not possible, I satisfied my "hunger" for all things Italian by cooking foods that reminded me of Italy. Last night I made pasta with Italian sausage, butter clams, vegetables and a touch of sweet butter. 

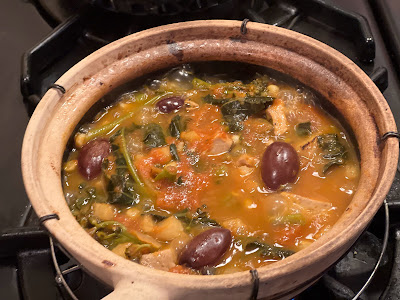
For my wife, who doesn't eat meat, I used a Chinese clay pot to make braised tofu with vegetables, the Spanish spice pimeton and San Marzano tomatoes D.O.P. That brought together China, Spain and Italy in a one pot dish.

For myself, I use bone-in chicken thighs and legs instead of tofu. Where the recipe says tofu, substitute 2 chicken thighs and 2 chicken legs.

Hot Pot Braised Tofu with San Marzano Tomatoes, Vegetables, Olives and Noodles

The cans of San Marzano Tomatoes I was gifted (see at the end, below) had enough tomatoes and sauce for several dishes. What I didn't originally use, separating sauce from tomatoes, I froze in 6 oz and 8 oz containers. Because our sons are fully grown, I cook for two. Whenever I have too much of an ingredient, I place small containers in the freezer, available when I want to create a dinner or lunch.

The San Marzano Tomatoes and sauce froze and reheated with no loss of flavor. 

Clay hot pots are available in Asian markets. Inexpensive, they require a bit of special care. Before using, each time, submerge the clay pot into clean water for 15 minutes. Purchase a wire trivet that you'll place on the stove-top burner. The clay pot goes on top of the wire trivet. Only use a low to medium flame to avoid stressing the clay. Allow the pot to cool before washing to avoid cracking.

If you can find only small clay pots, use two to prepare this dish.

Serves 4

Time to prepare 15 minutes

Time to cook 45 minutes

Total time: 60 minutes

Ingredients

1 cup yellow onions, washed, peeled, roughly chopped

1 cup carrots, washed, ends removed, peeled, roughly chopped

1 cup daikon, washed, ends removed, peeled, roughly chopped

1/2 cup corn kernels, cut off the cob (when available)

1 cup broccolini or broccoli, stems roughly chopped, leaves whole and florets sliced into bite sized pieces

2 cups tofu, preferably firm and organic, washed, cut into bite sized pieces

1 cup San Marzano tomatoes D.O.P., roughly chopped

1/2 cup San Marzano tomato sauce, D.O.P.

2 cups homemade vegetable stock, if none available, use water

1 cup green or black olives, preferably olives with pits

1 pound noodles, dried or fresh

1/2 tablespoon pimeton

Sea salt and freshly ground black pepper to taste

Directions

Heat olive oil in hot pot over medium heat. 

Saute onions until lightly browned.

Add tofu, lightly brown and stir well.

Add pimeton and stir well. Don't burn the spice.

Add carrots, daikon and corn. Stir after each ingredient is added.

Add broccolini or broccoli stems. Stir well and cook to soften.

Add broccoli or broccoli leaves. Sir well.

Add chopped tomatoes and tomato sauce, if frozen, no need to defrost.

Add vegetable stock, if frozen, no need to defrost. If stock unavailable, use water.

Add olives, cover and simmer 30 minutes.

While the tofu is braising, bring a pot of salted water to boil and cook noodles according to the package. 10 minutes if dried, 2-3 minutes if fresh. Drain and set aside.

Remove cover and add cooked noodles.

Stir well to mix together tofu, vegetables and noodles.

Serve hot in bowls.

Please send me recipes and photographs when you make your delicious dishes using Pomodoro San Marzano Dell'Agro Sarmese-Nocerino D.O.P. and I will submit your recipe to enter a contest to win a gift basket of these wonderful D.O.P. San Marzano tomatoes.


The tomatoes I used were provided courtesy of the Consorzio di Tutela del Pomodoro San Marzano dell’Agro Sarnese-Nocerino DOP and ANICAV.

Monday, May 23, 2022

San Marzano Tomatoes Make a Best-Ever Vegan Soup

"You say tomato, I say tomato" say Ella Fitzgerald and Louis Armstrong in their classic song about lovers who can't even agree on how to pronounce everyday words like "tomato" and "potato." But today pronunciation isn't the only issue when it comes to "tomato."

Recently, I was brought up-close-and-personal with a controversy that is raging in the culinary world. 

When is a San Marzano tomato a real San Marzano tomato? 

Widely regarded as the best-of-the-best, low-acid San Marzano tomatoes are so prized they have been given a D.O.P. designation along with Italy's other prized food products like Basilico Genovese, Acute Balsamic di Reggio Emilia and Grand Padang cheese, to name a few. 

Officially the tomatoes are called Pomodoro San Marzano Dell'Agro Sarmese-Nocerino D.O.P.   "D.O.P" means "Denominazionedi Origins Protetta" or "Protected Designation of Origin." In the EU, if a can of tomatoes says "San Marzano," the D.O.P. seal must also be visible on the label to confirm that the tomatoes and sauce inside are guaranteed to have been grown in San Marzano and harvested and packaged according to the designation (more about that later).

That seems simple enough. If the label says "San Marzano," then it must be "San Marzano D.O.P." But not so fast. 

In the United States, "D.O.P." has no meaning. U.S. domestic producers can say "San Marzano" if the seeds are from that tomato strain. So it's buyer beware. If you want a San Marzano experience in the U.S., look for "D.O.P." 

Why are San Marzano tomatoes so highly regarded?

Grown within sight of Mount Vesuvius in the Agro Sarnese-Nocerino region near Naples, the tomatoes develop their delicate flavor, sweetness and low-acidity in the rich volcanic soil, under the ever-present southern Italian sun. To receive the D.O.P designation, the tomatoes must also be handpicked, steamed, peeled and combined with sauce made from San Marzano tomatoes. 

At the Wednesday Santa Monica Farmers Market, one enterprising farmer had identified his fresh tomatoes as "Sanmarzano." He might have found San Marzano seeds, but his Southern California tomatoes do not have the benefit of the Agro Sarnese-Nocerino terroir. 


The tomatoes are always packaged whole. If you see a label that says San Marzano "cherry tomatoes" or "diced tomatoes," that product might be of good quality but if you want a D.O.P. experience, look for that D.O.P. 

To purchase San Marzano D.O.P. products, search online. I found authentic products on Amazon, Supermarket Italy, Etaly and other online retailers and even many supermarkets like Ralph's and Von's as well as Italian shops and specialty food stores. Try Cost Plus World Market as well.

Please send me recipes and photographs when you make your delicious dishes using Pomodoro San Marzano Dell'Agro Sarmese-Nocerino D.O.P. and I will submit your recipe to enter a contest to win a gift basket of these wonderful D.O.P. San Marzano tomatoes.


The tomatoes I used were provided courtesy of the Consorzio di Tutela del Pomodoro San Marzano dell’Agro Sarnese-Nocerino DOP and ANICAV.

San Marzano Tomatoes-Garbanzo Bean and Vegetable Soup

I knew about San Marzano tomatoes but had never cooked with them because I have used my own roasted tomatoes and tomato sauce. When I was offered several cans of San Marzano tomatoes, I was very happy. I quickly made a favorite recipe, tomato-garbanzo bean and vegetables soup. The result was excellent. The tomatoes thickened the soup and added a layer of flavor that made me a fan.

Please try my recipe and track down authentic San Marzano tomatoes D.O.P. Enjoy!


Cut all vegetables into pieces the size of a garbanzo bean.

Use homemade stock. I keep my vegetable stock in the freezer so its available whenever I want to make soup.

Serves: 4

Time to Prepare: 30 minutes

Time to Cook: 60 minutes

Ingredients

1 medium carrot, washed, peeled, ends trimmed

1 small yellow onion, washed, peeled, ends trimmed 

2 cups kale, washed, stems removed

1/2 cup corn kernels (when in season)

1/2 cup Italian parsley, washed, stems removed

1/2 cup celery hearts and small leaves (celery hearts have more flavor)

1 cup broccoli florets, washed

2 cups green cabbage, preferably Savoy, ribs removed and chopped separately from leaves

6 shiitake mushrooms, washed, pat dried

1 cup canned garbanzo beans with liquid 

2 cups San Marzano tomatoes and sauce 

4 cups stock, preferably homemade

2 oz cheese rind (optional)

2 tablespoons olive oil

Sea salt and freshly ground black pepper to taste

Directions

Season olive oil with sea salt and pepper and heat over a medium flame.

Add all vegetables except the garbanzo beans and liquid and San Marzano tomatoes and liquid.

Stir well and soften. Do not brown. 10-15 minutes.

Add garbanzo beans with liquid and stir.

Add San Marzano tomatoes and sauce and stir.

Add stock and stir.

Add cheese rind (optional).

Simmer uncovered 30 minutes.

Taste and adjust seasoning and continue simmering if needed.

Served hot with crusty bread and a tossed green salad

Ready, Set, Prep: Careful Planning Makes Thanksgiving Day a Lot More Fun

Thanksgiving was my mother's favorite holiday. She loved the food, the gathering of friends and family and the positive outlook of a hol...