Showing posts with label comfort food. Show all posts

Saturday, March 5, 2011

What's for Breakfast? Mashed Potatoes and Eggs

A hot breakfast is a smart way to begin the day. But it can take too much time to prepare. Because they're already cooked, left-over mashed potatoes are a quick and easy way to make a nutritious breakfast.

For dinner last Sunday, we had a Caesar salad made with frisee instead of romaine and roast pork (porchetta) flavored with Italian parsley, garlic and onions. Garlic mashed potatoes and roasted whole tomatoes were the sides.  A plate of cut up cara cara oranges and a custard with crystallized ginger and orange juice finished the meal. All in all, dinner was very satisfying.

The next day, the refrigerator was the beneficiary of Sunday's dinner. Considering what was left-over, we were looking at a succession of meals we could have during the week.

Reheated, the porchetta could easily be enjoyed as an entrée or a hot sandwich. The roasted tomatoes would make a delicious pasta sauce. And the mashed potatoes....! They were so delicious the first time around.

Made from King Edward potatoes bought at the Santa Monica Farmers Market, the mashed potatoes were sweet and full of flavor. Certainly we could just reheat them to serve again with the porchetta but they would also be good for breakfast.

From my hippie days, I always save the potato skins when I make mashed potatoes because I add them to stocks. It occurred to me that they would also be good sauteed (to crisp up) and added to the mashed potatoes.

Some bacon would be good too.

Breakfast Mashed Potatoes with Crispy Potato Skins and Onions

Using a non-stick pan is the way to go with this dish. Just be sure to use the pan on a medium-low to medium flame to avoid health risks.

Serves 4

Time 15 minutes

Ingredients

1 cup skins, peeled from 6 large potatoes, julienned
2 cups mashed potatoes, King Edward, Sierra Gold or Yukon Gold potatoes
1 tablespoon sweet butter
1 medium onion, washed, peeled, root, skin and stem removed, roughly cut
1/4 cup Italian parsley, leaves only, washed, finely chopped
2 slices cooked, crisp bacon, cut into strips (optional)
Sea salt and pepper, to taste

Method

Melt the butter in a non-stick pan over a medium flame, saute the potato skins, onion and parsley until lightly browned, add the bacon (optional) and the mashed potatoes, mix together, season with sea salt and pepper and saute until potatoes are lightly browned on top and form a crust.

Serve with eggs, any style.

Monday, February 28, 2011

The Infinitely Variable Omelet

Omelets are a great main course. Perfect for breakfast but also satisfying as lunch, dinner or a snack.

Easy to make, infinitely variable, filling, healthy and affordable, they are warming and delicious.

Just about any ingredients that can be sauteed can be used as a filling. (Why saute the fillings? To eliminate excess water and caramelize the ingredients.)  I like mine with cheese, but that's a matter of personal choice.

For breakfast this morning, I made my wife a vegetable omelet with spinach and shiitake mushrooms while I had a bit of bacon in mine.

Bacon Omelet with Comte Cheese and Parsley

Use any kind of frying pan, but a nonstick pan makes everything easier and a nice crust forms on the outside of the omelet.

For a one-person omelet, use a 9" pan. An omelet for two requires a doubling of the recipe ingredients and a 12" pan.

Serves: 1

Time: 10 minutes

Ingredients

2 large or extra large eggs, farmers' market fresh
2 tablespoons milk, half and half or cream
2 teaspoons sweet (unsalted) butter
1 slice raw bacon, finely chopped
1/4 cup Italian parsley, finely chopped
2 tablespoons onion, roughly chopped
1/4 cup grated cheese (comte, cheddar, munster, or swiss)
Sea salt and pepper to taste

Method

Beat the eggs with the milk and set aside.

Heat the nonstick frying pan on a medium flame, melt 1 teaspoon butter and saute the bacon, parsley and onion until lightly browned. With a silicon or rubber spatula, remove the sauteed vegetables and reserve.

Return the pan to the flame. Melt the other teaspoon of butter, add the eggs, swirling them over the bottom of the pan. Season with sea salt and pepper. Sprinkle grated cheese on one half of the omelet. Spoon the sauteed vegetables over the cheese.

Let the eggs set and the cheese melt, about 2 minutes. Using the spatula, gently fold the "empty" side of the omelet onto the side that has the cheese and sauteed vegetables.

Slide onto a plate. Serve with toast or fresh fruit and a hot beverage.

Monday, February 14, 2011

Eat Like a Rock Star in Your Own Kitchen: Fresh Ravioli With Tomatoes and Butter

Sean Stone and Steve Jenkins serve rock stars through Eat Your Hearts Out catering company
Complaining that busy lives preclude shopping for fresh ingredients and making home-cooked meals, most people rely on shortcuts that include fast food, prepared meals, or bowls of cereal for dinner.

Imagine how you would eat if you were living the life of a rock star, traveling from city to city, performing for hours before thousands of screaming, out-of-their-minds fans.
For big-name musical groups, sex, drugs and rock 'n' roll don't cut it anymore. Healthy, freshly prepared meals are the order of the day.

To see just how it's done, I hooked up with Green Day in the fall when they were performing south of Los Angeles at the Irvine Amphitheater.

For Zesterdaily I went behind the stage to check out how chefs Sean Stone, Steve Jenkins and Steve Ricalis keep Billie Joe Armstrong, Mike Dirnt and Tré Cool happy and well-fed when they are on tour.

Tuesday, August 31, 2010

A Labor Day Meal: Salmon with a Citrus Glaze Tangos with Mango Salsa

On holidays like Labor Day, the best dishes to serve friends and family are the ones that take very little effort to prepare.  That way you can spend your time enjoying the day not laboring in a hot kitchen.

Versatile salmon can be grilled, sauteed, baked, and braised. More often than not the preferred approach is to simply grill the fish--whole or filleted--with olive oil, sea salt, and pepper, the Italian way. But there are times when a little more seasoning accents salmon's natural flavors.

Spanish style preparations saute the fish with fresh tomatoes, pitted olives, peppers, onions, and parsley. American barbecue relies on sweet-heat. Another approach, one borrowing from South American and Caribbean recipes, marries citrus with honey and garlic in a simple sauce.

Serve the roasted fish with a side of reserved pan drippings and a mango-grilled corn salsa and you'll have the perfect summer meal to be enjoyed with a glass of chardonnay or an ice cold beer.

Mango Salsa

Make the salsa ahead and keep refrigerated in a sealed container

Serves 4

Time 15 minutes

Ingredients

1 ear corn, husks and silks removed, washed
1 large mango, washed, skin removed, meat cut into small pieces, pit discarded
1/4 cup red onion, finely chopped
1 tablespoon Italian parsley, washed, leaves only, finely chopped
1 garlic clove, skin on, charred in an open flame
1 tablespoon olive or safflower oil
1/2 teaspoon fresh lemon juice
Sea salt and pepper to taste

Method

Grill or oven roast the corn in a 400 F oven for 15 minutes or until lightly browned. Let cool and remove the kernels. Discard the cob. Clean off the charred skin from the garlic, finely chop, add to a bowl with the corn kernels, mango, onion, parsley, olive oil, and lemon juice. Toss well. Taste and season with sea salt and pepper.

Roast Salmon with a Citrus Glaze

Buy a fillet that has skin but not bones for easy serving.  The fresher, the better.

Serves 4

Time 45-60 minutes

Ingredients

1 1/2 pounds salmon fillet with skin on, washed, pat dried
1/4 cup fresh squeezed orange juice
1 tablespoon fresh squeezed lemon juice
1 tablespoon fresh squeezed lime juice
2 tablespoons honey
1 garlic clove, skin removed, thinly sliced
1 tablespoon olive oil
1/4 teaspoon pepper flakes or cayenne
1 tablespoon Italian parsley, washed, leaves only, finely chopped


Method

Preheat the oven to 350 F. Cutting across the fillet, score deeply into the flesh about half way. Place the salmon on a Silpat or other non-stick material like parchment paper placed on a rimmed baking sheet.

Mix together the juices, honey, garlic, olive oil, cayenne, and parsley until the honey is well dissolved. Pour over the fillet.  Roast in the oven 30 minutes.  Remove and clean away and discard any pink solids.

Raise the temperature of the oven to 500 F. Baste the fillet with the pan drippings. Return the salmon to the oven and cook another 10 minutes. Remove from the oven, baste, bake another 5 minutes being careful to brown but not burn the skin.

Transfer the salmon to a serving plate. Use a rubber spatula to collect all the pan drippings and place in a small bowl.

Serve the salmon with the pan drippings, mango salsa, and a green salad or freshly steamed rice.

Thursday, August 12, 2010

The Easiest Pasta You’ll Ever Make Using Grilled Corn and Roasted Garlic


On a recent trip to Sonoma County, my wife and I wandered from the coast to the inland farmland to eat our way across one of America's most productive valleys. We were lucky enough to have some wonderful meals. We especially enjoyed chef Josh Silvers' 
We loved his roasted garlic-butter sauce on his grilled corn, I was inspired to write a recipe that adapted that flavor combination with pasta.  I posted the recipe on Zesterdaily.

Tuesday, July 27, 2010

Egg Salad with Grilled Vegetables and Crisp Bacon


I keep connecting with an early childhood memory about summer days at the beach.

To get to the beach we'd drive a long time in our hot car and coming home, I was always sunburned, with gritty sand in my swimsuit.  The travel part wasn't what I liked, but the picnic lunch my mom packed sure was.

Fried chicken, potato salad, biscuits with butter and honey, watermelon slices, and egg salad.

My dad rarely came with us so usually my mom had a friend along for company while my sister and I splashed in the water, determined to annoy one another as much as possible.  After awhile we'd get tired. Then it was time to eat.

We'd load up paper plates and settle down on the sand watching the older kids body surf.  We didn't talk much but we'd share the moment enjoying our mom's food.

I don't know why but it's the egg salad I most remember.  Hers was a pretty straightforward affair.  Hardboiled eggs, some red onion, mayonnaise, a little salt and pepper.  Sometimes she'd add capers if she wanted to get all fancy.

I don't get down to the beach much these days, but when I travel and know I have to endure the long lines at security, a cramped airplane cabin, and no food service, I bring along a couple of egg salad sandwiches. Nothing is more comforting at 30,000 feet.

Egg Salad with Grilled Vegetables and Crisp Bacon

Starting with my mom's basic recipe, I've added grilled vegetables and freshly chopped parsley for color and flavor. Crisp bacon bits makes the egg salad really good. The bacon strips can be cooked first but better is to mince the raw bacon and saute the bits. That way, each bacon bit is nicely browned and holds a uniform shape.


Yield: 4 servings

Time: 45 minutes

Ingredients

4 farmers' market fresh large or extra large eggs
1 large carrot, washed, ends trimmed, peeled
1 ear of corn, tassels and husk removed, washed
1/2 cup Italian parsley leaves, washed, finely chopped
1 tablespoon capers, rinsed, finely chopped
2 strips of bacon, finely chopped, sauteed until crisp, drained
1 tablespoon finely chopped shallots or scallion
2 tablespoons mayonnaise
2 tablespoons olive oil
Sea salt and black pepper

Method

I like to put the eggs into a pot of cold water, turn the flame to medium-high, and cook them for 30 minutes. Many people say that's way too long but it works for me. The yolks come out flaky, the whites dense. Rinse with cold water, take off the shells, and roughly chop.

Slice the carrot into flat slabs about 1/4" thick and 3" long.  Toss in olive oil seasoned with sea salt and black pepper.  Do the same with the ear of corn.  Grill until lightly browned all over or oven roast in a 400 degree oven for 15 minutes. Turn frequently to avoid burning. Let cool.  Finely chop the carrots. Remove the kernels from the cobs.

In a large mixing bowl, combine the chopped eggs, carrots, corn kernels, parsley, shallots, and crisp bacon bits. Toss. Season with sea salt and black pepper.  Add the mayonnaise and mix well.

Serve on bread, crackers, or lettuce leaves.

Variations

Add 1/4 cup roasted red pepper, finely chopped

Omit the bacon

Add 1/4 cup finely chopped, pitted olives

Roast 2 garlic cloves, tossed in olive oil, seasoned with sea salt and pepper until lightly browned, peel off the skins, finely chop the soft garlic and add to the egg salad

Add a dash of tabasco or a dusting of cayenne pepper for heat

Thursday, July 8, 2010

Summertime Fun: U-Pick Blueberries on the 101

For most people, summer means vacation time and, more than likely at least one road trip. We started early this year and took a trip up the coast for a long weekend.

Driving from Los Angeles to Northern California, we usually take the 5.  A boring drive, the 5 is all about getting up the coast as quickly as possible.

This trip we decided to take the 101. A bit slower, but a lot more scenic with the opportunity to interact with the communities along the way.

When I was growing up, my mom’s favorite thing to do when we hit the road was to stop at the roadside stands and buy fruit and vegetables from the local farmers.  What she dearly loved was when we could actually stop at the farm and do the picking ourselves.

One of her favorite places to visit was Cherry Valley, east of Los Angeles, where she would find an orchard that would let us kids climb up the ladders, buckets in hand, and pick and eat as many cherries as we could handle.


Heading up north I remembered those experiences when I saw the signs for Restoration Oaks Ranch's Santa Barbara Blueberry Farm, with its U-Pick option.

Thirty minutes north of Santa Barbara and three miles south of Buellton (home of Anderson's Pea Soup), from May to early August, keep a lookout on the east side of the highway.  There are signs on both sides of the highway but the turn off comes quickly, so be alert, especially on the southbound side where the exit is from the left lane.

Protected from birds by a high wall of netting, the farm grows several varieties of blueberries: Bluecrisp, Emerald, Jewel, Star, Misty, and Sharpblue.  The plants grow in long rows, stretching from the highway back into the hills.

Blueberries grow on low bushes, the fruit gathering in tight clusters on the branch ends.

Walking up and down the rows we passed couples feeding each other berries as if they were on a romantic date.  Then there were the families with kids, who rushed from plant to plant, picking and eating berries, yelling out, "I found the best ones."

For our part, my wife and I approached the task with deliberation. Mostly that meant picking berry by berry, but when we found a perfectly formed cluster, a quick sweep of the branch yielded a handful of berries that clattered satisfyingly into the bucket.

Harvesting blueberries is sweet work. You pick a few and eat a lot as you walk down the rows. We enjoyed them all the more knowing blueberries are healthy and nutritious.

The best berries are plump, firm, and colored a dark shade of blue. Ripe berries are on the top of the plant but also down below, so it's worth the effort to crouch down and check the lower branches.

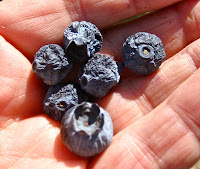
In addition to all those nice plump, ripe berries, you'll also see ones that are slightly wrinkled.  We had a difference of opinion about those.

My wife didn't care for them, but I did because they have a thick, jammy taste, reminding me of homemade blueberry pie. Because my wife didn't want any wrinkled berries in our bucket, I ate them as I picked.

My wife wandered off in one direction.  I, in another. We walked up and down the rows, enjoying the warmth of the afternoon sun and the easy quiet of the rolling hills surrounding the farm.

Walking down the rows, I couldn't get over that there were so many berries!  How could I pass by ripe, perfectly formed blueberries, sweet and luscious and not pick every one in sight?

With a quick grab, I could fill my mouth with great tasting blueberries.  So delicious, so available.

With blueberry stained fingers, I placed yet another handful of berries in my mouth when my wife called out to me.  Actually she called several times before I heard her.  "David," she said, "Come on, you've had enough."

I nodded in agreement but managed to run my hand along another branch and enjoyed a last mouthful of berries before I re-joined her. With our buckets filled, we walked hand-in-hand down the dirt road, stopping at the outdoor sink to wash the blueberry stains off our hands, and then to the shack where we paid for our blueberries.

In 30 minutes my wife and I had filled our buckets.  At $15.00 a bucket (about 2 quarts), the blueberries are a bargain, considering that at farmers' markets small containers cost $3.00-4.00.

At our friends' house that night, we proudly served the berries as the crowning topping to a pineapple-strawberry fruit salad.  The combination was perfection.  Each fruit had a different tartness and sweetness.  Their flavors melded beautifully.

With a large bowl in the refrigerator, everyone in the house made frequent stops to grab a handful.  In no time at all, we had eaten all the blueberries.

With a short growing season and given that it was unlikely we would drive up 101 anytime soon, when we headed back to LA, we left early so we could stop at the blueberry ranch and pick another bucket.

Back home I remembered all those ears of corn, peaches, and cherries, I used to pick with my mom and sister and I was very happy to have a bucket of blueberries in the refrigerator.  What a great way to start the week with a breakfast of fresh blueberries, yogurt, and cereal.

Thursday, December 3, 2009

Kimchi Chicken Wings Take Flight

Needing an appetizer for an Asian themed dinner, I played around with the kimchi I had in the refrigerator. A simple marinade using brown sugar lessened the impact of kimchi's bite, but there was still plenty of spiciness.

The result was a sweet-heat dish, a good companion for cocktails before dinner.

Kimchi Chicken Wings

Yield: 4 servings

Time: marinate overnight; cook approximately 60 minutes

Ingredients

2 1/2 pounds chicken wings, washed, pat dried
2 tablespoons brown sugar
1/2 cup kimchi, finely chopped
1 tablespoon kimchi water from the bottle
1 tablespoon olive oil
1 small onion, washed, peeled, sliced thin
2 tablespoons soy sauce

Method

Dissolve the brown sugar in the kimchi water, olive oil, and soy sauce. Add the kimchi, onion slices, and chicken wings. Mix well, cover, and refrigerate overnight.

Preheat the oven to 350 degrees. Line a baking tray with tin foil for easy clean up. Place a wire rack on the tray and arrange the wings on the rack. Drizzle the wings with olive oil. Put into the oven and bake 30 minutes. Turn over with tongs. Bake another 30 minutes. The wings should be tender and golden brown. If not, turn the wings over and continue baking another 10 minutes. Check again and continue baking at 10 minute intervals, turning the wings each time, until they are done.

In a small saucepan on a low flame, reduce the marinade by a third. Reserve.

The wings should be eaten hot. Pour the heated, reduced marinade over the wings just before serving.

Make sure everyone has plenty of napkins and a chilled drink of choice.

Variations

Add 1 tablespoon julienned garlic and 1/4 cup finely chopped Italian parsley to the marinade
Just before serving, top with 1 teaspoon toasted sesame seeds and 1 tablespoon thinly sliced scallion

Tuesday, May 19, 2009

Summer Vegetable Risotto

With summer vegetables appearing in the farmers' markets, a vegetable risotto is a perfect way to feature the bounty of the garden.

This past Sunday at the Palisades Farmers' Market, we picked up several ears of fresh corn and some baby zucchini. We also bought carrots, spinach, Italian parsley, scallions, green garlic, squash, asparagus, English peas, spinach, and broccoli, any of which would be good in the risotto.

To make risotto requires a variety of rice--Carnaroli, Violone or Arborio-- with a high starch content, the source of risotto's distinctive creamy quality.

For the liquid, you have a lot of choices: vegetable, chicken, meat, or fish stock, wine, even water with a pat of butter added for flavor. You'll achieve the best results if you use homemade stock with its fresher taste and lower sodium content.

Risotto likes a steady hand, stirring frequently for 18-20 minutes. Because the rice both releases starches into and absorbs the stock, there is a window of a few minutes when the rice is simultaneously al dente and the broth creamy. Past that point, the grains bond together, becoming gummy like porridge, which still tastes good but isn't risotto.

Those last moments are crucial and the rice wants all your attention. Whatever you want to add to the risotto should either cook in a few minutes like spinach or be prepared ahead and added in those last moments.

Serve immediately because the rice will keep absorbing the broth even after you've removed the risotto from the stove.

Risotto with Farmers' Market Fresh Vegetables

Yield: 4 servings
Time: 45 minutes

Ingredients

1 large tomato, washed
1 small yellow onion, peeled, finely chopped
3 garlic cloves, peeled, finely chopped
1 ear of corn, shucked, kernels removed
4 baby zucchini, washed, thinly sliced
1 1/2 cups risotto
3 1/2 cups homemade stock, vegetable, chicken, fish, meat, or wine
2 tablespoons olive oil
Sea salt and pepper
1 teaspoon sweet butter (optional)

Method

Preheat the oven to 400 degrees. Cut out the stem part of the tomato. Put the tomato on an aluminum foil covered cookie sheet, drizzle with olive oil and roast for 30 minutes. Remove, let cool to the touch, peel off the skin and discard, tear apart and reserve the pulp and juice in a bowl. The tomato can be roasted ahead and frozen. That way it is ready and waiting whenever you need it to spice up a sauce or stew or, in this case, a risotto.

Drizzle a tablespoon of olive oil into a frying pan. On a medium flame, saute the onions, garlic, and corn kernels until lightly browned, about 5 minutes. Remove and set aside.

Drizzle the 2nd tablespoon of olive oil in the pan, season with sea salt and pepper, add the rice, stir and cook for 2 minutes, then add 1/2 cup of stock. The stock will deglaze the pan, adding the caramelized flavors of the vegetables to the rice.

Continue stirring. Add another 1/2 cup of stock as the rice absorbs the stock. Continue adding a 1/2 cup of stock at a time, stirring, and adding more stock. Do this for 18-20 minutes until the rice is al dente.

When the rice is almost cooked, add back the sauteed vegetables and roasted tomato pulp. Stir well, taste and adjust the seasoning with sea salt and pepper, a drizzle of olive oil or a pat of butter.

Serve with grated Parmesan or Romano cheese.

Variations

To the saute add 4 mushrooms, brown or shiitake, washed, dried, thinly sliced

To the saute add 1/2 cup finely chopped Italian parsley leaves

Add 1 cup grilled chicken breast, cut into small pieces

Add 1 cup asparagus cut into 1/2" pieces to the saute

Add 1 cup grilled Italian sausage, cut into small pieces

Wednesday, January 23, 2008

Braised Chicken with Vegetables

It's raining outside. The wind is banging against the front windows. I just made matzo ball soup, but that's not enough to get rid of the chill and feed my hunger-caused-by-the-cold. I need a rich soup, with meat falling off the bone and enough carbos to boost my internal temperature a couple of degrees.

Braised chicken legs and thighs with parsley, potatoes, and carrots hits the spot.

2 chicken legs, washed
2 chicken thighs, washed
4 shallots
2 large cloves garlic, peeled, julienned
2 cups Italian parsley, washed, chopped
2 medium sized, Yukon potatoes, washed, peeled, roughly chopped
2 large carrots, washed, peeled, cut into thick rounds
10 shiitake mushrooms, dried or fresh, sliced
6 cups water
Olive oil
Sea salt
Freshly ground black pepper

If you are using dried shiitake's, submerge them in hot water for 30 minutes or until soft, then cut off and discard the stems. Squeeze the excess water out of the mushrooms, then slice. Reserve the soaking water. If you're using fresh shiitakes, wash and trim any dirt off the stems, but use them as well as the caps.

Sauté the chicken in the olive oil, seasoned with sea salt and black pepper, until lightly browned on all sides. Remove the chicken and sauté the shallots, garlic, shiitake mushrooms, and parsley. Put back the chicken and add 6 cups of water. If you used dried shiitakes, use 5 cups of water and 1 cup of soaking water.

Lightly cover the pot with a piece of tin foil and simmer on a medium flame for 30 minutes. Add the potatoes and cook for another 20 minutes. Add the carrot rounds and simmer for a final 10 minutes.

Serve in a soup bowl so each person gets a generous portion of the thick soup. If the potatoes aren't enough carbos, top each serving with homemade croutons.

Serves 2. Preparation Time: 15 minutes. Cooking Time: 75 minutes.

Sunday, January 6, 2008

Chicken and Dumplings with Sweet Potato Stuffing

Chicken and dumplings is the classic comfort-food entree, no question about it. Stuffing the dumplings with a savory sweet potato puree takes them to another flavor level. Adding that little touch, makes the dish perfect for a dinner party.

Chicken and Dumplings with Sweet Potato Stuffing

Yield: 4-6

Time: 2 1/2 hours

Ingredients

1 medium sized sweet potato or yam, washed, wrapped in tin foil
1 shallot, peeled, finely chopped
8 cloves, garlic, peeled, finely chopped
2 4-pound chickens, washed
1 yellow onion, peeled, roughly chopped
1 ear of corn, the kernels removed
3 large carrots, peeled, cut into thick rounds
1/2 pounds mushrooms, washed, sliced thin
4 cups chicken stock, homemade
2 tablespoons olive oil
4 tablespoons butter
2 cups white flour
1/2 teaspoon baking powder
1/2 cup cream or half-and-half
Sea salt
Freshly ground black pepper

Method

Bake the sweet potato in a 350 degree oven for 1 hour (turning it over after the 1st 30 minutes) until soft. Remove from the tin foil and peel off the skin and mash with a fork. (For a chef's snack, try the skin with a little sea salt. Yummy.) Saute the finely chopped shallots and 2 of the garlic cloves in olive oil until lightly browned, then add to the sweet potato puree and put aside.

Cut apart the chicken, separating the legs, thighs, and wing parts (cut apart the three wing bones, keeping the 2 and using the wing tip for stock). Debone the breasts and remove the skin. Put the meat into a bowl and season with 1/4 cup olive oil, sea salt, and black pepper.

To make the stock, put the carcass, wing tips, and breast skin into a large pot with 1/2 gallon of water and simmer on a medium flame for 1 hour. The water should have reduced by half. Strain out the bones and put the stock aside.

Cutting apart the chicken and making the stock the night before has a couple of advantages. You don't have to deal with it on the day you're cooking the meal, the meat will tenderize in the seasoned olive oil, and you'll be able to strip off the fat that will solidify on top of the stock. These are all good things.

In a large skillet or dutch oven, brown the wings, legs, and thighs in olive oil on a medium flame, turning them frequently so they don't burn. Remove and drain on a paper towel. Pour off the fat and discard. Measure 1 tablespoon of olive oil and saute the onions, garlic, corn, and mushrooms until lightly browned. Add the wings, legs, thighs and chicken stock. Cover with a lid or piece of tin foil and simmer for 30 minutes or until the chicken is tender.

Add enough stock or water to cover the chicken and vegetables.

Make the dumplings by first mixing together the flour and baking powder. Using a fork, crumble the butter into the flour, then season with a little sea salt and freshly ground pepper. Stir the flour mixture and slowly add the cream until the texture is like thick porridge.

The dumplings will take 30 minutes to cook, so save this last step until your guests have arrived and they're enjoying drinks and hors d'oeuvres. Ask someone to keep you company or help with making the dumplings. They're fun to make but a bit tedious.

One last thing before you start making the dumplings. This is the moment when you can decide if you want to include the breast meat or save it for another dish (like grilled chicken paillard or breaded chicken breasts). If you want to have both white and dark meat in the dish, then cut the breasts into 1" cubes and lightly saute them in a olive oil for 2 minutes on each side, then add them to skillet.

Put the flame onto medium and start fashioning the dumplings. Using 2 large metal spoons, scoop up a quarter-sized amount of the dumpling mixture in one of the spoons. With the other, take a dime-sized amount of the sweet potato puree and spread that over the dumpling mixture, then scoop up another quarter-sized portion of the dumpling mixture and spread it on top of the other spoon so the sweet potato puree is completely hidden.

Describing how to make the stuffed dumplings makes it sound difficult, but it's very simple. You'll quickly get the hang of it.

There should be enough liquid in the pot to reach 1/2" above the meat and vegetables, because the dumplings need liquid to stay moist. Once the dumpling has been formed in the one spoon, use the other spoon to gently slide it off into the pot so it rests on top of the chicken and vegetables.

As you make the dumplings, set them into the pot, one next to the other--no overlapping--until the top of the pan is completely covered with dumplings. It's best if there's a little space between dumpling so they have room to expand.

Cover the pot and come back in 30 minutes. Use a large soup plate to serve the chicken with a sampling of vegetables and a dumpling.

Smoky Leek Soup

It's January cold. The sky is overcast, a very heavy rain storm on the way. Of course in Southern California, a day like today is an 'event' and that means we can indulge in an East Coast afternoon, with the fireplace going and a comfort-food lunch.

The Sunday farmers' market had baby leeks, so it's going to be Smoky Leek Soup and a corned beef sandwich with coleslaw--leftovers from yesterday's visit to Nat 'n Al's in Beverly Hills.

To put a bit more flavor into the soup, add sauteed smoked bacon and lightly brown the garlic and leeks.

Smoky Leek Soup

Yield: 4 servings

Time: 40 minutes

Ingredients

1 bunch leeks, green stems and roots cut off and discarded
1 tablespoon finely chopped smoked bacon
1 teaspoon olive oil
1 tablespoon sweet butter (no salt)
1/4 teaspoon freshly ground black pepper
2 cloves garlic, peeled, finely chopped
3 cups stock, duck or chicken
1/4 cup homemade croutons

Method

Wash the trimmed leeks in a bowl of water, letting them soak for 5 minutes to get rid of any grit. Heat a saucepan on a medium-low flame. Sauté the bacon until lightly browned. Cut the leeks into thin rounds. Add the leeks, olive oil, butter, and and garlic to the bacon.

Traditionally leeks are only supposed to be softened, but lightly browning them gets more sweetness into the soup and adds a layer of flavor.

Sauté for 10 minutes on a medium-low flame. Add the stock and simmer for 30 minutes.

Laddle the soup into 2 bowls and top with the croutons.

Tuesday, December 25, 2007

Mushroom Soup

My mother had a couple of specialties when we were growing up: a braised brisket of beef topped with a package of Lipton's onion soup, sour cream dip made with canned clams, and tuna casserole sauced with Campbell's cream of mushroom soup.

I still remember those dishes fondly.

What I learned from my mom was to have fun cooking, to care about flavors, and to find the most efficient way possible to make a dish. Use the fewest ingredients, don't be overly complicated, and clean up as you cook. That was her mantra.

Today I made a simple soup for lunch: mushroom soup with a handful of garlic. With a small salad and some grilled lavash, we were very happy.

Garlic-Mushroom Soup

Yield: 4 servings
Time: 60 minutes

Ingredients

4 cloves garlic, peeled, finely chopped
3 sprigs parsley, washed, finely chopped, stems and leaves
5 shallots, peeled, thinly sliced
1 tablespoon olive oil
1/2 pound mushrooms, shitaki or chanterelles, washed, thinly sliced, stems included
1 tablespoon butter
4 cups water or chicken stock
1/4 cup cream or half and half (optional)
1 tablespoon cooked rice per serving or cooked pasta (optional)
Sea salt
Freshly ground black pepper

Method

Over a medium flame, sauté the garlic, shallots, and parsley with the olive oil until lightly browned, about 5 minutes. Add the mushrooms and butter. Stir well and continue to cook for 15 minutes until lightly browned, then add the stock or water to deglaze the pan.

Simmer for 30 minutes on a low flame. Taste and adjust the flavors, adding sea salt and black pepper as needed. In the last 5 minutes, add the cream, being careful to avoid a boil.

When serving, put a tablespoon of cooked rice or cooked pasta (optional) on the bottom of the bowl, then add the soup and mushrooms.

Friday, December 21, 2007

Duck Legs & Thighs with Winter Vegetables

The first time I cooked duck, I was completely freaked out. "Duck!" seemed way too exotic, too odd, too French for me to deal with. Duck had too much tradition behind it. Chicken was my safe-zone fowl.

Anyway, I took the plunge and cooked a whole duck. It turned out...ok. There's all that fat to deal with and the fact that the whole bird is dark meat. After dozens of outings, I figured out how to cook duck, and, I have to say, duck is great. Taste-wise it's midway between chicken and beef, but better than either.

To the point: cooking a whole duck is an obligation. Cooking duck legs and thighs is a lot more normal. Think "chicken" and it won't seem so special, but the end result will be.

The duck we get comes from Vietnamese markets where the cost per pound averages $2.25. It's easy enough to buy a half dozen legs and thighs (they come together) and freeze them. The easy way to do that is to wash and pat dry each leg/thigh, lay it on a piece of plastic wrap, drizzle with olive oil on both sides and season with sea salt and black pepper. Place the individually wrapped duck leg/thighs into a ziploc bag, squeeze the air out, seal the bag, and the duck will stay fresh-tasting for months.

Duck Legs & Thighs with Winter Vegetables

One of those great comfort food recipes that works in cold or hot weather. The duck makes a "soup," so you can fill out the serving with a nice pasta like Zitti or Penne.

Yield: 4

Time: 90 minutes

Ingredients

4 duck leg/thighs
2 carrots, peeled, cut into thick rounds, then quartered
2 yams or sweet potatoes, peeled, cut into thick rounds, then quartered
10 Brussels sprouts, trim the bottoms, quarter
10 shitaki mushrooms, washed, cleaned, sliced
1/2 cup finely chopped Italian parsley
4 cloves garlic, peeled, finely chopped
10 shallots, peeled, halved
Olive oil
Sea salt
Freshly ground black pepper

Method

When you're ready to cook the duck, separate the thighs from the legs at the joint.

Heat 2 tablespoons of olive oil in a large Dutch oven or fry pan. Season the duck pieces with sea salt and black pepper, then sauté the duck until browned on all sides. Remove from the pan and drain on a plate with paper towels.

Pour off the duck fat into a container and save (freeze it if you aren't going to use it right away). Duck fat sells for $20/pint; don't waste it. Duck fat is magic.

Sauté the shitaki mushrooms until lightly browned on each side. Remove to a plate. Now saute the garlic, carrots, sweet potatoes, shallots, garlic, and parsley until lightly browned. Remove to a plate.

Put the duck back into the pan and cover with water. Put a lid on the pan and braise over a medium flame for 45 to 60 minutes, until the meat is tender and separates from the bone with a little pressure. Add back the mushrooms and vegetables and cook another 15 minutes, uncovered.

Adjust the seasoning with salt and pepper.

Serve as is or add a cup of cooked pasta for each plate.

Tuesday, December 18, 2007

Oyster Stew

Good oysters are a rare treat.

Eaten raw with a classic tomato-based cocktail sauce they're delicious. Especially with an ice-cold shot of tequila.

On a cold day, though, oyster stew is the way to go. Satisfying and comforting, the best stews, like the ones served at the Grand Central Station Oyster Bar, are prepared as simply as possible.

My recipe is a variation on that theme.

Oyster Stew

Yield: Serves 4

Time: 60 minutes

Ingredients

6 oysters, raw, shucked, the nectar strained and reserved
1 medium sized, Yukon potato, peeled, finely diced (1/2 cup)
1 small yellow onion, peeled, finely chopped (1 tablespoon)
1 garlic clove, peeled, finely chopped
2 sprigs, parsley, finely chopped, stems and leaves (1 tablespoon)
1 small carrot, finely chopped (1 teaspoon)
2 fresh shiitaki mushrooms, washed, julienned
1 tablespoon unsalted butter
Olive oil
Sea salt and freshly ground black pepper
Hot sauce
1 cup homemade chicken stock
1 cup water
1/2 cup cream or half and half

Method

In a medium sized saucepan, sauté the potatoes, garlic, and onions with a tablespoon of olive oil for 10 minutes, stirring frequently so they don't brown. Season with a pinch of sea salt and freshly ground black pepper, then add the butter and continue sautéing for another 5 minutes. Season to taste with a dash of hot sauce.

Add the chicken stock and water. Simmer, covered, on a low flame for 15 minutes. Remove the lid, stir, and taste, adjust the flavors.

Shuck the oysters. Reserve and strain the nectar, getting rid of any sand and shell pieces. If the oysters are very large, use kitchen shears or scissors and cut them into bite-sized pieces.

Keeping the stew on a low flame, add the oysters and nectar. Cook gently for 5 minutes. Stir in the cream and continue cooking on a low flame for another 5 minutes.

Serve with fresh crusty French bread or topped with homemade croutons.

Pickle Me Up! It's Thanksgiving!

Pickles are delicious anytime of the year. For Thanksgiving they are especially good. Their crunch and acidity counterbalances the delicious...