Showing posts with label Vegetarian Recipes. Show all posts

Thursday, July 26, 2018

Watermelon Ice Cubes to Cool Down Summer's Sizzle


A summer heat wave is messing with planet earth. Making an icy-cold batch of watermelon ice cubes will definitely take the edge off the heat.
You love summer but not when it is uncomfortably hot. For relief, you could jump into the pool. Or, you could cut a thick slice of watermelon and let the sweet juices cool you down. Even better, you could fill a tall glass with a watermelon cocktail made with watermelon ice cubes and straight-from-the-freezer vodka and settle into the chaise lounge.

You stir the ice cubes. Bits of watermelon juice break free. The crystal clear vodka turns pink. You sip, stir and eat a watermelon ice cube and suddenly you are not overheated any longer.  Now, you are cool and happy.

The non-alcoholic version is as delicious. Fill a tall glass with watermelon ice cubes and pour in freshly made lemonade. Stir and enjoy.

Summertime and the livin’ is easy

Summer is good for watermelon. They grow quickly in the heat of the sun, producing fat, heavy fruit loaded with sweetness.
At the farmers market I was always told to use a hand to thump on the melon. When the sound was deep and resonant, the melon was ripe, ready to eat. If there is a farmer you frequent at your neighborhood market, ask for advice about a good melon that’s ready to eat.
Prices for watermelon vary greatly. At Asian and Latin markets, watermelon can sell for as little as 10 cents a pound. At upscale supermarkets and farmers markets, the prices can be significantly higher.
A melon is delicious at room temperature or ice cold. I like to chill the melon overnight in the refrigerator. Of course, the easiest way to eat watermelon is to use a sharp knife to cut out a thick slice.
But when I was in Zurich recently I met Olivier Rais, a talented chef who runs the bistro Rive Gauche in the iconic hotel Baur au Lac across the street from Lake Geneva. He had just returned from working with Tal Ronnen, the celebrated chef who created Crossroads Kitchen, an upscale Los Angeles restaurant devoted to vegan cuisine.
Rais made several vegan dishes for me to taste, one of which was a watermelon-gazpacho served in a glass.
I love watermelon but had never thought of extracting the juice. When I replicated his gazpacho at home, I had watermelon juice left over. Deciding to experiment, I reduced the juice in a sauce pan over a low flame. Once the juice cooled, I poured it into a mini-ice cube tray.
Watermelon ice cubes in an ice cube tray. Credit: Copyright 2016 David Latt
That night I added the ice cubes to vodka that we keep in the freezer. I dropped in an espresso spoon, settled into a chair and stirred my drink. After a few sips, I realized that I had stumbled onto an easy-to-make, deliciously refreshing cocktail. Summer’s perfect drink.
Serve the cocktail with an espresso or small spoon. One of the pleasures of the drink is stirring the ice cubes. As the ice cubes melt, the watermelon juice infuses the vodka. The mellow sweetness takes the edge off the vodka.
As you stir, the ice cubes crater and reduce by half. Use the spoon to scoop up the icy bits. In an effervescent moment, the softened ice cubes dissolve like pop rocks in your mouth.

Watermelon Surprise

Watermelon slices. Credit: Copyright 2016 David Latt
Use any size plastic ice cube tray. The mini-trays that make 1” square ice cubes work well because the ice cubes melt easily. Use only unflavored premium vodka, and for non-alcoholic drinks, add the ice cubes to glasses of carbonated water or lemonade.
Prep time: 30 minutes
Freezer time: 1 hour or overnight depending on the temperature of the freezer
Total time: 1 hour 30 minutes or overnight and 30 minutes
Yield: 4 servings
Ingredients
1 (3-pound) watermelon, washed
8 ounces unflavored premium vodka
Directions
1. Place the vodka bottle in the freezer the night before serving.
2. Using a sharp knife, remove the rind from the watermelon. Discard.
3. Cut the melon into chunks, removing any seeds.
4. Place a food mill or a fine mesh strainer over a non-reactive bowl.
5. Press the watermelon chunks through the food mill or strainer, capturing all the juice in the bowl. Discard any pulp and seeds.
6. Pour the juice into a sauce pan over low heat. Reduce volume by 30%. Remove from stove. Allow to cool.
7. Pour the reduced juice into the ice cube tray.
8. Place into freezer.
9. Just before serving, pour 1½ ounces ice cold vodka into each glass. Place 5 to 6 ice cubes into each glass.
10. Serve with an espresso or small spoon.
Main photo: Watermelon Surprise, watermelon ice cubes in a vodka cocktail. Credit: Copyright 2016 David Latt
   

Thursday, February 8, 2018

Korean Chili Sauce Heats up Valentine's Day

Valentine's Day used to make me nervous. That discomfort began in middle school when we were given sugar hearts with little sayings that we were supposed to give to one another. "Love You." "Cutie." "My Valentine." Fearful of rejection, I didn't give out many hearts. In time, as my confidence grew, candy hearts gave way to fresh flowers and picking romantic restaurants. But I was still nervous.
I embraced Valentine's Day when I learned to cook. By preparing a meal, I could create artful dishes with exciting flavors. By preparing a meal, I could show I cared.

A special meal for a special evening

Google Valentine's Day dishes and the many recipes that pop up for this evening of romance emphasize richly extravagant ingredients or over-the-top sweetness. Kobe steaks with buttery sauces. Truffle rich lobster mac n'cheese. Double-dipped chocolate strawberries. Flourless chocolate cakes dusted with candied pistachios.

All those are great. But heavy. I prefer healthy and full of flavor.

That's where the Korean spicy condiment gochujang comes in. A little bit of spice goes a long way to brighten flavors and stimulate conversation. All chefs know that a few grains of cayenne adds sparkle to any dish. Gochujang does that and more. If pepper sauce can be said to have umami, gochujang has plenty of umami.
A mix of peppers, rice and sugar, gochujang gets its unique flavor from a process of fermentation. I always enjoyed gochujang at Korean restaurants. A trip to a Korean market and I saw dozens of brands and varieties of gochujang, but a quick reading of the ingredient label turned me off. Too many chemical preservatives, additives and chemical compounds.

When I was given a bottle of Chung Jung One Gochujang Sauce, I read the ingredient list. There were no chemicals, no wheat and no animal products only the essentials of red pepper powder, rice, cane sugar, water and rice wine vinegar. A little heat and a little sweet. Perfect.

With a little experimentation, I discovered two very good uses of gochujang. I used gochujang instead of Tabasco to make a Bloody Mary, adding a level of deep, richly flavored umami to that classic cocktail. And, I used gochujang to spice up a comfort food treasure, chicken and dumplings.

Gochujang Bloody Mary

Use a good quality vodka, although its qualities will be masked by the flavors of the seasoned tomato juice. While there are many brands available, I would recommend Chung Jung One's Gochujang Sauce because the ingredients do not include chemicals or preservatives. 

Serves 2 (of course!)

Time to prepare: 5 minutes

Ingredients

4 ounces unflavored vodka, preferably Tito's, Prairie or your favorite premium vodka
8 ounces tomato juice, preferably organic and without preservatives or additives
1/2 teaspoon to 1 teaspoon gochujang, depending on preference
1/4 teaspoon Worcestershire sauce
2 pinches freshly ground black pepper
1/4 teaspoon freshly squeezed lime juice
1/4 teaspoon freshly squeezed lemon juice
2 lime wedges to garnish
2 celery sprigs with leaves to garnish

Directions

Fill a large shaker with all liquid ingredients. Shake well to mix.

Fill two large glasses with ice. Pour all the mix into the glasses. Place a celery sprig into the glass and a lime wedge on the edge of each glass.

Gochujang Spicy Chicken and Dumplings

Use seasonal vegetables you enjoy. I used string beans, carrots, onions, broccoli leaves and shiitake mushrooms, but shelled English peas, cauliflower florets, celery and turnips would also be good. I would recommend Chung Jung One's gochujang but if that is not available, use another. 
Use homemade chicken stock. Store bought stock has a higher salt content.

Serves 2

Time to prep: 15 minutes

Time to cook: 35 minutes

Total time: 50 minutes

Ingredients for the dumplings

1 cup all-purpose flour
1/4 teaspoon baking soda
2 tablespoons gochujang
1/8 teaspoon sea salt
Pinch of freshly ground black pepper
1/4 cup sweet butter, chilled, cut into dime sized pieces
1 cup half and half

  Ingredients

1 cup cooked chicken, cut into dime sized pieces
1/4 cup string beans, washed, ends trimmed off, cut into 1" long pieces
1/4 cup carrots, washed, peeled, cut into 1/2" pieces
1/4 cup yellow onion, washed, peeled, cut into 1/2" pieces
1/4 cup broccoli leaves julienned or broccoli florets, cut into 1/2" pieces
2 cups chicken stock
1 tablespoon extra virgin olive oil
Sea salt and freshly ground black pepper to taste

Directions for the dumplings

In a small mixing bowl, mix together all the ingredients. Stir well to break up the butter. Set aside.

Directions

Heat a 6 quart sauce pan on a medium flame. Add olive oil and all the chicken and vegetables. Stir well and sauté 5 minutes.

Add chicken stock. Bring to a simmer.
Make dumplings using two soup spoons and place gently into the simmering stock. After all the dumplings are in the sauce pan, cover and continue cooking 30 minutes.

If the stock boils over, lower the temperature.

Serve hot.

Wednesday, January 31, 2018

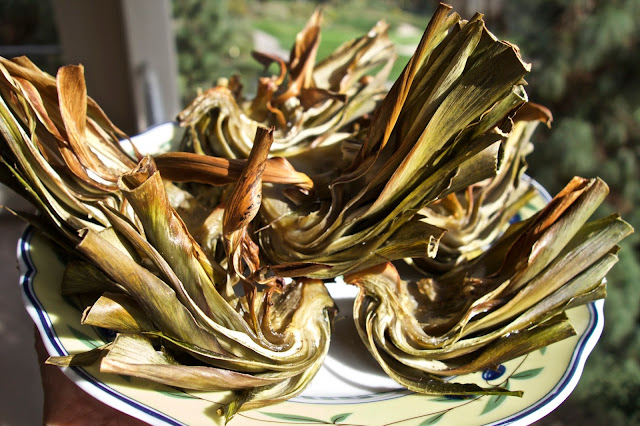
Go Green for Super Bowl Sunday! Cook Easy-to-Make Roasted or Grilled Artichokes

We are planning a Super Bowl Sunday party. My plan is to serve "picnic" food. Carrot salad, potato salad, Little Gem green salad, Persian salad, crispy fried chicken, brown sugar salmon and roasted artichokes.

Super Bowl Sunday food should be fun, delicious and healthy.

Spring is happening and artichokes are showing up in our farmers markets. The dark green vegetable, prized by cooks, is healthy and easy-to-prepare.
Looking at an artichoke, with its hard exterior and sharp pointed leaves makes me wonder how anyone figured out they would be good to eat. With a small amount of effort, that tough looking exterior gives up the wonderfully savory flavor bits at the end of the each leaf.
Choosing a good artichoke

Whether you find one that is the size of your hand or a larger one the size of a soft ball, give it a squeeze. If the artichoke feels solid, you've found a good one. An artichoke past its prime will be squishy like a child's squeeze toy. Make sure all the leaves are green. Don't buy an artichoke with brown or blackened leaves.
Having a sharp pair of scissors or kitchen shears, a pairing knife and a chefs knife will make breaking down the artichoke easy.

Roasted or Grilled Artichokes

One person can easily eat one artichoke the size of your hand. The larger artichokes will feed 2-3 people as an appetizer or a side dish. 

Serves 4

Prep Time: 10 minutes

Cooking Time: 30-35 minutes

Total Time: 40-45 minutes

Ingredients

4 medium sized or 2 large artichokes, washed
1 tablespoon kosher salt
2 tablespoons olive oil
1 teaspoon sea salt
1/2 teaspoon black pepper
1/4 cup sweet butter (optional)
Directions

Preheat oven to 350F. Or, set grill (indoor or outdoor) to medium-high.

Place a large stock pot on the stove on a high flame. Add kosher salt. Bring to a low boil. Cover.

To roast the artichoke sections after boiling, cover the bottom of a baking sheet with parchment paper, a Silpat sheet or a piece of aluminum foil. Set aside.

Using scissors trim off the pointy end of each artichoke leaf.

Trim off the stem of each artichoke, flush to the bottom. Discard the stems.

Give each artichoke a flat-top haircut. Place the artichoke on its side. Using a chefs knife, trim off the top 1/4" of each artichoke and discard.

Place the artichoke on the cutting board. Using a chefs knife, cut each artichoke in half, from bottom to the top. Cut each half into two pieces. If the artichoke is large, cut those four pieces in half, creating eight segments.

Working quickly, because the inside of the artichoke will discolor when exposed to air, use a sharp pairing knife to remove the fuzzy part on the inside of each section. Rinse the artichoke sections and discard the fuzzy parts.

Place all the artichoke sections in the boiling salted water. Cover and cook 10 minutes.

Using the pairing knife, test one of the artichoke sections. The knife should easily go into the fleshy part on the bottom of the leaves. If the knife doesn't go in easily, cook another 5 minutes but beware not to over cook the artichokes. They should be firm not mushy.

Place a colander or strainer in the sink. Pour the hot salted water with the artichoke sections into the colander and drain.

Transfer the artichoke sections to a mixing bowl. Drizzle with olive oil. Season with sea salt and black pepper. Toss well to coat.

If grilling, place the artichokes on the pre-heated grill. Turn frequently to avoid burning. Remove when grill marks appear on all sides.

If baking in the oven, arrange the artichokes on the prepared baking sheet, leaving room between the sections.

Place in the oven and cook 15 minutes. Using tongs, turn the sections over and place back in the oven another 15 minutes so they cook evenly.

Remove the artichokes from the oven and serve hot or at room temperature with sea salt, black pepper and small dishes of melted butter (optional).

If serving with melted butter (optional), melt the butter in a small saucepan being careful to avoid burning.

Monday, September 11, 2017

The Perfect Soup - Healthy, Delicious Creamy Kabocha Squash Soup

I love soup. A cold soup in summer and a hot soup in winter are wonderful comfort foods. The best soups for me are ones that not only nourish but delight with layered flavors.  In summer a light and spicy watermelon-gazpacho takes the edge off soggy, sultry days. In cool weather, a satisfying soup of roasted squash is filling and refreshing.
With cooler weather approaching, a great many varieties of squash will be available in farmers markets. My favorite is the Japanese squash kabocha. A squat round squash with a flecked dark green outer skin, the flesh can be bright yellow or pumpkin orange. Similar to butternut squash, kabocha is sweeter and cooks more quickly.
I first enjoyed kabocha as light and crispy tempura at Yabu, a sushi bar in West Los Angeles. Included in an order was a sheet of seaweed, shrimp, shiso pepper, shiitake mushroom and kabocha. With only one slice of each to an order, my wife and I divided up the sampling but we always shared the sweet flavored kabocha.

Over the years, I tried preparing kabocha using different techniques. Boiling, steaming, roasting and deep frying. Boiled, the flesh absorbs too much water and becomes soggy. Deep frying is specific to tempura. Steaming softens the flesh. Roasting puts a crust on the outside.

I discovered that combining steaming and roasting created full-of-flavor, firm fleshed pieces. We serve steamed & roasted kabocha as a side dish to accompany grilled fish, chicken and meat. Cut into bite sized pieces, the kabocha is delicious added to soups, stews and braises. Pureed, kabocha creates a deliciously sweet and creamy soup.
For a pot-luck brunch at a friend's beach house, I decided to make kabocha soup. Still out of season locally, kabocha can usually be found in Asian, Latin and Persian markets.

To make a vegetarian/vegan soup, I used homemade vegetable stock. Homemade chicken stock can also be used because of its light flavor but I wouldn't use beef or seafood stock because they are too strong.

Homemade stock is much preferable to store bought because the flavors will be cleaner and the salt content will be much lower. We always have a good supply of homemade stocks in the freezer so I can make soup at a moment's notice.

Making vegetable stock is easy, with a little planning and one important kitchen tool: a food mill. Vegetable stock can be made with a variety of your favorite vegetables. Dice and simmer carrots, celery, onions and mushrooms for an hour with water until soft. Run the liquid and softened vegetables through a food mill to create a delicious stock with pulp, ideal for making soups and sauces.

An alternative method is the one I prefer. During the week I collect vegetable trimmings as I prepare salads and stir fries. I place them into a sealed bag in the freezer. When we have corn on the cob, we put the cobs in the freezer as well. Once there is a large amount collected, all the trimmings and cobs go into a large stock pot. I add enough water to cover and simmer uncovered for an hour or more until the stock has flavor. Then the trimmings, except the corn cobs, go into the food mill as described above. I freeze stock in 16 and 8 ounce sealed containers for times when I want to make a soup or a braise.

Richly Flavored Kabocha Squash Soup

If kabocha is not available, butternut and acorn squash are good substitutes. But they are not as sweet.

If shiitake mushrooms are not available, brown and portabella mushrooms are good substitutes.

The slow roasted tomatoes are easy to make. While you sleep or read or work around the house, the tomatoes cook in the 225 F oven. Slow roasting removes the tomato's water, concentrating the flavors, bringing out sweetness. After the tomatoes are removed from the oven and cooled, they can be refrigerated or frozen in an air tight container. Remove the paper thin skins before using.  The skins aren't edible but they add a wonderful flavor to vegetable stock.

To puree the soup and create a creamy texture, use an immersion blender or a blender. I like the immersion blender because of the easy clean up. When blending, no need to remove all small vegetable bits. A bit of texture is good.
As a topping, homemade croutons or charred greens (escarole, spinach or kale) and onions are good.

Serves 4 (entree) or 8 (starter)

Time to prep: 30 minutes

Time to cook: 60 minutes plus 6 hours to make slow roasted Roma tomatoes

Total time: 90 minutes plus 6 hours to make slow roasted Roma tomatoes

Ingredients

2 large Roma tomatoes, washed, stem removed, cut in half from stem to tip

1 1/2 pound kabocha squash, washed, skin on, quartered from top to bottom, seeds and pulp removed and discarded

1 cup sliced mushrooms, preferably shiitake, washed, pat dried

1 medium and 1 small yellow onion, washed, root and stem removed, skin removed and discarded

2 cups kale leaves, washed, stems removed, finely cut

6 cups homemade stock, vegetable for vegan and vegetarian soup or chicken stock

1 cup escarole, spinach or kale, washed, finely shredded

2 tablespoons extra virgin olive oil

1 teaspoon kosher salt

1/4 teaspoon sea salt

1/8 teaspoon freshly ground black pepper

Pinch cayenne (optional)

Directions

Before you go to bed or while you are working around the house, preheat the oven to 225 F. Place the halved Roma tomatoes on a Silpat or parchment sheet on a baking sheet. Drizzle with olive oil. Place in the oven 5-6 hours. Remove when the tomatoes are still plump and they have reduced their size by half.
Remove tomatoes and allow to cool. If using immediately, remove the skins and discard or use to make vegetable stock. Finely chop the roasted flesh and reserve.

Place 2" water and kosher salt into the bottom of a large pot. Place a steamer basket into the pot with the quartered kabocha on top. Cover. Bring water to boil. Cook 10 minutes or until a pairing knife can be easily inserted into the flesh. Remove and cool.
Using a pairing knife, remove the kabocha skins and discard. Place the steamed kabocha on the Silpat or parchment sheet covered baking sheet. Drizzle with olive oil. Place into preheated 350 F oven. Cook 30 minutes. Remove and allow to cool.
Heat a tablespoon olive oil in a large pot. Sauté but not do not brown mushrooms, medium onion slices and kale. Cut roasted kabocha into quarter sized pieces and place into the pot. Add stock. Stir and simmer 30 minutes.

Heat a teaspoon olive oil in a small frying pan. Saute the sliced small onion and chopped escarole, spinach or kale until charred. Remove and reserve.

Taste soup. Adjust seasoning with sea salt and/or black pepper. Taste and add cayenne (optional).

Using an immersion blender or blender, puree soup until smooth allowing for some vegetable bits.

Serve hot with the charred escarole and onions sprinkled on top.

Monday, July 10, 2017

Watermelon Ice Cubes Make A Cool Summer Cocktail


Watermelon Surprise, watermelon ice cubes in a vodka cocktail. Credit: Copyright 2016 David Latt
You love summer but not when it is uncomfortably hot. For relief, you could jump into the pool. Or, you could cut a thick slice of watermelon and let the sweet juices cool you down. Even better, you could fill a tall glass with a watermelon cocktail made with watermelon ice cubes and straight-from-the-freezer vodka and settle into the chaise lounge. You stir the ice cubes. Bits of watermelon juice break free. The crystal clear vodka turns pink. You sip, stir and eat a watermelon ice cube and suddenly you are not overheated any longer.  Now, you are cool and happy.

The non-alcoholic version is as delicious. Fill a tall glass with watermelon ice cubes and pour in freshly made lemonade. Stir and enjoy.

Summertime and the livin’ is easy

Summer is good for watermelon. They grow quickly in the heat of the sun, producing fat, heavy fruit loaded with sweetness.
At the farmers market I was always told to use a hand to thump on the melon. When the sound was deep and resonant, the melon was ripe, ready to eat. If there is a farmer you frequent at your neighborhood market, ask for advice about a good melon that’s ready to eat.
Prices for watermelon vary greatly. At Asian and Latin markets, watermelon can sell for as little as 10 cents a pound. At upscale supermarkets and farmers markets, the prices can be significantly higher.
A melon is delicious at room temperature or ice cold. I like to chill the melon overnight in the refrigerator. Of course, the easiest way to eat watermelon is to use a sharp knife to cut out a thick slice.
But when I was in Zurich recently I met Olivier Rais, a talented chef who runs the bistro Rive Gauche in the iconic hotel Baur au Lac across the street from Lake Geneva. He had just returned from working with Tal Ronnen, the celebrated chef who created Crossroads Kitchen, an upscale Los Angeles restaurant devoted to vegan cuisine.
Rais made several vegan dishes for me to taste, one of which was a watermelon-gazpacho served in a glass.
I love watermelon but had never thought of extracting the juice. When I replicated his gazpacho at home, I had watermelon juice left over. Deciding to experiment, I reduced the juice in a sauce pan over a low flame. Once the juice cooled, I poured it into a mini-ice cube tray.
Watermelon ice cubes in an ice cube tray. Credit: Copyright 2016 David Latt
That night I added the ice cubes to vodka that we keep in the freezer. I dropped in an espresso spoon, settled into a chair and stirred my drink. After a few sips, I realized that I had stumbled onto an easy-to-make, deliciously refreshing cocktail. Summer’s perfect drink.
Serve the cocktail with an espresso or small spoon. One of the pleasures of the drink is stirring the ice cubes. As the ice cubes melt, the watermelon juice infuses the vodka. The mellow sweetness takes the edge off the vodka.
As you stir, the ice cubes crater and reduce by half. Use the spoon to scoop up the icy bits. In an effervescent moment, the softened ice cubes dissolve like pop rocks in your mouth.

Watermelon Surprise

Watermelon slices. Credit: Copyright 2016 David Latt
Use any size plastic ice cube tray. The mini-trays that make 1” square ice cubes work well because the ice cubes melt easily. Use only unflavored premium vodka, and for non-alcoholic drinks, add the ice cubes to glasses of carbonated water or lemonade.
Prep time: 30 minutes
Freezer time: 1 hour or overnight depending on the temperature of the freezer
Total time: 1 hour 30 minutes or overnight and 30 minutes
Yield: 4 servings
Ingredients
1 (3-pound) watermelon, washed
8 ounces unflavored premium vodka
Directions
1. Place the vodka bottle in the freezer the night before serving.
2. Using a sharp knife, remove the rind from the watermelon. Discard.
3. Cut the melon into chunks, removing any seeds.
4. Place a food mill or a fine mesh strainer over a non-reactive bowl.
5. Press the watermelon chunks through the food mill or strainer, capturing all the juice in the bowl. Discard any pulp and seeds.
6. Pour the juice into a sauce pan over low heat. Reduce volume by 30%. Remove from stove. Allow to cool.
7. Pour the reduced juice into the ice cube tray.
8. Place into freezer.
9. Just before serving, pour 1½ ounces ice cold vodka into each glass. Place 5 to 6 ice cubes into each glass.
10. Serve with an espresso or small spoon.
Main photo: Watermelon Surprise, watermelon ice cubes in a vodka cocktail. Credit: Copyright 2016 David Latt
  

Friday, July 7, 2017

Corn is Back. Let the Feast Begin.

Two weeks ago the first corn appeared in our local farmers markets in Santa Monica and Pacific Palisades. After the winter months without corn on our plates, we debated should we enjoy our first taste of corn, boiled or grilled? Both are delicious. Both are easy to prepare. We decided to embrace tradition.
We stripped off the husks and silks. Placed the cleaned ears into a pot of water and turned the burner on high. Every couple of minutes we gave the ears a spin so they would cook evenly. Once the water boiled we knew the ears were cooked.

Plucked out of the hot water, drained and placed onto a platter, we seasoned the ears with sweet butter, sea salt and freshly ground pepper. Old School, simple and delicious.
Those first ears were good but not yet great. Early in the season, the ears' flavor is balanced between starchiness and sweetness. For the scales to tilt toward flavor-bursting sweetness, we'll have to wait for the summer sun to blast the kernels with more heat.

At the Palisades and Santa Monica farmers markets, corn commands a premium, selling for $1.00/ear or 3 ears for $2.00. When we visit my wife's mom in New Jersey, we shop at Wegman's, a local supermarket with affordable pricing and Whole Foods quality. There, the corn can sell for much less. Depending on the supply, the corn can sell for as little as 6 ears for $1.00. Whatever the price, Jersey corn is famous for being especially tender and sweet.

For July 4th, a friend splurged and brought a dozen ears of corn to our fireworks-watching picnic. With a great many dishes to share, we had left-over corn. I volunteered to transform what was left into other dishes.

Versatile corn

First thing was to cut the kernels off the cobs. Cooked corn can be added to salads, stews, soups and stir fries. I love mixing the sweet-crunchy kernels to egg salad and potato salad. As a side with charred steak or grilled chicken, butter poached corn with a dusting of cayenne is delicious.
The cobs have flavor too. Usually consigned to the compost bin, the cobs can be boiled in water to create a savory stock, perfect as a base for soups, sauces, and corn chowder.

With the July 4th corn, I made corn stock, corn chowder, braised chicken with carrots, mushrooms and corn, corn and parsley salad and roasted corn to use in a green salad.
Even with all those dishes, there were still several cups of kernels available which were easy to freeze. To avoid freezer burn, submerge the cooked kernels in corn stock and seal them with air tight lid before placing in a freezer.
Then, when corn has again disappeared from the markets, the defrosted kernels can be added to a cold weather soup of root vegetables to remind us of summer's bright heat during the darkness of winter.

Corn Stock

If a large number of cobs are not available at any one time, save them in an air tight plastic bag in the freezer. When a dozen or more are available, you can rinse off any freezer crystals and drop them into a pot of boiling water as described below.

Serves 4

Time to cook: 45 minutes

Ingredients

12 or more corn cobs, kernels removed

Directions
For every 12 cobs, place 2 quarts of water into a large pot. Add the cobs. Place the pot on a medium-high flame.

Cook uncovered and simmer 45 minutes to reduce the volume by half.

Taste. The stock should have a mild flavor. Drain and discard the cobs. Use stock immediately or place in small air tight containers and freeze for future use.

Corn Chowder

The vegan/vegetarian version made with corn stock has its own unique, clean flavor. You can also use clam, lobster or chicken stock, preferably home made.
Use either frozen or freshly prepared stock. Do not use powdered or canned stocks because of their high salt content.

Serves 4

Time to prepare: 10 minutes

Time to cook: 30 minutes

Total time: 40 minutes

Ingredients

4 cups cooked or raw corn kernels removed from the cobs

1 small yellow onion, peeled, stem & root removed, washed, finely chopped

2 cups shiitake mushrooms

1 cup Italian parsley leaves, washed, pat dried, stems removed

4 cups stock, preferably corn stock or homemade chicken stock

Dusting of cayenne (optional)

1 tablespoon olive oil

Sea salt and freshly ground black pepper to taste

2 tablespoons sweet butter (optional)

Directions

In a large saucepan, heat olive oil on medium flame. Add onions. Stir and cook until softened but not browned.

Add mushrooms and parsley. Stir and cook until softened but not browned.

Add corn kernels. Mix well. Season with sea salt and freshly ground black pepper. If desired, add sweet butter and cayenne (optional). Cook 5 minutes to combine flavors.

Add stock. Stir well. Raise heat to a simmer. After 10 minutes, taste and adjust seasoning if needed. Reduce flame to medium. Cook another 15 minutes. Taste and make final flavor adjustments.

Serve hot with steamed rice, pasta, buttered bread, croutons or a salad.

Sunday, April 2, 2017

Ugly Tomatoes Make Beautiful Meals

In the winter or spring farmers markets, you've passed them by with a disapproving look. Blemished fresh tomatoes. Discounted to a dollar or less, these unhappy looking suitors for your attention appear destined to become compost.
Occasionally you will see someone who has stopped at the bin looking through the misshapen mound and you probably think they are too poor to buy the perfectly red, perfectly shaped tomatoes grown in a hot house.

The truth is, there are treasures hidden there. Find tomatoes that are firm and only slightly blemished and you will have found diamonds in the rough. They lack summer's full-blasted brightness. but tomatoes grown during winter and spring's weaker sun grow thicker skins and develop a rich, deep umami flavor.
Oven roasted, these tomatoes find sweetness hidden deep within. The acid so prized in summer tomatoes is mellowed and sweetened in off-season farmers market tomatoes.

But treat these tomatoes with care. Brought home from the farmers market and left on the kitchen counter in the sun, they will quickly soften and turn bad. They are used to cold, so place them in the refrigerator and they will last days and even a week until you are ready to use them roasted as a side dish for braised meat, tossed with pasta, served on steamed rice or mixed into soups, stews and braises.

Roasted Winter/Spring Tomatoes

Check each tomato carefully. You want firm tomatoes. A few blemishes are ok because those can be easily removed with a sharp pairing knife. 

Heirloom tomatoes are especially flavorful.

Summer tomatoes can be roasted with a similar but different result. 

Serves 4

Time to prepare: 10 minutes

Time to cook: 30 minutes

Total time: 40 minutes

Ingredients

3 pounds tomatoes

1 medium yellow onion, washed, skins, root and stem ends removed and discarded

1 tablespoon olive oil

1/4 teaspoon sea salt

Freshly ground black pepper to taste

1 tablespoon Italian parsley, leaves only, washed, finely chopped

Directions

Preheat oven to 400F.

Prepare a baking tray with a small lip (about 1/2"). Lay a Silpat (non-stick silicone) sheet or a piece of parchment paper onto the bottom of the baking tray.
Using a sharp pairing knife, remove the stem and spot on the bottom where the blossom was attached. Remove any dark blemishes and discard.

Cut into 1" slabs. Place slabs onto the prepared baking tray.

Cut onion in half, cutting from top to bottom. Cut thin slices by cutting from top to bottom. Place in mixing bowl. Season with olive oil, sea salt and freshly ground black pepper. Mix with Italian parsley.

Spread onion-parsley mixture over tomatoes.

Place baking tray into oven.

After 15 minutes, using a spatula or flipper, turn the slabs over. Keep onion-parsley mixture on top to brown. Return to oven.

Remove after 15 minutes.

The onion-parsley mixture should have lightly browned. Carefully remove the slabs which are now very delicate from the pan. Reserve the onion-parsley mixture and all of the liquid that has accumulated in the pan. This is full of tomato-essence
flavor.

To use as a side-dish, reheat and serve in a bowl. The roasted tomatoes are delicious when added to soups, stews and braises.

If not used immediately, keep the roasted tomatoes in an air-tight container. They will keep in the refrigerator for several days or in the freezer for a month.

Friday, January 13, 2017

When You Don't Have Time to Cook But You Still Want a Home-Cooked Meal, Do This!

Home cooked meals are definitely better for you and less expensive, but sometimes cooking seems too difficult and time-consuming.

When you're tired and hungry, it seems easier to stop for take-out on the drive home, order in or nuke those Trader Joe's frozen Shrimp Soft Tacos you bought last week.

But with a little effort (not much) and even less time (minutes), you can prepare two easy-to-make vegetable dishes that combine well with a charred steak, sautéed tofu or roasted chicken breasts which cook in no time at all.

Salt-boiled vegetables

Salt boiling cooks vegetables quickly. Cook them as little as possible so they have a crisp, fresh taste. Like pasta, vegetables should be eaten al dente, with a little firmness.

How long a vegetable should be cooked depends on its density and the size of the pieces being boiled. A 1" zucchini round will cook faster than a 1" carrot round. A 2" carrot round takes longer to cook than does a 1" carrot round.

Adding kosher salt to the water gives the vegetables a sweet-salty flavor.
Broccoli florets prepared this way cook in 2 minutes. The bright green flavor bites are so delicious, we eat them hot or cold, as a snack, side dish or, cooled, added to a salad.

Oven-roasted vegetables

Another easy-to-master technique is oven roasting vegetables. As with salt-boiled vegetables, they should be cooked al dente. How long the vegetables take to cook depends on the density of the vegetable and the size of the pieces.
Fingerling potatoes are an especially good side dish to serve with a grilled or baked protein. They are delicious with a steak grilled on an outdoor grill or charred on a carbon steel pan. Before baking, toss the cut fingerlings with Italian parsley, olive oil, sea salt and freshly ground black pepper.

If you enjoy onions, sprinkling a handful of finely sliced onions or shallots over the vegetables before baking adds a delicious sweetness.

Salt-Boiled Broccoli

Buy broccoli that is deep green in appearance. Do not use broccoli with yellow florets or ones that feel limp because that means they are old and will not taste good.
Besides broccoli, the technique works great for spinach, carrots, English peas and green beans. Each requires a different length of cooking time. Spinach (30 seconds), peeled carrot rounds cut 1/2" thick (3-5 minutes), shelled English peas (30 seconds) and green beans cut into 1" lengths (3 minutes).

Use only kosher salt or sea salt. Do not use iodized salt because of the metallic after-taste.

Serves 4

Time to prep: 5 minutes

Time to cook: 3 minutes

Ingredients

2 tablespoons kosher salt

4 large broccoli crowns, enough to make 10 cups, washed, stem ends trimmed

Directions

Using a pairing knife, cut the florets (the bud or flower of the broccoli) off the stem. Cut each floret in half and set aside. Using a chefs knife, cut the stem into slabs, 1/2" thick, 1" long. Set aside.

Add kosher salt to 4 quarts water and bring to a boil.

Place stems in boiling water first. Cover. Cook 1 minute.

Add floret halves to water. Cover. Cook exactly 2 minutes.

Strain broccoli in the sink. Place cooked broccoli into bowl and serve.

Oven Roasted Fingerling Potatoes

If fingerling potatoes are not available, baby Yukon or Sierra Gold potatoes are also good.
Use a Silpat sheet so the potatoes do not stick to the baking sheet. If not available, use parchment paper or aluminum foil.

Serves 4

Time to prep: 5 minutes

Time to cook: 30 minutes

Ingredients

2 pounds fingerling potatoes, washed

1 cup Italian parsley, washed, leaves only, finely chopped

1 medium yellow onion or 4 large shallots, skins, stems and root ends removed, washed, cut into thin slices

2 tablespoons extra virgin olive oil

Sea salt to taste

Freshly ground black pepper to taste

Directions

Preheat oven to 400F.

Line a large baking sheet with a Silpat sheet.

Cut each potato in half, the long way, then into 2" pieces. Place them in a mixing bowl with the olive oil. As the cut potatoes are added to the bowl, toss to coat with olive oil to prevent discoloration.

When all the potatoes are in the bowl, add parley and onions. Toss well. Season with a little sea salt and freshly ground black pepper.

Spread on the Silpat sheet lined baking sheet so the pieces have some room. They will acquire more browning if they are not piled on top of one another.

Place in oven.

After 15 minutes, toss for even cooking. Check after another 15 minutes. Toss. Taste. Adjust seasoning and cook longer if needed. When the potatoes are cooked through but not too soft, serve hot with a protein. The potatoes are delicious with a grilled steak, sautéed fish filet or charred chicken breast.

Friday, June 10, 2016

Blasting Heat Sears in Flavor

A few years ago I convinced a chef to teach me how he made crispy skin on a filet of fish. Chef Taylor Boudreaux said it was easy. I couldn't believe that. For years I had tried to cook a filet of fish with the skin on and the result wasn't good. Either the skin was chewy or burnt to a crisp.
When I ate Boudreaux's salmon filet with mushrooms, the charred skin was crisp as a slice of perfectly cooked bacon. A perfect contrast to the moist, sweet flesh.

He reveals the secret in the video. A carbon steel pan. That's it. The pan takes an incredible amount of heat. Up to 700F. The skin sizzles and in seconds is perfectly seared. A quick flip to char the flesh and then into a 350F oven to cook the filet on the inside.
After I bought a pan and seasoned it and used it successfully on a fish filet, I discovered the pan's other advantage. Easy clean up. Very much like a cut-down wok, the pan needs only a quick cleaning with a soapy sponge to remove the left-over oil, heated again on the stove top to burn off the water and that's it. No strenuously scrubbing to clean the pan the way I had done for years with the stainless steel pans I relied upon. Just a quick clean up and I was done.

A cast iron pan also works well at high heat, but from my experience the carbon steel pan does a better job. Both pans are relatively inexpensive. A carbon steel pan will cost half the price of a comparably sized, quality stainless steel pan. When you shop for a carbon steel pan, buy one that is made with a thicker gauge steel. I have been using de Buyer pans. Chef Boudreaux recommends Matfer Bourgeat. The advantage of the thicker gauge pans is they retain heat longer than the pans made with a thinner steel.

Cast iron pans are easy to find. Carbon steel pans, not as much. In the Los Angeles area, the only source for the pans is Surfas Culinary District. In New York, I have seen them upstairs at Zabar's

Recently, I have seen a great many De Buyer pans on Amazon. I recommend looking there. Given the variety of De Buyer pans, I recommend the frying pans, not the pans with higher, rounded sides and frying pans with smooth bottoms. The ribbed bottoms are excellent to create grill marks, but the ribs inhibit good sautéing.


Using the pan exclusively, I discovered the beautiful work it does on steaks. Treated very much in the same way as the fish filets, each side of the dry seasoned steak is charred and then placed into a 350F oven to cook the interior of the steak. While the steak is resting for five minutes under aluminum foil, quickly sear your favorite vegetables in the pan to pick up the pan dripping flavor and serve as a side dish.


After that, I moved on to tofu, shrimp, octopus and chicken breasts. And then onto vegetables. Broccoli, shiitake mushrooms, Japanese eggplant, carrots, asparagus, green beans, English peas and corn kernels. Every firm fleshed vegetable I tried worked perfectly when I applied high heat using the carbon steel pan.

Blast the Heat for For A Charred Vegan Salad

Chef Tips For Crispy Skin Pan Seared Salmon Filets

Pickle Me Up! It's Thanksgiving!

Pickles are delicious anytime of the year. For Thanksgiving they are especially good. Their crunch and acidity counterbalances the delicious...